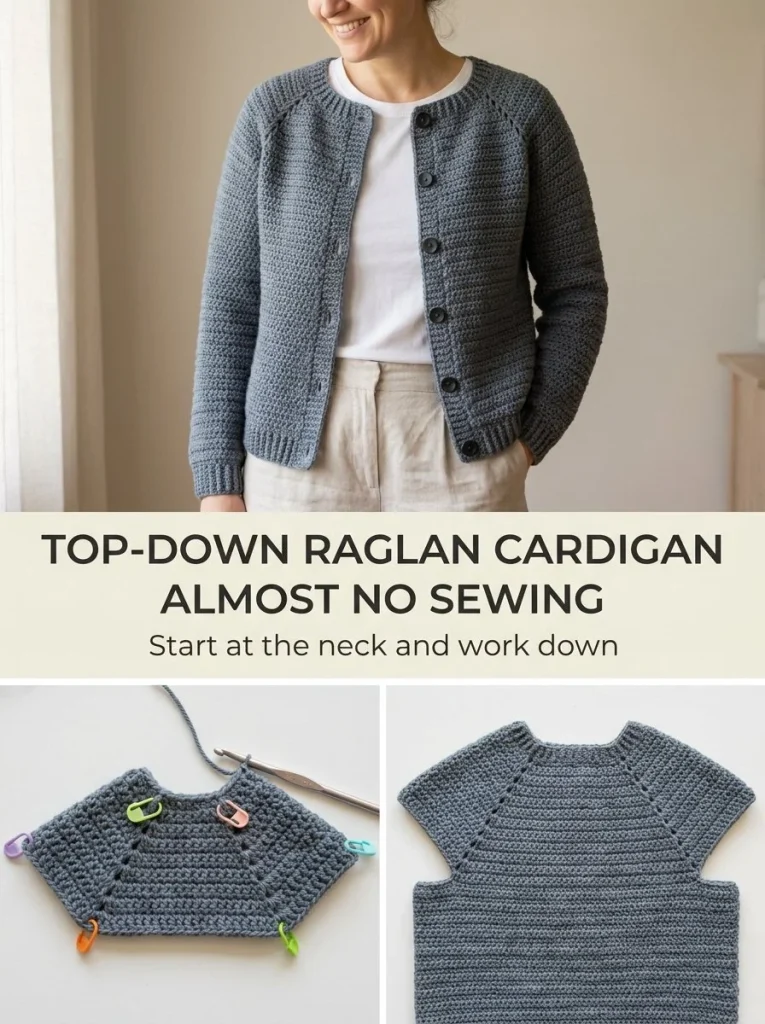
Creating a crochet cardigan is a delightful project that combines functionality with style, making it an ideal choice for both beginners and experienced crocheters. The Top-Down Raglan Crochet Cardigan features a seamless design, allowing for easy wear and customization. In this pattern, you will learn how to create your own raglan cardigan that fits comfortably and showcases your crochet skills. If you’re looking for additional styles, consider exploring other crochet cardigans, like the classic ribbed v-neck cardigan for inspiration.
Skill Level
This project is suited for the Confident Beginner. If you’re familiar with basic stitches and shaping techniques, you’ll find the construction straightforward but rewarding. The pattern features repetitive increases and straightforward construction, perfect for those looking to expand their skills.
Materials
To start your cardigan, gather the following materials:
- Worsted-weight #4 yarn
- 5mm crochet hook
- 5 buttons
- Stitch markers
- Tapestry needle
- Measuring tape
- Gauge of approximately 14 hdc = 4 in/10 cm
Abbreviations — US Terms
- ch – chain
- sl st – slip stitch
- sc – single crochet
- hdc – half double crochet
- st(s) – stitch(es)
- sp – space
- ch-sp – chain space
- BLO – back loop only
Special Stitches
The primary stitch used in this pattern is the half double crochet (hdc), which is essential for creating the fabric of the cardigan. Here’s how to perform it:
Half Double Crochet (hdc)
- Yarn over, insert the hook into the indicated stitch.
- Yarn over again and pull through the stitch. You will have three loops on your hook.
- Yarn over and pull through all three loops on your hook.
Gauge
It’s important to achieve the correct gauge to ensure your cardigan fits properly. The gauge for this pattern is approximately 14 hdc = 4 in/10 cm.
Finished Size
This pattern is designed to fit a standard adult women’s size. Adjustments can be made during construction for personal fit.
Pattern Notes
- This cardigan is worked in rows.
- You will divide your stitches into five sections: front, sleeve, back, sleeve, and front.
- Use stitch markers to help define the sections as you work.
- The pattern utilizes chain stitches to create space for the underarms.
Crochet Instructions
Part 1 – Yoke
Foundation Chain
Begin at the neckline with a foundation chain long enough for the back neck plus both front neckline sections. Use a measure that usually is divisible by 5 for stitch division.
Row 1
- Setup: Chain a length to match your measurements.
- Divide Stitches: Place stitch markers to divide your chain into five sections: front, sleeve, back, sleeve, front.
- Work HDC: In the first stitch after your markers, make 1 hdc in each of the first two front stitches, then proceed to the first sleeve and make 1 hdc in each stitch until you reach the back marker.
Row 2
- Increase: At each raglan marker, work 2 hdc, ch 1, and 2 hdc into the marked corner space.
- Continue: Repeat the process of working across each section, increasing at the raglan markers, until the yoke depth reaches the wearer’s underarm and the sleeve sections fit the upper arms comfortably. Visualize that after this row, you should have a wider yoke with defined sleeve sections.
Row 3+
- Continue increasing until your yoke depth is satisfactory.
Creating The Body
- On the next row, work across the first front, skip the sleeve section, chain several stitches for the underarm.
- Work across the back, skip the second sleeve section, chain the same number of underarm stitches, then work across the final front.
- Continue the body straight down until it’s at hip length.
Part 2 – Sleeves
- Join yarn around each sleeve opening and work hdc rounds to the wrist.
- If desired, decrease evenly every few rows for a tapered sleeve effect.
Cuffs and Hem
- Finish the cuffs and bottom hem with back-loop single crochet for a neat edge.
- Work 3-5 sc rows around the front opening and neckline.
- Create 5 buttonholes on one side, spacing them evenly.
Part 3 – Finishing Touches
- Once you’ve completed the buttonholes, sew 5 buttons on the opposite side of the cardigan.
- Make sure all ends are woven in neatly using a tapestry needle.
After following these instructions, please ensure all finishing details are well-executed for a polished look. If you’re interested in exploring more cardigan patterns, check out the lovely cropped tie front crochet cardigan pattern that offers a different stylish option.
Tips for the Best Result
- Use stitch markers to keep track of your counts and make sure your increases are even.
- Count your stitches frequently to avoid any mistakes, especially when working the body and sleeves.
- If you’re having trouble visualizing the increases, don’t hesitate to stop and check your work against the provided visual guide.
Common Mistakes
Uneven Stitch Count
A common issue occurs when stitch counts are off at the raglan increases. Ensure you are placing two hdc, chain, and then two hdc as instructed at each corner.
Holes in Underarm
If there are gaps at the underarm section, it may indicate too many skipped stitches when you chain. Use fewer skipped stitches, or adjust as needed.
Finishing
Make sure to fasten off securely and weave in all ends to prevent unraveling. Consider blocking your cardigan to shape it correctly and ensure a professional finish.
Care
For best results in maintaining your cardigan, follow care instructions according to your yarn label. This will usually include gentle washing and laying flat to dry.
This crochet cardigan not only looks great but also offers opportunities for various styles and personal touches. Happy crocheting!



