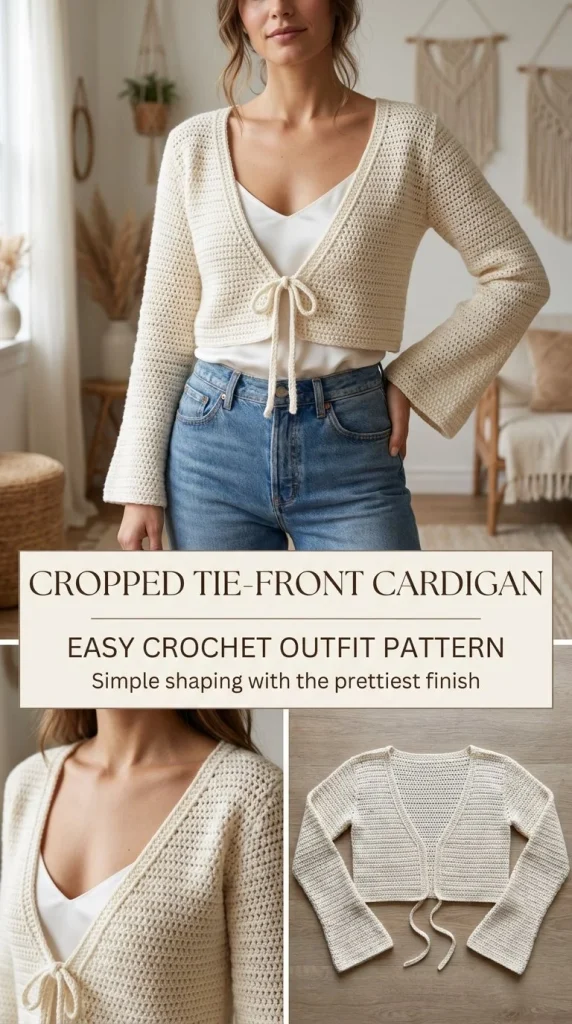
The Cropped Tie-Front Crochet Cardigan is a stylish and easy-to-make addition to any wardrobe. With its charming tie-front design, this cardigan offers versatility that suits various outfits and occasions. Whether you’re dressing up for a casual day out or layering for cooler weather, this pattern will guide you through the steps to create a beautiful piece. If you’re looking for additional accessories to pair with your cardigan, consider exploring this easy mini jewelry pattern that complements the style perfectly.
Skill Level
This project is best suited for confident beginners to intermediate crocheters. Basic knowledge of double crochet and the ability to follow pattern instructions will help you create the cardigan successfully.
Materials
To create your Cropped Tie-Front Crochet Cardigan, gather the following materials:
- Yarn: DK #3 yarn
- Hook: 4-4.5mm crochet hook
- Needle: Tapestry needle for weaving in ends
- Markers: Stitch markers for keeping track of your rows
- Measuring Tool: Measuring tape for ensuring proper sizing
- Gauge: Approximately 16 double crochets (dc) = 4 inches (10 cm)
Abbreviations — US Terms
- ch – chain
- sl st – slip stitch
- sc – single crochet
- dc – double crochet
- st(s) – stitch(es)
- sp – space
- ch-sp – chain space
Special Stitches
No special stitches are required for this pattern beyond basic stitches, primarily double crochet.
Gauge
The gauge you aim for is approximately 16 double crochets (dc) = 4 inches (10 cm). Getting the correct gauge is crucial for the sizing of your cardigan.
Finished Size
The finished size of the cardigan will depend on the chosen bust size with an allowance of 2–4 inches of positive ease. The back width will be half of your finished bust measurement.
Pattern Notes
- The cardigan is constructed in rows.
- The stitch multiple is based on double crochet, enabling the creation of the fabric.
- Each front section begins at approximately the finished bust measurement divided by four.
- Rows are worked straight until 5–7 inches below the shoulder.
- A decrease occurs at the inner neckline edge every row or every two rows until the shoulder width matches the back.
- The sleeves are developed with slight increases toward the wrist for a bell shape.
Crochet Instructions
Body
- Foundation Chain: Decide on your finished bust size (plus 2-4 inches for ease) and chain that length to create the foundation for the back panel. The back width will be the finished bust size divided by two.
Row 1
- Begin at the natural waist. Work 1 dc into the 4th chain from your hook. This acts as your first double crochet, then continue to work in each chain across.
- Total: Your total should equal the back width stitch count.
Row 2
- Turn your work. Ch 3 (counts as first dc) and then work 1 dc into the next st or chain.
- Repeat this across the row until you reach the end.
- Total: You should maintain the same stitch count as the previous row.
Rows 3-10
- Continue repeating Row 2 until your work measures approximately 5–7 inches below the shoulder.
Decrease for Neckline
- Begin decreasing at the inner neckline edge. For every row (or every two rows), decrease by 1 stitch at this edge while maintaining the overall stitch count on the opposite edge.
- Continue decreasing until the shoulder width matches the width of the back panel.
Front Panels
Right Front:
- Start with the same foundation as the back but work until you have approximately finished bust divided by four stitches.
- Work straight in double crochet until you reach 5–7 inches below the shoulder.
- Decrease as previously explained.
Left Front:
- Make this as a mirror image of the right front.
Joining
- Once both front panels and back are complete, join the shoulders by aligning the edges and slip stitching or sewing them together.
- Join the side seams, leaving armholes.
Sleeves
- Upper Arm Width: Begin with a foundation chain that matches the upper arm width.
Row 1
- Work 1 dc in the 3rd chain from your hook, then continue working rows in double crochet.
Increasing for Bell Shape
- After reaching the desired upper arm length, increase by 1 stitch at each edge every 6–8 rows until you reach the wrist size.
Finishing Sleeves
- Make the second sleeve identically, then seam and attach both sleeves to the body of the cardigan.
Ties
- At the lower inner edge of each front, join a new yarn to create the ties. Chain 45-70 stitches.
- Work 1 sc or sl st back along the chain to create a sturdy tie. Repeat this for the opposite side to create two ties.
Neckline and Hem
- Finish the neckline and hem by working 1 round of single crochet around the entire edge of the cardigan.
Tips for the Best Result
- Use a stitch marker to mark your decrease rows for clarity.
- Make sure to maintain even stitch tension across all sections to avoid a ruffled fabric.
- For a polished look, consider blocking your cardigan after finishing for an even shape.
Common Mistakes
Uneven Sizing
- Ensure that you are following the stitch count accurately on both the front and back panels to maintain consistent sizing.
Tight Stitches
- If your canvas is curling or pulling, check your tension; it may be too tight, especially in the foundation chain.
Project Ideas or Variations
This cardigan pattern offers a base for creativity. You can consider altering the length or adding embellishments such as pockets or decorative edges later on, similar to designs found in projects like a charming accessory pattern.
Finishing
- Weave in all loose ends and ensure the cardigans’ lines are sharp.
- Lightly block to shape and smooth out any uneven stitches.
Care
Handle your finished cardigan delicately. It’s important to follow the yarn care instructions provided on the label to maintain its integrity.
Creating your Cropped Tie-Front Crochet Cardigan can be a rewarding project that enhances your crocheting skills while yielding a beautiful garment. Enjoy your crafting journey!



