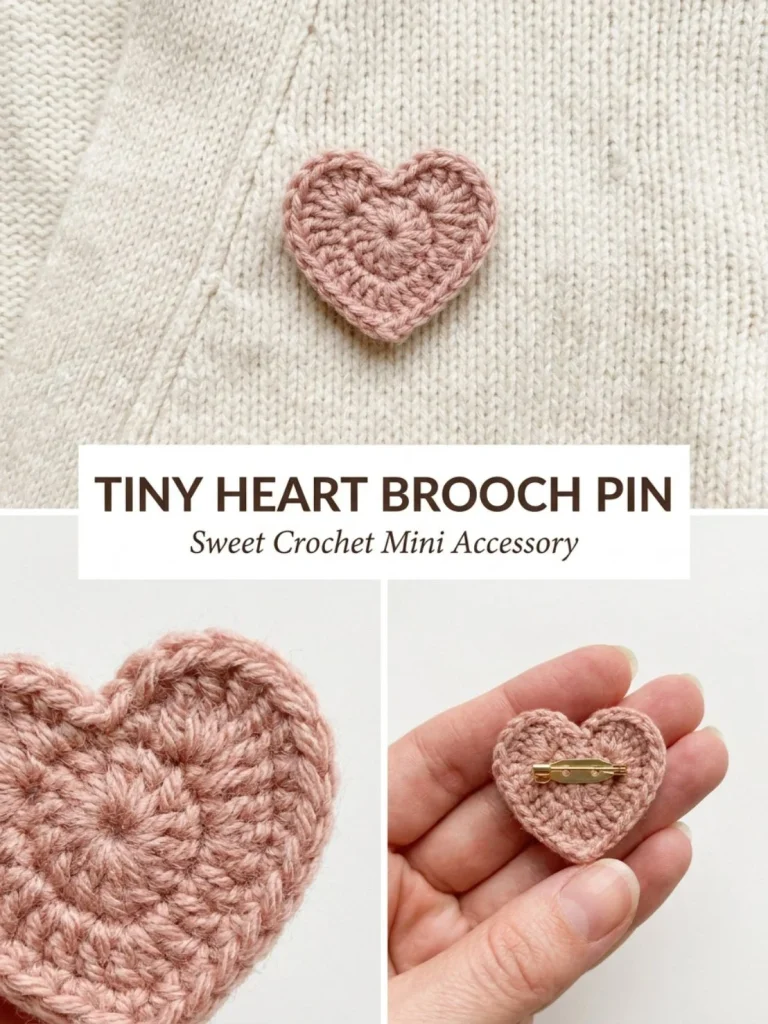
The Tiny Heart Brooch Pin is a delightful project perfect for adding a touch of handmade charm to your outfits or gifting to a loved one. This brooch is not only a cute accessory but also a simple crochet project that is ideal for beginners or those looking to practice their skills. The easy construction allows for quick completion, making it a perfect last-minute gift. When working on this pin, I’ve found that using bright colors really helps the heart shape pop, which can be especially appealing in the spring and summer seasons. You may also find Alpine Moss One Row Repeat Throw useful.
Why You’ll Love This Crochet Pattern
- Quick and easy to make, perfect for beginners.
- A thoughtful, handmade gift for friends and family.
- Versatile design that can be customized with different colors and yarn.
- Great for using up leftover yarn scraps.
- Can be made in bulk for events, holidays, or craft fairs.
Finished Size
The finished size of the Tiny Heart Brooch Pin is approximately 3 inches wide and 3 inches tall. Keep in mind that the size may vary depending on your yarn type, hook size, and tension.
Skill Level
This pattern is classified as beginner. The straightforward stitches and simple assembly make it accessible for those new to crocheting or anyone wanting a quick and satisfying project.
Materials Needed
- Size 10 cotton thread in cherry red, blush, or cream
- 1.25–1.5 mm crochet hook
- Yarn needle
- Scissors
- 1 brooch pin backing
- Small felt scrap (optional for added support)
Stitches and Abbreviations
- sc: single crochet
- mr: magic ring
- dc: double crochet
- hdc: half double crochet
- ch: chain
- sl st: slip stitch
Gauge and Tension Notes
Gauge is not critical for this project, but maintaining even tension will yield a neater final product. If you find your stitches are too tight or too loose, adjust your hook size accordingly.
Pattern Notes Before You Start
The Tiny Heart Pin is worked in the round without joining, which allows for continuous flow in the stitches. The optional edging provides a cleaner outline and can be worked for a more polished look. Color changes may occur if you choose to use multiple colors for embellishments.
Step-by-Step Crochet Instructions
- Start with a magic ring (mr) and work 4 sc into the ring.
- Without joining, continue Round 1 by placing 2 sc in each stitch around for a total of 8 sts.
- Join the round.
- Begin Round 2: Ch 1, in the same stitch work 2 sc, then 3 dc in the next stitch, 1 dc in the next stitch, 1 hdc in the next stitch, 1 dc in the next stitch, and 3 dc in the following stitch.
- Place 2 sc in the next stitch, ch 1, and sl st into the starting point to form the bottom point of the heart.
- Fasten off. For an optional cleaner appearance, rejoin the thread and sl st evenly around the heart.
- Weave in ends and gently flatten the heart.
- Sew or glue the heart to the brooch backing. For added stability, first sew the heart to a small felt circle before attaching it to the pin backing.
Assembly and Finishing
Once you finish crocheting the heart, ensure it is flattened neatly to maintain its shape. If you are using glue, apply it sparingly to avoid excess that can seep through. Attach the heart to the backing securely, and weave in any loose ends carefully.
Helpful Tips
- When using smaller hooks, ensure your tension remains consistent to create smooth edges.
- If you choose to add an edging, be cautious not to pull the stitches too tightly as it may distort the heart shape.
- Experiment with different sizes of felt circles for various aesthetics.
- Make sure to have a good pair of scissors for trimming threads neatly.
Common Mistakes to Avoid
- Skipping the magic ring step can lead to a heart that doesn’t have good structure.
- Not counting stitches can result in uneven shapes, so keep track of your stitch count.
- Forgetting to fasten off securely may cause the heart to unravel when handled.
Customization Ideas
- Change the colors to fit a holiday theme – think red and white for Valentine’s Day or green for St. Patrick’s Day!
- Embellish the heart with tiny beads or sequins for added sparkle.
- Experiment with different yarn textures to achieve varied looks.
- Use the same pattern to create larger or smaller versions depending on your preference.
How to Use or Display This Crochet Project
The Tiny Heart Brooch Pin can be attached to jackets, bags, or hats for a charming accent. They also make lovely gifts wrapped in handmade cards or added to flower bouquets as a personal touch.
Care Instructions
To clean your Tiny Heart Brooch Pin, gently hand wash it in cold water and lay it flat to dry. Store it in a cool, dry place to maintain its shape and vibrancy.
Frequently Asked Questions
1. Can I use a different yarn?
Absolutely! Just remember that different yarn types may change the final size and appearance.
2. How long does it take to make one pin?
Typically, it takes about 1 to 2 hours to complete one pin, depending on your skill level.
3. What if my heart shape doesn’t look right?
Make sure you are counting your stitches correctly, and adjust your tension if needed. A gentle blocking may also help.
4. Can I sell the finished pins?
Yes, feel free to sell your creations, but please do not reproduce or distribute this pattern commercially.
The Tiny Heart Brooch Pin is a heartwarming project that can brighten your day or someone else’s with a little crochet love. If you’re looking for more inspiration, consider checking out this tiny hedgehog needle book pattern for a fun addition to your crochet repertoire.



