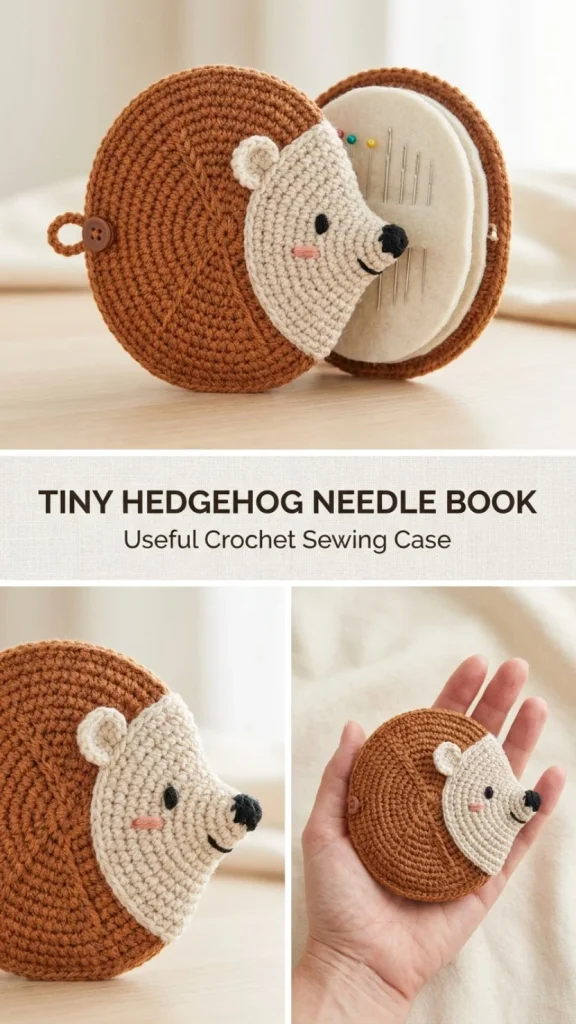
This Tiny Hedgehog Needle Book is a delightful crochet project that’s both practical and charming. Designed as a cozy little book to hold your sewing or embroidery needles safely, it’s perfect for makers who appreciate cute, functional accessories in their craft space. The design features two warm brown body panels with an oatmeal cream face patch, complete with embroidered details like eyes, nose, and a tiny blush cheek. Its flat texture ensures needles won’t catch, making it an ideal companion for any stitching project. Beginners will appreciate the straightforward panel construction, and the flexible spine allows it to open like a real book. Plus, it’s a quick project that makes a thoughtful handmade gift for crafty friends. I often find that adding a delicate closure loop and a small button really helps keep everything snug without flattening the felt pages inside. If you’re looking for other small projects, you might enjoy a similarly sweet and practical design like the Meadow Lane Bookmark to complement your needle book.
Why You’ll Love This Crochet Pattern
- Creates a compact, adorable needle book that protects your tools while looking charming.
- Uses simple stitches and easy shaping, making it great for confident beginners.
- Includes detailed embroidery instructions to add personality and warmth.
- Flat spine design avoids needle snags, keeping your collection safe.
- Flexible enough to open like a little book for ease of use.
- Works up quickly with standard DK cotton yarn and a modest hook size.
Finished Size
The approximate finished size is about 3.25 inches wide by 2.5 inches tall (8.3 x 6.5 cm). Keep in mind your size may vary slightly depending on your tension, yarn brand, and hook. This compact size is perfect for slipping into a project bag or keeping on your work table.
Skill Level
Intermediate beginner. The pattern features straightforward single crochet panels worked in rows, but the shaping through increases and the sewing together requires a bit of attention. Embroidery on the face patch adds a decorative step that beginners may enjoy as a practice in simple surface stitching.
Materials Needed
- DK weight cotton yarn (#3) in warm brown and oatmeal cream
- Black and blush embroidery thread or floss
- 3.0 mm crochet hook
- Two oval wool felt pieces, approximately 3.25 x 2.25 inches
- One 10-12 mm button for closure
- Tapestry needle for weaving ends and sewing panels
- Sewing needle for attaching felt and embroidery
- Scissors
- Stitch markers to keep track of rounds and stitches
Stitches and Abbreviations
- ch = chain: a foundation stitch creating a series of loops
- sc = single crochet: insert hook into stitch, yarn over, pull through, yarn over, pull through both loops
- inc = increase: two single crochets in the same stitch
- sl st = slip stitch: insert hook into stitch, yarn over, pull through stitch and loop on hook (used for joining or finishing)
- Magic ring: a technique to start rounds tightly in the center
Gauge and Tension Notes
Exact gauge is not critical for this project, but aim for an even and fairly firm tension to give the needle book stability without stiffness. Avoid loose stitches so the panels hold their shape well and the embroidered details sit flat. If your stitches are very tight, you might find assembly a little trickier — loosen slightly for easier sewing.
Pattern Notes Before You Start
This needle book is worked in two rectangular body panels crocheted flat in rows and the face patch as a separate smaller piece. The ears are made as small single crochet circles folded in half and sewn on. The body panels are joined only along one long edge to create a flexible spine, which then allows the book to open freely. Felt pages are sewn inside to safely hold needles, and a button loop closure completes the design. Keep embroidery and texture flat to avoid snagging needles.
Step-by-Step Crochet Instructions
-
Body Panels (Make 2 in warm brown):
- Ch 9.
- R1: sc in 2nd ch from hook and next 6 ch, 3 sc in last ch; working along opposite side of foundation chain, sc in next 6 ch, 2 sc in first ch = 18 sts.
- R2: inc (2 sc in first stitch), sc in next 6 sts, inc in each of next 3 sts, sc in next 6 sts, inc in each of last 2 sts = 24 sts.
- R3: (sc, inc), sc in next 6 sts, (sc, inc) x3, sc in next 6 sts, (sc, inc) x2 = 30 sts.
- Join and fasten off.
-
Face Patch (With oatmeal cream):
- Ch 6.
- R1: sc in 2nd ch from hook and next 3 ch, 3 sc in last ch; sc in next 3 ch on opposite side, 2 sc in first ch = 14 sts.
- R2: inc, sc in next 3 sts, inc in each of next 3 sts, sc in next 3 sts, inc in last 2 sts = 20 sts.
- Fasten off.
-
Ears (Make 2 with oatmeal):
- Magic ring, 5 sc into ring.
- Do not join tightly.
- Fasten off and fold each small circle in half.
-
Face Details:
- Sew face patch onto the right half of one brown panel, leaving a visible brown border.
- Attach ears at upper and lower left edges of patch.
- Embroider a small black eye, triangular nose at pointed end, a short smile, and add a tiny blush stitch cheek.
-
Spine Texture:
- Along the exposed brown half of the front panel, embroider short V-shaped stitches in darker brown or attach small surface chains for texture. Keep flat to avoid needle snags.
-
Needle Book Assembly:
- Place the two brown body panels wrong sides together.
- Join with single crochet through both layers along one long side only to create a spine. Do not join the other edges; the panels must open like a book.
-
Felt Pages:
- Stack the two wool felt ovals.
- Position centered along the inside crochet spine.
- Sew them securely with running stitch to the crochet spine, allowing pages to turn freely.
-
Closure Loop:
- Join brown yarn at the outer edge of the back panel, chain 10, slip stitch into same point to form a loop.
- Sew button to the matching outer edge of the front panel.
- Check closure loop slips over button snugly without compressing felt pages.
- Weave in all ends.
Assembly and Finishing
When sewing the panels together, use a tidy single crochet seam; this keeps the edge neat and flexible. Position the face patch carefully to maintain a balanced brown border for a polished look. Embroidery adds charm but keep stitches smooth and tight so nothing catches on your needles. Before attaching felt pages, make sure your panels open well and the spine is flexible. Finally, secure the closure loop and button firmly, so it withstands repeated use. Weaving in ends neatly inside the panels improves durability and comfort.
Helpful Tips
- Use stitch markers to keep count on increases, especially on body panels for consistent shaping.
- When embroidering the face, work on a contrasting surface so you can see stitches clearly.
- Fold your ears carefully before sewing them on to create a more defined hedgehog shape.
- Choose a wool blend felt for pages; it holds needles well without dulling tips.
- If your crochet tension is loose, add a row or two of sc along edges before assembling to reinforce shape.
- Always check that the closure loop fits over the button easily but snugly to avoid dropping the needle book.
This pattern’s flexibility and small size make it a perfect desk companion or a lovely gift for fellow fiber artists. For similar projects with a neat finish and sweet details, you might find inspiration in the Meadow Lane Bookmark pattern, which also complements this needle book beautifully in terms of practicality and charm.
Common Mistakes to Avoid
- Missing increases on body panels will cause uneven shapes; carefully count stitches each round.
- Attaching the face patch off-center can distort the final look; always position before sewing.
- Overly loose tension can make the needle book floppy and less protective.
- Embroidering with thick thread might snag needles inside; use fine embroidery floss.
- Sewing felt pages too tightly restricts turning; ensure a loose running stitch along the spine.
Customization Ideas
- Use different yarn colors for a playful or seasonal hedgehog look (gray, cream, or autumn browns).
- Experiment with textured yarn like cotton-linen blends for a rustic finish.
- Add tiny beads or sequins on the spine texture for a subtle sparkle effect.
- Change the closure button to a carved wooden one for a nature-inspired style.
- Make felt pages in assorted colors or patterned fabric for a unique interior.
How to Use or Display This Crochet Project
This needle book is designed to sit neatly on your craft desk, keeping needles tidy and easy to access. It’s also a fantastic gift idea for stitchers and sewers who appreciate handmade accessories. Because of its friendly size, it can be slipped inside a project bag or pouch without adding bulk. Display it on a shelf or drawer organizer where your tools live for a cozy, handmade touch to your creative space.
Care Instructions
Hand wash in cool water with mild soap to preserve yarn colors and felt texture. Avoid wringing; gently squeeze excess water and reshape flat to dry. Cotton yarn is quite durable but avoid bleach or harsh detergents. Store away from direct sunlight to prevent fading and keep the button and embroidery threads secure.
Frequently Asked Questions
Q: Can I use acrylic yarn instead of cotton?
A: Yes, acrylic works, but cotton tends to hold shape better and feels smoother against needles.
Q: Is stuffing needed for this needle book?
A: No stuffing is required since the felt pages provide padding inside.
Q: Can I change the size?
A: Increasing chains and rounds proportionally works but may require adjustments in felt page sizes and button closure.
Q: How do I prevent needle snags on the crochet surface?
A: Keep spine and embroidered textures flat and avoid bulky stitches or raised decorations.
Q: What if I don’t have wool felt?
A: Use a sturdy cotton fabric doubled with interfacing, but wool felt is best for holding needles securely.
Final Thoughts
Creating this Tiny Hedgehog Needle Book brings a smile every time you open it while keeping your needles safe and organized. Its charming face and clever design offer both practicality and a sweet handmade accent to your craft room. Try it out for a quick project that’s sure to delight—and check other small treasures like the Meadow Lane Bookmark to add more charm to your craft collection.
Conclusion
Whether gifting to a friend or treating yourself, this needle book combines fun crochet skills with thoughtful assembly. For stitchers looking for different handmade organizing solutions, the Velvet Pink Pear Needlebook Cross Stitch Pattern offers a beautiful, complementary style to explore next. Happy hooking and stitching!



