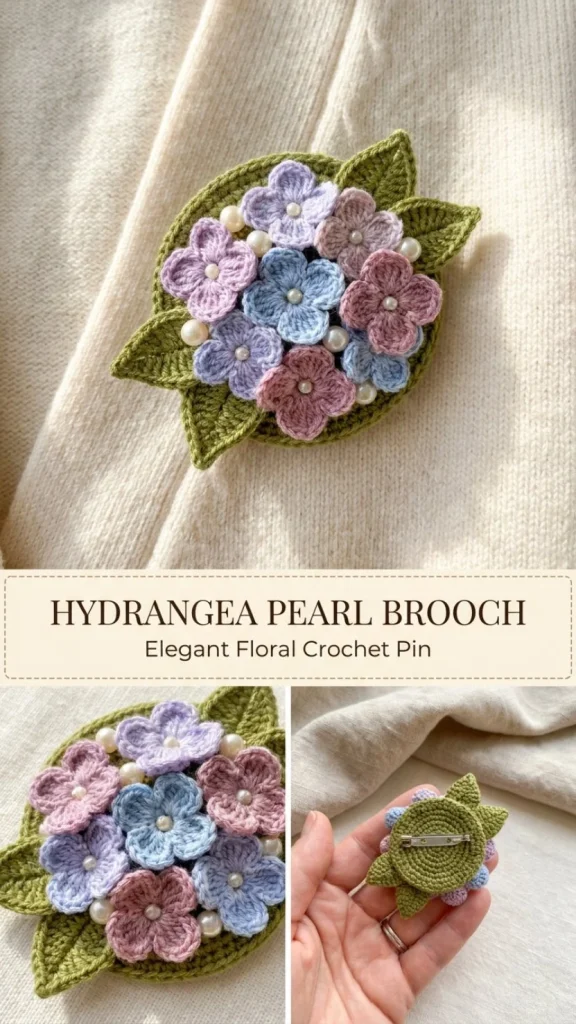
This Hydrangea Pearl Brooch is a delicate crochet project that brings a touch of floral elegance to your accessories collection. With a balanced blend of lavender, pale blue, and dusty rose yarns worked into dainty flower motifs, this brooch is both a charming gift and a lovely decorative piece. It’s perfect for makers who enjoy creating small, wearable art that adds personality to coats, scarves, or bags. The pattern is designed with beginners in mind, featuring easy-to-follow instructions and simple stitches that build confidence as you go. One practical tip I’ve found while making this brooch is to ensure the green base lies perfectly flat to support the floral cluster. This prevents the brooch from warping and keeps the finished piece looking polished. If you’ve admired crochet floral accessories before, you might also appreciate how this project complements other pieces like the delicate Blossom Pearl Hair Vine, especially for creating coordinated gifts or matching outfit accents.
Why You’ll Love This Crochet Pattern
- It uses beginner-friendly stitches that don’t overwhelm new crocheters.
- The small size makes it a quick project perfect for instant gratification.
- The color scheme offers subtle but charming variation with soft pastel tones.
- Practical assembly techniques ensure the brooch holds together firmly for everyday wear.
- Creating balanced flower clusters develops your skills in motif arrangement.
- Includes optional pearl embellishments for an elegant finishing touch.
Finished Size
The completed hydrangea brooch measures approximately 3 to 3.5 inches (7.5 to 9 cm) in diameter, depending on your yarn choice, hook size, and individual tension. The finished flat base allows the piece to sit neatly on fabric without bulk.
Skill Level
Easy beginner. This pattern is ideal if you’re comfortable with magic rings, single crochet (sc), half double crochet (hdc), double crochet (dc), slip stitch (sl st), and basic increases (inc). The flower petals are made with simple repeats that gradually build confidence for other motif-based projects.
Materials Needed
- Size 10 crochet cotton in lavender, pale blue, dusty rose, olive green, and cream
- Size 1.25 mm steel crochet hook
- Optional: 3 small pearl beads (for embellishment)
- One brooch pin back, approximately 1.25-1.5 inch (3.2-3.8 cm)
- Small felt circle to back the brooch
- Tapestry needle for sewing
- Strong sewing thread
- Scissors
Stitches and Abbreviations
- ch: chain
- sc: single crochet – insert hook, yarn over, pull through, yarn over, pull through both loops
- hdc: half double crochet – yarn over, insert hook, yarn over, pull through, yarn over, pull through all 3 loops
- dc: double crochet – yarn over, insert hook, yarn over, pull through, yarn over, pull through 2 loops, yarn over, pull through last 2 loops
- sl st: slip stitch – insert hook, yarn over, pull through stitch and loop on hook
- inc: increase – 2 stitches worked into the same stitch
- magic ring: adjustable loop used to start rounds worked in the round
Gauge and Tension Notes
Gauge is not critical for this project, but maintaining consistent tension is important to keep the green base flat and flowers even. Use a comfortable tension that produces firm stitches, especially for the base, to avoid curling edges. A 1.25 mm hook works well with size 10 thread for tight, defined petals and leaves.
Pattern Notes Before You Start
This brooch is worked in separate pieces: flowers, green base, leaves, and finally assembled. All flower petals are worked in rounds from a magic ring, and leaves are created flat using chains and various stitches for texture. No color changes occur within rounds, but you’ll switch yarn colors between motifs. The flowers are made first and sewn securely onto the base, which must be flat to prevent distortion when pinned. The finished brooch is backed with felt to hide all threads and support the pin attachment.
Step-by-Step Crochet Instructions
-
Make 9 Flowers
Using lavender, pale blue, and dusty rose, create a balanced mix.- R1: Magic ring, 8 sc, join. (8 sts)
- R2: (sl st in next st, ch 2, 2 hdc in next st, ch 2, sl st in same st) repeat 4 times to form 4 petals. Fasten off.
- Optional: Sew a tiny cream French knot in the center of each flower for added detail.
-
Green Base
Using olive green:- R1: Magic ring, 6 sc.
- R2: Increase in each stitch around = 12 sc.
- R3: (sc, inc) repeat 6 times = 18 sc.
- R4: (2 sc, inc) repeat 6 times = 24 sc.
Fasten off. This base should lie flat with no curling.
-
Make 3 Leaves
With olive green:- Ch 7.
- Starting in 2nd ch from hook, work: sl st, sc, hdc, dc, hdc, 4 sc in last ch; then continue along opposite side of the chain: hdc, dc, hdc, sc, sl st.
Fasten off.
-
Flower Cluster Assembly
Arrange 5 flowers tightly in the center of the green base cluster. Position the remaining 4 flowers around the edges, filling gaps while keeping petal shapes distinct. Sew each flower through the center ring and at least one outer base point to secure firmly. Add up to 3 small pearls in open spaces between flowers (not on petals) for elegance. -
Attach Leaves
Sew two leaves extending from the lower-left side and one leaf on the upper-right of the cluster. Stitch only through the leaf center spine to allow natural curve along edges. -
Attach Pin Back
Cut a felt circle slightly smaller than the base. Sew the brooch pin horizontally onto the felt with strong thread, making multiple passes through pin holes. Sew the felt backing to the back of the crochet green base, hiding all flower attachment threads. Check that the clasp opens freely and the brooch sits flat.
Assembly and Finishing
Ensure all flower centers are firmly sewn to prevent shifting. Take care to sew leaves with minimal stitches to maintain their shape. When adding pearls, secure them tightly with a knot on the back to avoid snagging fabric. Weave in all yarn ends neatly on the back before sewing the felt. The felt backing not only hides threads but also protects clothes and supports the clasp for durability.
Helpful Tips
- Keeping the green base flat is crucial; if edges curl, try loosening your tension or gently blocking the piece before assembly.
- Use a fine tapestry needle for sewing flower centers to avoid visible holes.
- French knots in flower centers add charm but make them tiny to prevent bulk under the felt.
- Pearls add a delicate, polished look but avoid overcrowding to maintain stitch definition.
- Check pin orientation before sewing felt to avoid discomfort when worn.
- Practice the slip stitch petal repeating round on scrap to gain rhythm before starting flowers.
Common Mistakes to Avoid
- Crocheting the base too tightly, causing curling edges. Hold tension lightly and block if needed.
- Skipping secure sewing of flower centers leads to loose petals that shift. Sew firmly through centers.
- Overcrowding pearls on petals makes the brooch look bulky. Space pearls in open spaces between flowers only.
- Sewing leaves flat all along edges instead of near center causes stiffness. Allow edges room to curve for realism.
- Forgetting to check pin clasp after assembly may make the brooch uncomfortable to wear or difficult to secure.
Customization Ideas
- Use different color palettes like cream and pink or blues and greens to match seasons or outfits.
- Substitute beads or small sequins for pearls for a touch of sparkle or contrast.
- Experiment with softer or thicker yarn for a different texture or size.
- Add more leaves or flower sets to create a larger statement brooch.
How to Use or Display This Crochet Project
Wear the brooch on lapels, scarves, hats, or bags to add a handmade floral accent to your look. It’s also perfect as a thoughtful gift for friends who love flowers or crochet. Display it in a shadow box or on a corkboard with other crochet accessories when not in use to keep it safe and admired.
Care Instructions
Hand wash gently in cool water with mild detergent. Avoid wringing; instead, press water out with a towel. Lay flat to dry away from sunlight to prevent fading. Store pinned items separately to avoid tangling or crushing.
Frequently Asked Questions
Q: Can I use thicker yarn or bigger hooks?
A: Thicker yarn and hooks will increase the brooch size and alter detail visibility. Try a gauge swatch first and adjust flower counts for balance.
Q: How do I make the French knot for the flower centers?
A: Use a contrasting thin thread or embroidery floss, wrap the thread twice around the needle, then insert back close to the starting point for a tiny decorative knot.
Q: Can I use safety pins instead of brooch pin backs?
A: Safety pins are less secure and may cause fabric damage over time. Brooch pin backs are recommended for durability and comfort.
Q: How do I keep the leaves curved and natural looking?
A: Sewing only along the leaf center line allows edges to lift naturally. Avoid sewing edges flat to fabric.
Q: What’s the best way to block the base if it curls?
A: Wet-block gently by pinning the base flat on a blocking board, letting it dry completely. If blocking is unavailable, a slightly looser tension helps.
Final Thoughts
This Hydrangea Pearl Brooch is a sweet and satisfying project that blends floral crochet techniques with practical assembly skills. It’s a great introduction to creating motif clusters and finishing wearable crochet pieces with care. If you enjoy delicate floral accessories, you might also find inspiration in the sophisticated Cherry Pearl Flower Ring pattern, perfect for adding coordinated charm to your handmade collection.
Conclusion
For those drawn to the elegance of hydrangea blooms, exploring real-life hydrangea varieties can inspire your crochet color choices and styling ideas. You might enjoy browsing selections like the Hydrangea – Nice Cream London collection, which captures the delicate hues and shapes that make these flowers so beloved.



