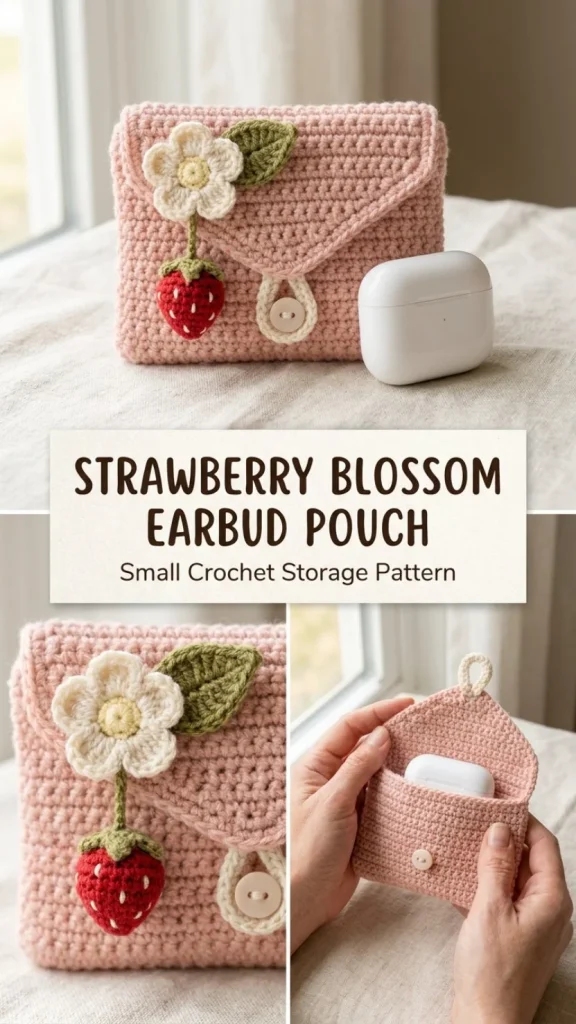
This charming Strawberry Blossom Earbud Pouch is a delightful, practical project for crochet enthusiasts looking to combine functionality with handcrafted cuteness. Designed to hold earbuds snugly while keeping cords tangle-free, it’s ideal for daily carry and gift-giving. The soft blush fabric provides a gentle base, while the sweet blossom and strawberry accents add that perfect pop of color and texture. It’s beginner-friendly, crafted using basic stitches, and straightforward assembly, but offers enough detail to be engaging and satisfying to make. From my experience designing small pouches, shaping the flap with decreases and adding a secure button loop really helps the pouch keep a neat and polished look once closed. Plus, you might enjoy making coordinating storage items like the bunny earbud pocket pouch which shares the same cozy appeal and functional feel.
Why You’ll Love This Crochet Pattern
- Uses accessible stitches like single crochet and basic shaping, perfect for beginners and intermediate crocheters alike.
- Compact size makes it an ideal small gift or personal accessory for protecting earbuds and small tech.
- Decorative but practical design with a button flap and a hanging strawberry charm for easy access.
- Offers hands-on experience with simple colorwork and assembling panels to improve finishing skills.
- Suitable for customization with different yarn colors or adding fabric lining to enhance durability.
- A fun way to practice motif sewing and embroidery, helping grow your crochet embellishment abilities.
Finished Size
The completed pouch measures approximately 3.5 inches wide by 4.5 inches tall (9 cm x 11.5 cm), with the flap adding a neat closure shape. Finished dimensions may vary slightly based on your yarn choice, hook size, and personal tension.
Skill Level
Easy to intermediate beginner. While the pouch mostly uses single crochet rows for the panels, techniques like shaping the flap with decreases, making motifs (blossom, strawberry, and leaf), and sewing parts together will give beginners helpful practice without being overwhelming.
Materials Needed
- DK (light) cotton yarn (#3 weight) in soft blush, cream, red, olive green, and pale yellow
- 3.0 mm crochet hook (US size D)
- One 10-12 mm button for the flap closure
- Yarn scraps for light stuffing (optional, for strawberry charm)
- Tapestry needle for weaving ends and sewing parts
- Stitch markers (optional, for marking rows or shaping)
- Scissors
- Sewing needle and thin cotton fabric for optional pouch lining
Stitches and Abbreviations
- ch: chain
- sc: single crochet
- sc2tog: single crochet two together (decrease)
- sl st: slip stitch
- dtr: double treble crochet (not used here, but if seen in other patterns)
- dc: double crochet
- hdc: half double crochet
- R: round or row number (context-dependent)
All stitches use US terminology throughout.
Gauge and Tension Notes
Gauge is not critical for this project but maintaining an even, firm tension will give the pouch structure and neatness. If your stitches are too loose, the pouch may look slack and not protect earbuds well; too tight, and shaping might become stiff and uneven. A balanced tension with consistent single crochet rows ensures smooth panels and a clean flap shape.
Pattern Notes Before You Start
The pouch is constructed from two main rectangular panels worked flat in rows with single crochet stitches. The front panel is plain, while the back panel includes shaping for the flap via decreases. Motifs — blossom flower, strawberry charm, and leaf — are crocheted separately and sewn on after assembly. The pouch is joined by single crocheting along three sides with wrong sides facing, leaving the top and flap free. A button is sewn on the front panel to secure the flap loop. Optionally, add a thin fabric lining inside before joining panels for a polished finish.
Step-by-Step Crochet Instructions
-
Front Panel
- With soft blush yarn, ch 16.
- Row 1: sc in 2nd ch from hook and across (15 sc).
- Rows 2-18: ch 1, turn, sc across (15 sc).
- Fasten off and weave in ends.
-
Back Panel and Flap
- With soft blush yarn, ch 16.
- Row 1: sc in 2nd ch from hook and across (15 sc).
- Rows 2-18: ch 1, turn, sc across (15 sc).
- For flap shaping:
- Row 19: ch 1, turn, sc2tog, sc in next 11 stitches, sc2tog (13 sc).
- Row 20: sc2tog, sc in next 9 stitches, sc2tog (11 sc).
- Row 21: sc2tog, sc in next 7 stitches, sc2tog (9 sc).
- Row 22: sc2tog, sc in next 5 stitches, sc2tog (7 sc).
- Row 23: ch 5, skip center stitches, sl st into last stitch to form button loop.
- Fasten off and weave in ends.
-
Blossom Motif
- With cream yarn, create a magic ring.
- R1: 10 sc into ring, join.
- R2: (sl st, ch 2, 3 dc in next sc, ch 2, sl st in same sc) repeat 5 times, join.
- Fasten off. Embroider a tight center using pale yellow yarn with compact French knots or tight stitches.
-
Strawberry Charm
- With red yarn, magic ring.
- R1: 6 sc in ring (6).
- R2: Inc in each stitch (12).
- R3: (sc, inc) x6 (18).
- R4: sc around (18).
- R5: (sc, dec) x6 (12).
- Lightly stuff with yarn scraps if desired.
- R6: dec around (6). Close tightly.
- With cream yarn, add small seed dash embroidery.
- Make green calyx: magic ring, 5 sc. Then (ch 3, sl st in 2nd ch, sc in next ch, sl st in next base stitch) repeat 5 times.
- Sew calyx to strawberry top.
-
Leaf Motif
- With olive green yarn, ch 6.
- Starting in 2nd ch from hook, work slip stitch, sc, hdc, dc, 4 sc in last ch; continue on opposite side with dc, hdc, sc, sl st.
- Fasten off.
Assembly and Finishing
Place front and back panels with wrong sides together, aligning bottom edges. Using soft blush yarn, join panels with single crochet along one long side, bottom edge, and opposite long side, leaving the top open—do not join the flap. Sew the blossom motif and leaf to the front upper-left corner as decoration. Attach the strawberry charm securely below the blossom with a short loop so it hangs about 1 inch (2.5 cm). Sew the button on the front panel positioned to close the flap loop snugly yet comfortably. Optionally, add a lightweight cotton fabric lining before joining panels for a professional look and extra protection. Weave in all yarn ends carefully for a clean finish.
Helpful Tips
- Use stitch markers on row edges to keep counts accurate during flap shaping.
- When sewing the charm and blossom, use small stitches and sew twice for secure attachment.
- Tension matters: keep your stitches consistent to avoid curling edges or uneven panels.
- Blocking the panels lightly before assembly can improve shape and even out stitches.
- If adding lining, baste lightly to keep fabric smooth and aligned during joining.
- For stuffing the strawberry, light fills avoid bulk and keep the charm soft and manageable.
Common Mistakes to Avoid
- Missing decreases on flap shaping rows; count your stitches often to maintain flap shape.
- Sewing the button in the wrong place, which can cause strain on the flap; test the loop closure first.
- Overstuffing the strawberry charm causing it to lose its shape or strain stitches.
- Skipping weaving in ends securely, leading to unraveling after use.
- Joining panels with the right sides together by accident, which misaligns the design.
Customization Ideas
- Switch up the soft blush base for pastel greens, blues, or lavender for a fresh look.
- Substitute cotton yarn with a soft acrylic blend for machine-washable convenience.
- Add a lining fabric with a fun print or color for extra flair inside the pouch.
- Experiment with making larger or smaller versions by adjusting the starting chain and rows, perfect for other small gadgets.
How to Use or Display This Crochet Project
This earbud pouch is perfect for daily use to keep your earbuds organized and protected in bags or pockets. It also makes a thoughtful handmade gift for music lovers or tech-savvy friends. Display your craft proudly on a desk or shelf when not in use, or give it as part of a tech accessory bundle. Pair it alongside the berry basket drawstring pouch to create a charming set of coordinating storage for earbuds and other small items.
Care Instructions
Due to the cotton yarn, hand wash the pouch gently with mild soap and cold water to retain softness and color vibrancy. Lay flat to dry to maintain shape and avoid stretching. Avoid machine washing or drying unless you add a durable lining and test for colorfastness.
Frequently Asked Questions
Q: Can I use a different yarn weight?
A: DK is recommended for the best fit and texture, but you can experiment with lighter or slightly heavier yarns, adjusting hook size and stitch counts accordingly.
Q: How do I fix uneven flap edges when shaping?
A: Make sure your sc2tog decreases are consistent, and count stitches each row. Use stitch markers to track where decreases occur.
Q: Do I have to add lining?
A: Lining is optional but adds durability and a smoother interior finish, especially if you plan to use the pouch frequently.
Q: Can the motifs be left off?
A: Yes, you can omit the blossom, strawberry, and leaf for a simple pouch. They add visual interest but aren’t structurally necessary.
Q: How tight should my stitches be?
A: Aim for firm but comfortable tension. Too loose can make the pouch floppy; too tight can cause stiffness and difficulty sewing parts together.
Final Thoughts
This Strawberry Blossom Earbud Pouch combines charming design with practical utility in a manageable, rewarding project. Whether you’re new to crochet or want a quick gift idea, the simple stitches and decorative accents offer both ease and delight. Have fun personalizing it with colors or additions, and enjoy the cozy satisfaction of crafting a lovely handmade pouch that’s as useful as it is adorable.
Conclusion
If you love this strawberry-inspired crochet project, you’ll find even more inspiration in the Strawberry Shortcake™ Collection | iPhone Cases & Accessories, featuring vibrant and playful designs to brighten your everyday tech accessories.



