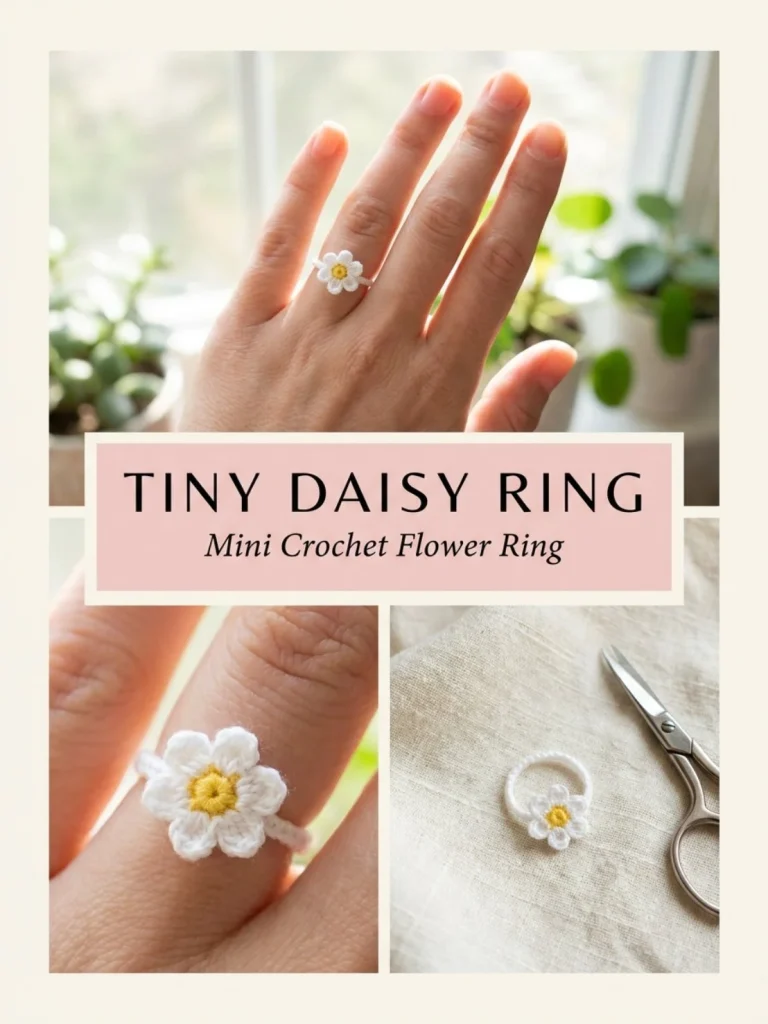
This Tiny Daisy Ring crochet project is the perfect blend of charm and practicality, making it an excellent accessory for any outfit. Its cheery design not only adds a pop of color but also invites compliments wherever you go. Crocheting this ring is a manageable challenge for beginners and intermediates alike, as the flowers are small and manageable while also allowing for creativity in colors. An intriguing aspect of this pattern is the option for an adjustable fit, making it versatile for gifting or personal wear.
Why You’ll Love This Crochet Pattern
- Quick and easy to make, making it perfect for last-minute gifts.
- The combination of vibrant yellow and white mimics nature beautifully.
- Versatile design options allow for personal creativity.
- It incorporates just a few basic stitches, making it beginner-friendly.
- The option for an adjustable band adds a functional twist for varying finger sizes.
Finished Size
The finished ring size typically ranges from 1.5 to 2 inches in diameter, depending on the yarn, hook, and your tension.
Skill Level
This project is classified as intermediate but is also accessible to motivated beginners. The techniques involved are simple, but working in rounds and shaping the flower petals can be a new experience for less seasoned crocheters.
Materials Needed
- Size 10 cotton thread in white and yellow
- 1.25–1.5 mm crochet hook
- Tapestry needle for weaving ends
- Scissors
- Thin elastic thread (optional for adjustable fit)
Stitches and Abbreviations
- sc: single crochet
- ch: chain
- dc: double crochet
- mr: magic ring
- sl st: slip stitch
Gauge and Tension Notes
While gauge is not crucial for this project, maintaining consistent tension will help ensure that your flowers have a neat appearance. A tight tension can help the petals hold their shape better.
Pattern Notes Before You Start
The ring is worked in rounds. The flower petals are made separately and then attached to the ring band. You make the petals by joining yarn to the center stitch of the flower shape. If you opt for the adjustable version, keep your band as a narrow strip, which can be tied at the back for a comfortable fit.
Step-by-Step Crochet Instructions
- Flower Center: With yellow thread, create a magic ring and work 6 sc into the ring. Join and fasten off.
- Petals: Attach white yarn to any center stitch. In the same stitch, work (ch 3, 2 dc, ch 3, sl st) for each of the 6 petals.
- Ring Band: With your choice of white or yellow, ch 18–24 depending on finger size. Join into a ring without twisting.
- Round 1: Work sc evenly around, then join and fasten off.
- Assembly: Securely sew the daisy flower to the top of the ring band. Weave in all ends.
For the adjustable version, make the band by chaining 24 and sc in the 2nd ch from the hook across. Fasten off, then tie the ends together underneath the finger or create a small loop to thread the ends through.
Assembly and Finishing
To finish your Tiny Daisy Ring, ensure the flower is securely attached to the band. Weave in any loose ends carefully so they do not distract from the ring’s design. If you experience any puckering at the petals, steam gently to shape them.
Helpful Tips
- Use a stitch marker in the beginning of each round to keep track of your rounds.
- For better shape, make sure not to crochet too tightly when forming the petals.
- If the flower petals curl up, consider using a larger hook for a looser feel.
- For a polished look, block your finished flower shape before sewing it onto the band.
Common Mistakes to Avoid
- Forgetting to join the beginning chain for the ring band, which may lead to twisting.
- Making the petals too tight, resulting in a stiff look.
- Not weaving in ends properly, which can lead to unraveling.
Customization Ideas
- Experiment with different color combinations or even use variegated yarn for a unique look.
- Adjust the size of the band to create a larger statement piece.
- Add beads or buttons to the center of the flower for additional embellishment.
How to Use or Display This Crochet Project
The Tiny Daisy Ring can be worn as a fun accessory, paired with casual outfits or even dressed up for special occasions. It makes a lovely gift for friends who appreciate handmade items, or you can simply wear it as a personal touch that enhances your style.
Care Instructions
To clean your crochet ring, hand wash with mild soap and lay it flat to dry. Store it in a cool, dry place away from direct sunlight to prevent fading.
Frequently Asked Questions
Q: How can I make my flowers look flatter?
A: Ensure you’re using the correct tension and try blocking them lightly after finishing.
Q: Can I use a different yarn weight?
A: Yes, but be aware that the size of the ring may change, and you might need to adjust your hook size accordingly.
Q: How do I ensure the ring fits?
A: Measure your finger accurately before starting to chain, adjusting the length of the chain accordingly.
Q: Can I add more petals to the flower?
A: Absolutely! Feel free to experiment with additional petals for a fuller flower look.
Q: What if I want a larger ring?
A: Increase the chain length for the band, and consider adding more rounds of sc for a wider base.
The Tiny Daisy Ring is a delightful project for both beginners and more experienced crocheters, allowing for a burst of creativity and color in your accessory collection. If you enjoyed this project, you might also want to explore other crochet patterns like the Berry Basket Drawstring Pouch or elevate your style with the Bluebell Drop Earrings. Happy crocheting!



