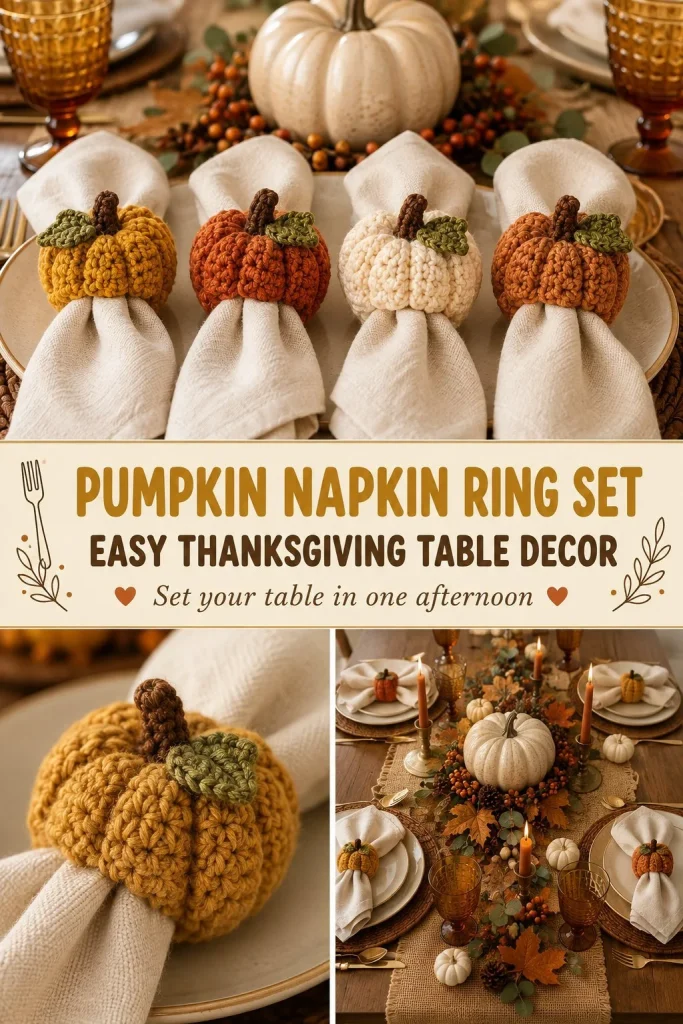
Pumpkin napkin rings are a charming and practical way to add a warm, handmade touch to your Thanksgiving table setting. This simple crochet project creates cozy, circular rings that slide easily around napkins, making them both decorative and reusable for many holiday seasons to come. The pattern is designed to be beginner-friendly, using basic stitches and straightforward rounds that you can complete quickly, even if you’re new to crochet. I like that each ring is created individually — no complicated assembly is needed beyond weaving in ends — which helps keep the tension even and the shape nicely rounded. Plus, mixing autumn-inspired yarn colors like mustard, orange, and cream adds a festive vibe that feels homemade and inviting. If you’re looking to expand your seasonal décor with other cozy crochet touches, you might enjoy exploring patterns that pair well with your table setting, such as pumpkin-themed garlands or miniature amigurumi pumpkins for added flair.
Why You’ll Love This Crochet Pattern
- Uses simple single crochet stitches ideal for beginners and quick work.
- Individual rings make for easy shaping without complex sewing or joining.
- Lightweight sport or DK weight cotton yarn creates soft but sturdy rings.
- Mix and match autumn colors for a personalized holiday look.
- Perfect gift idea or easy way to impress guests with handmade detail.
- Practical design ensures napkins slide smoothly without stretching out.
Finished Size
Each napkin ring measures approximately 2 inches (5 cm) in diameter when finished. The exact size may vary depending on your yarn choice, hook size, and personal crochet tension. Cotton yarn with slight stretch gives an ideal snug fit without being too tight.
Skill Level
This pattern is perfect for beginners or easy beginners. It involves only working in rounds with basic single crochet stitches and slip stitching to join – no advanced shaping, increases, or decreases needed. The simplicity means you can focus on consistent stitch tension and weaving in ends neatly.
Materials Needed
- Cotton yarn in autumn shades such as mustard, orange, and cream (sport or DK weight recommended)
- 3.5 mm (E) crochet hook
- Tapestry needle for weaving in ends
- Scissors
- Optional: stitch markers to keep track of rounds
Stitches and Abbreviations
- ch = chain: create a foundation chain.
- sc = single crochet: insert hook, yarn over, pull through stitch, yarn over, pull through both loops.
- sl st = slip stitch: insert hook, yarn over, pull through stitch and loop on hook simultaneously.
Gauge and Tension Notes
Gauge is not critical for this project but maintaining an even tension is important to achieve smooth, round napkin rings. Too tight a tension will make the ring rigid and difficult to slide, while too loose may cause it to stretch out or lose shape. Using cotton yarn helps maintain a balanced stretch with good shape retention.
Pattern Notes Before You Start
This pattern works flat foundation chains joined into a loop and then stitches worked evenly around in rounds. Each napkin ring is crocheted separately; there is no need to join or sew multiple parts together. Color mixing is encouraged by using different yarn shades for each ring, but changes happen only between rings, not inside one ring. Take care not to twist the chain when joining into a loop to keep a neat edge.
Step-by-Step Crochet Instructions
- Chain 16. Be sure not to twist your chain when you join.
- Join the last chain to the first with a slip stitch to form a round loop.
- Round 1: Chain 1, single crochet into each chain around (16 sc total), slip stitch to join.
- Round 2: Chain 1, single crochet into each stitch around (16 sc total), slip stitch to join.
- Fasten off your yarn and weave in ends securely with the tapestry needle.
- Repeat these steps to make a total of 4 napkin rings. Feel free to mix yarn colors for each ring.
Assembly and Finishing
No sewn assembly is required after crocheting each ring. Weave ends in thoroughly to prevent unraveling and gently shape the rings by hand for a smooth round form. Lay flat or hang to dry if any slight dampening occurs during finishing. Avoid joining the rings to each other so every napkin ring can slide freely on its own napkin.
Helpful Tips
- Using stitch markers on your first stitch each round helps avoid losing track of rounds.
- Be mindful not to twist the chain before joining; a twisted chain leads to uneven shaping.
- Maintain even tension to keep the rings’ diameter consistent and fit snugly around napkins.
- Weave in yarn tails close to the base and tuck securely to avoid fraying with repeated use.
- Cotton yarn performs well here—it’s washable and holds its shape better than acrylic.
- For more Halloween and fall-themed décor patterns, check out designs that pair beautifully with these napkin rings like a pumpkin garland for your mantel or table centerpiece.
Common Mistakes to Avoid
- Twisting the foundation chain before joining, which distorts the ring shape.
- Missing the slip stitch join at the end of rounds, causing gaps or uneven edges.
- Crocheting too loosely, resulting in a floppy ring that doesn’t hold its form.
- Failing to weave in ends securely, which can cause the ring to unravel.
- Forgetting to shape the rings by hand before drying, which helps keep a polished look.
Customization Ideas
- Use textured yarn or variegated colors to add visual interest.
- Adjust the number of chains to make larger or smaller rings.
- Add a subtle accent stitch like a slip stitch ridge for decoration.
- Attach a tiny embroidered leaf or button for an autumn motif.
- Pair with coordinating crochet pumpkins or table runners for a seasonal set.
How to Use or Display This Crochet Project
Slip these pumpkin-themed napkin rings over cloth or paper napkins to add a handcrafted touch to your Thanksgiving table. They make charming hostess gifts or handmade favors, and their durable cotton yarn withstands multiple holiday seasons. Use them with seasonal colors and patterns for a festive meal presentation that guests notice and appreciate.
Care Instructions
Machine wash gently on a cold, delicate cycle or hand wash to maintain yarn integrity. Lay flat to dry to avoid stretching or distortion. Store napkin rings in a breathable bag or box to keep them dust-free and ready for next use.
Frequently Asked Questions
Q: Can I use acrylic yarn instead of cotton for this pattern?
A: Acrylic yarn can be used but cotton is preferred as it holds shape better and washes well without stretching.
Q: How do I keep the rings from stretching out over time?
A: Choose a yarn with less stretch and avoid overly loose tension. Store rings flat and dry to maintain shape.
Q: Can I make these rings larger for bigger napkins or towels?
A: Yes, simply increase the foundation chain length evenly and adjust rounds if needed for a snug fit.
Q: Is stuffing required for these napkin rings?
A: No stuffing is needed since they are solid crocheted rings designed to slide around napkins.
Q: What other seasonal crochet projects pair well with these?
A: These napkin rings complement fall décor pieces like pumpkin garlands or mini crochet pumpkins. For example, you can find an easy pattern for a pumpkin garland string to coordinate with your table setting.
Final Thoughts
This simple pumpkin napkin ring set is a quick and satisfying project that adds cozy charm to your Thanksgiving decor. Its beginner-friendly design makes it a great way to practice working in rounds while creating something festive and functional. Hopefully, this pattern encourages you to add handmade warmth to your seasonal celebrations with ease. For those looking to try out other pumpkin-inspired crochet projects, exploring a mini amigurumi pumpkin pattern might be a delightful next step. Happy crocheting!



