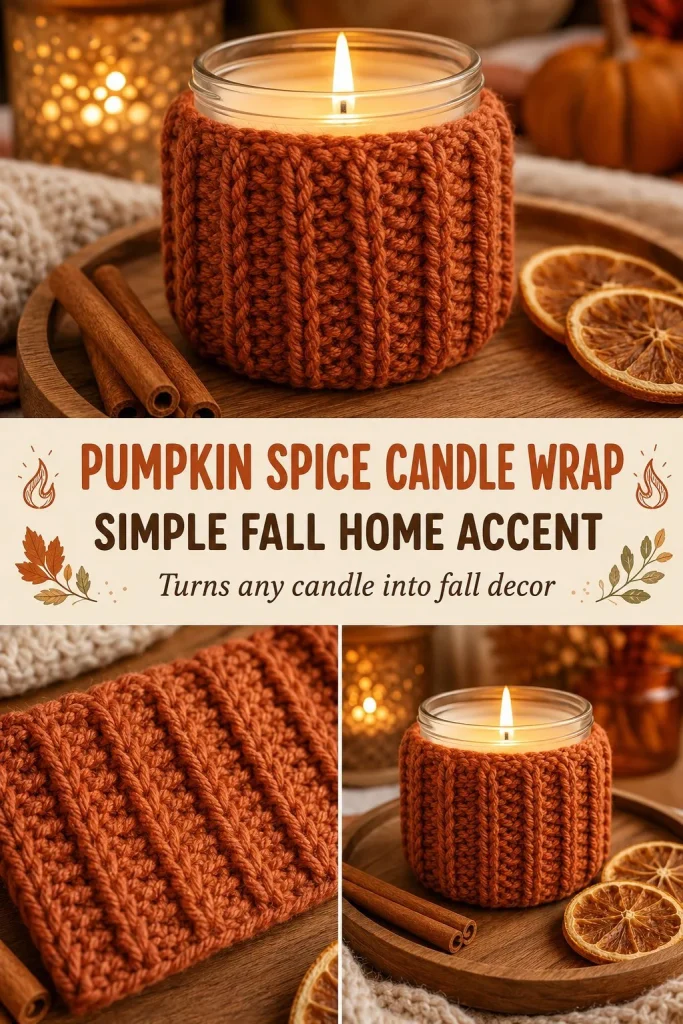
This cozy pumpkin spice candle wrap is a quick and simple crochet project perfect for adding a touch of autumn warmth to your home. It’s designed to fit snugly around a candle jar, elevating an ordinary candle into a charming fall accent. Working up a textured ribbed fabric with single crochet stitches worked in the back loops creates a neat, stretchy effect that hugs your jar beautifully. I love how this pattern is beginner-friendly yet still gives a polished, handcrafted look that makes it ideal as a gift or seasonal decoration. Measuring your candle jar’s circumference to chain an even number ensures the wrap fits just right without fuss. If you’re enjoying other fall-themed crochet projects, you might find inspiration by exploring related designs like a pumpkin bunting banner, which brings the same cozy seasonal vibe to your walls.
Why You’ll Love This Crochet Pattern
- Uses simple stitches and repetitive rows, making it perfect for beginners.
- Customizable sizing to fit any candle jar by adjusting the chain count.
- Quick to make, requiring only about 25-50 grams of worsted weight yarn.
- Creates a ribbed texture that adds visual interest without complicated stitches.
- Made with easily accessible materials and basic tools.
- A charming fall accent that can be paired with other easy crochet projects for seasonal decorating.
Finished Size
The finished wrap is a rectangular strip approximately 3 to 5 inches tall and wide enough to fit your candle jar circumference minus a small overlap for seaming. Exact dimensions depend on your yarn thickness, hook size, and personal tension. This flexibility helps you create a perfect fit whether your candle jars are small votives or taller jars.
Skill Level
This project is ideal for beginners comfortable with chain (ch) and single crochet (sc). The pattern works in rows with a simple stitch variation—single crochet in the back loop only—that provides texture without complexity. Minimal shaping and straightforward seaming makes it accessible to those new to garment-like crochet pieces.
Materials Needed
- Worsted weight yarn in a fall-inspired color such as terracotta, pumpkin orange, or warm browns (approximately 25-50 grams)
- 4 mm (G) crochet hook
- Tapestry needle for weaving in ends and seaming
- Scissors
- Optional: stitch markers to help track stitch counts or rows
Stitches and Abbreviations
- Ch (chain): a foundation stitch creating a base row.
- Sc (single crochet): insert hook into stitch, yarn over, pull through, yarn over, pull through both loops.
- Back Loop Only: working single crochet into the back loop of each stitch instead of both loops to create ribbing.
Gauge and Tension Notes
Gauge is not critical for this project but maintaining consistent tension ensures an even, stretchy fabric that comfortably wraps around your candle. Avoid crocheting too tightly, which could make the wrap stiff and hard to seam neatly. Conversely, very loose stitches may cause gaps and reduce the snuggly fit.
Pattern Notes Before You Start
This wrap is worked flat in rows rather than in rounds. You will make a rectangular strip with the ribbing texture by working single crochet stitches into the back loop only from Row 2 onward. The strip’s length (width of the wrap) is measured by your initial chain, which should be the candle jar circumference plus one chain, with an even number of chains total. After creating the strip, you join the two short ends together to form the circular wrap.
Step-by-Step Crochet Instructions
- Measure the circumference of your candle jar. Chain that number plus 1, ensuring you have an even number of chains.
- Row 1: Single crochet (sc) into the 2nd chain from the hook and across the row. You will have one less stitch than your chain count.
- Row 2: Chain 1, turn your work, then single crochet in the back loop only across every stitch.
- Repeat Row 2 until the strip reaches your desired candle wrap height (typically 3-5 inches).
- Fasten off, leaving a long tail for seaming.
- Wrap the finished strip around your candle jar, aligning the ribbed edges to keep the texture consistent.
- Use the long tail and a tapestry needle to whip-stitch the short ends together from the inside for a neat seam.
- Weave in all remaining yarn ends thoroughly to prevent unraveling.
Assembly and Finishing
After joining the short ends, double-check that your seam lies neatly inside so the wrap maintains a smooth outer surface. Use small, tight whip stitches for a clean finish. Weaving in ends carefully on the inside prevents visible tails and keeps your wrap looking professional. If you prefer, a blocking step can gently even out stitches and relax the fabric to sit better around the jar.
Helpful Tips
- Use stitch markers to count your chains if your candle circumference is large; this helps prevent accidental chain miscounts.
- Stretch the wrap gently on your candle to align ribbing edges before seaming.
- Keep tension consistent, especially when single crocheting in back loops, for an even ribbed texture.
- If your yarn tends to split, try using a smoother worsted weight to get neat stitches.
- Experiment with colors or yarn textures, such as a soft acrylic or washable cotton, to create different feels.
Common Mistakes to Avoid
- Not chaining an even number plus one can cause the stitch pattern to be off or the wrap not to fit smoothly.
- Forgetting to stitch into the back loop only from Row 2 onward will flatten your texture.
- Sewing the ends together with stitches that are too loose can cause sagging; whip-stitch firmly but not too tight.
- Leaving yarn ends loose inside risks unraveling; always weave in ends securely.
- Crocheting too tightly may stretch your hook and yarn, making assembly difficult.
Customization Ideas
- Try variegated or ombré yarn for a subtle color shift in the ribbing.
- Adjust the height by crocheting longer or shorter repeats of Row 2 to fit candles of different heights.
- Add a simple embroidered pumpkin or leaves after finishing for extra autumn charm.
- Pair with matching crochet garlands or other decor such as the pumpkin garland string to create a coordinated fall display.
How to Use or Display This Crochet Project
Place the wrap around your favorite scented candle to instantly update your fall table or mantel. This project also makes a thoughtful handmade gift for friends who love cozy home accents. Use multiple wraps to dress various candles in different sizes, creating a layered seasonal ambiance. When not in use, fold and store these wraps flat to keep their shape and texture.
Care Instructions
Hand wash your candle wrap gently in cool water with mild detergent to maintain softness and color vibrancy. Lay flat to dry to prevent stretching. Avoid high heat or aggressive machine washing, especially if using delicate or wool-blend yarns. Proper storage helps retain the ribbed texture and keeps the wrap ready for next season.
Frequently Asked Questions
Q: Can I use a different yarn weight for this pattern?
A: Yes, but adjust your hook size accordingly to maintain the ribbed texture and fit. Worsted weight and a 4 mm hook give a good balance of stretch and stability.
Q: Why chain an even number plus one?
A: This ensures your working stitch count and stitch pattern align correctly for the ribbing to look consistent around the wrap.
Q: Can I make this in multiple colors?
A: You can, but to keep the ribbing uniform, it’s best to change colors at row ends and complete rows fully in one color.
Q: Is it essential to single crochet in the back loop only?
A: Yes, this creates the ribbed elastic texture that makes the wrap fit nicely and look neat.
Q: How long does this project typically take?
A: For beginners, about 1 to 2 hours depending on speed and size; more experienced crocheters may finish faster.
Final Thoughts
This pumpkin spice candle wrap is a lovely quick project that brings warmth and charm to your fall decor without complex techniques. Its simple construction makes it approachable for new crocheters while providing a satisfying handmade touch that brightens any space. Whether you keep it for yourself or gift it, this wrap offers an easy way to celebrate the season with cozy style.



