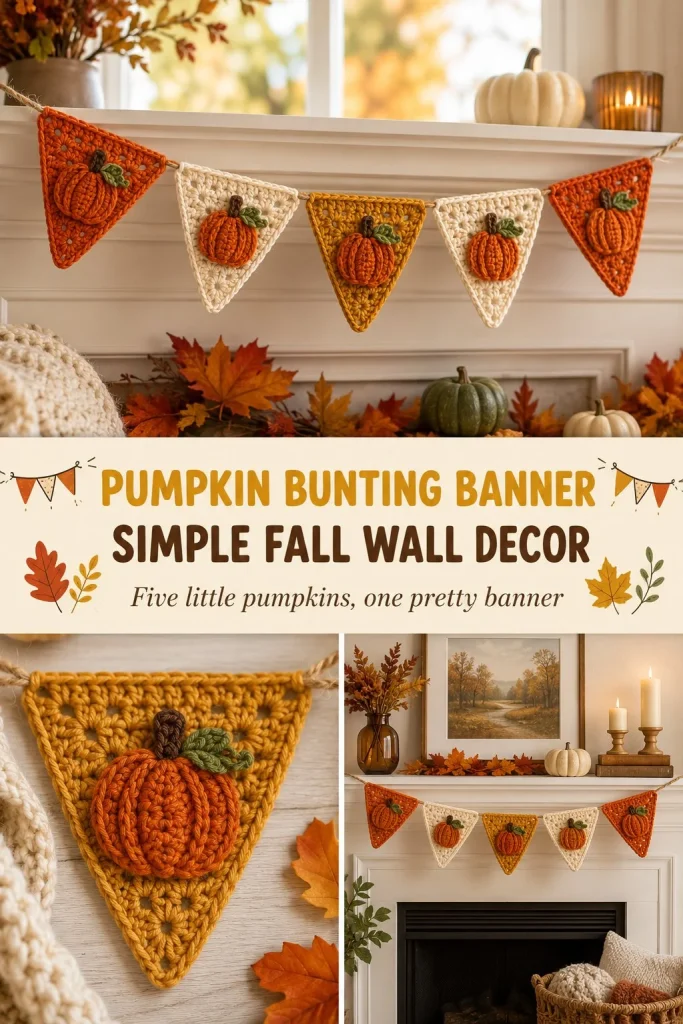
Fall is the perfect time to bring cozy, charming touches to your home, and this Pumpkin Bunting Banner is just the thing for a simple yet festive wall decoration. This beginner-friendly crochet pattern uses basic stitches and easy shaping to create small triangular pumpkin-inspired flags in warm fall tones. Working with cotton yarn in colors like orange, mustard, and cream helps these little triangles hold their shape and look neat on your twine string. If you’ve ever enjoyed making quick, eye-catching projects that don’t require complex assembly, this bunting is a satisfying way to add a handmade touch to your space. Plus, if you’re looking for other beginner-friendly patterns to complement your decor, you might enjoy exploring the cherry blossom crochet hair comb pattern for some floral inspiration.
Why You’ll Love This Crochet Pattern
- Uses simple stitches like chain and single crochet, making it accessible for beginners
- Quick to make: each triangle is small and works up fast
- Perfect way to practice increasing stitches and shaping simple motifs
- Handmade decor adds a warm, personal touch to your fall home styling
- Easy to customize with your favorite fall colors or yarn types
- Ideal for gifting or selling at craft fairs as seasonal home accents
Finished Size
Each triangle measures approximately 3 inches wide at the top when finished. The entire bunting length depends on how much extra twine you leave and the spacing of the triangles, but expect about 18–20 inches of decoration plus twine ends. Size naturally varies with yarn weight, hook size, and your tension.
Skill Level
Advanced beginner — this pattern is suitable if you know basic crochet stitches and can follow simple row increases and shaping instructions. It’s an excellent next step if you’ve mastered single crochet and chains but want to practice shaping motifs.
Materials Needed
- Cotton yarn (worsted weight recommended) in orange, mustard, and cream
- 4mm (G) crochet hook
- Length of twine or cotton string for hanging
- Tapestry needle for weaving ends and stitching triangles to twine
- Scissors
- Optional: stitch markers to track row starts and increases
Stitches and Abbreviations
- ch = chain: yarn over, pull through loop on hook
- sc = single crochet: insert hook into stitch, yarn over, pull through stitch, yarn over, pull through both loops on hook
Gauge and Tension Notes
Gauge is not crucial for this decorative project since the bunting’s size can vary to suit your space. However, consistent tension helps keep the triangle shapes even and neat. Avoid crocheting too tightly, which can make the fabric stiff and curl, or too loosely, which may cause your triangles to flop.
Pattern Notes Before You Start
You will crochet 5 separate triangles worked flat in rows, starting from the point and increasing each row on both ends to form the triangle shape. The triangles are not joined but will be attached to the twine afterward by stitching or tying along their tops. Mixing yarn colors freely makes the bunting visually interesting. You’ll finish each triangle by fastening off, weaving ends, then securing them spaced evenly on the twine.
Step-by-Step Crochet Instructions
- Using your chosen yarn color, chain 5 to begin.
- Row 1: sc 3 into the third chain from the hook (3 stitches total).
- Row 2: ch 1, turn work. Work 2 sc in the first stitch, sc across to the last stitch, 2 sc in the last stitch (5 stitches total).
- Row 3: ch 1, turn. Repeat the increase pattern from row 2 to make 7 stitches.
- Continue increasing by 1 stitch at each end every row, following row 2’s formula until the triangle reaches about 3 inches wide at the top.
- Fasten off and weave in ends neatly with the tapestry needle.
- Repeat steps 1–6 for the remaining four triangles, varying colors as you like.
Assembly and Finishing
Lay your twine flat on a table, arranging the triangles evenly spaced along it. Use the tapestry needle and a strand of yarn or thread to stitch through the tops of the triangles, attaching them securely but without pulling tight, so they hang nicely. Tie or knot extra twine at both ends for easy hanging. For neatness, weave all loose ends well inside the backs of the triangles.
Once assembled, gently shape the triangles if needed by smoothing edges or trimming any uneven yarn tails. This simple finishing ensures your bunting looks polished and ready to display.
Helpful Tips
- Keep your tension consistent, especially when increasing stitches to maintain triangle symmetry.
- Using a cotton yarn helps the bunting hold its shape better than softer acrylic or wool blends.
- Stitching the triangles to the twine with the same yarn color keeps the look cohesive and tidy.
- Blocking the triangles lightly by pinning them flat before assembly can improve their shape.
- If you want a more dimensional look, use a chunky yarn or a larger hook for a bolder texture like the bold stripe chunky statement ring crochet pattern.
Common Mistakes to Avoid
- Forgetting to increase at both ends of each row, which can lead to uneven triangle sides.
- Starting with too few chains, making the base too narrow to reach the desired triangle size.
- Not weaving in ends securely, causing loose yarn tails that catch or fray after hanging.
- Attaching triangles too close together on the twine, making the bunting look crowded.
- Using yarn that is too stretchy, which distorts the triangle shape over time.
Customization Ideas
- Use variegated or gradient yarns for a multi-tonal fall look.
- Add small crocheted pumpkin stems or leaves sewn to the top corners for extra charm.
- Vary the size by adjusting the starting chain length and number of increase rows.
- Attach mini tassels or beads between triangles on the twine for added texture.
How to Use or Display This Crochet Project
This pumpkin bunting adds instant warmth to any wall, mantelpiece, or doorway in your home during fall. It’s an easy seasonal decoration for your kitchen, living room, or porch. The bunting also makes a thoughtful handmade gift for friends who love holiday decor. Because the triangles are lightweight and portable, you can swap them out easily for other seasonal banners or pair them with other handmade decor like cozy crochet pumpkin coasters or garlands.
Care Instructions
Hand wash gently with mild detergent in cool water to preserve the cotton yarn’s color and integrity. Lay flat to dry to prevent stretching or misshaping. Store your bunting flat or rolled loosely to avoid creases or distortion when not in use.
Frequently Asked Questions
Q: Can I use acrylic yarn instead of cotton?
A: Yes, but cotton helps the triangles hold their crisp shape better. Acrylic may stretch or curl more.
Q: How do I adjust the size of the triangles?
A: Start with a longer or shorter foundation chain, then continue increasing rows until the desired width is reached.
Q: Can I make more than five triangles to lengthen the bunting?
A: Absolutely! Add as many triangles as you like to fit your space.
Q: How do I keep the triangles from twisting on the twine?
A: Stitch securely along the entire top edge and space evenly to maintain balance.
Q: Is this pattern suitable for a complete beginner?
A: This is best for advanced beginners familiar with chain and single crochet and comfortable following simple shaping instructions.
Final Thoughts
This Pumpkin Bunting Banner is a delightful way to bring hand-crafted warmth and seasonal cheer into your home. Its simplicity makes it a quick and rewarding crochet project, perfect for refreshing your fall decor or gifting handmade charm. With just a few basic skills and cozy yarn colors, your space will feel ready for crisp autumn days ahead.




How do we do the pumkin