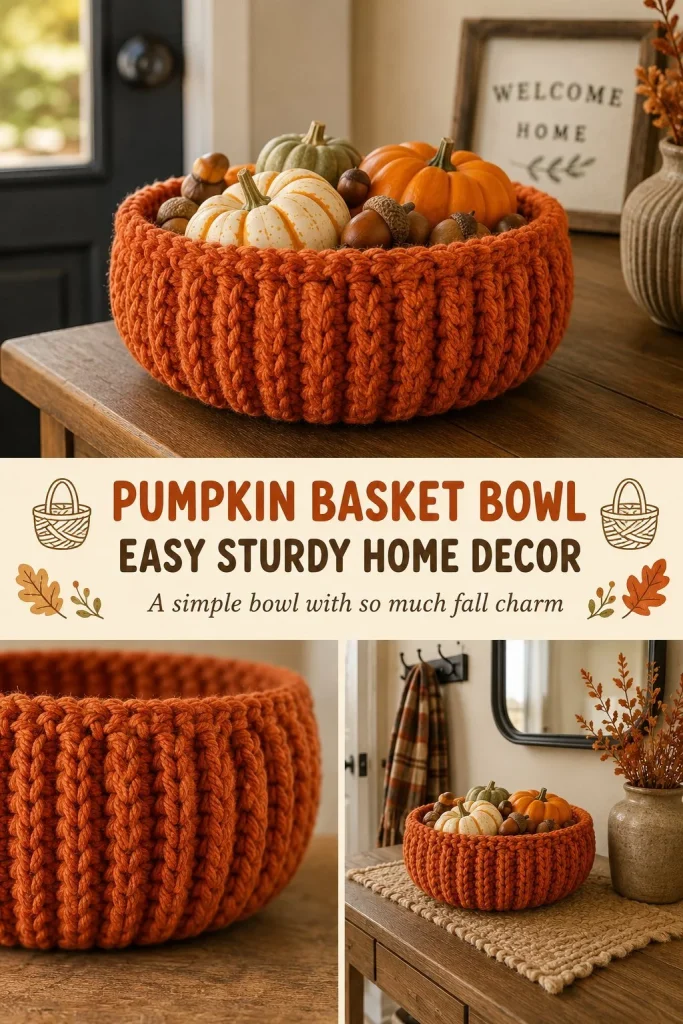
This pumpkin basket bowl is a charming and sturdy crochet project perfect for adding cozy autumn vibes to your home decor. Crafted with worsted-weight cotton yarn held double, this design results in a durable yet soft bowl that’s ideal for holding small fall treasures, keys, or even as a cute gift container. The pattern uses simple single crochet stitches worked in rounds, making it beginner-friendly without sacrificing structure. One detail I particularly appreciate is working the sides in the back loops only, which helps the bowl maintain upright, clean edges without needing extra stiffeners. If you’re looking to decorate further for fall, this pumpkin bowl pairs wonderfully with seasonal accents like a pumpkin garland string that you can hang nearby to complete your autumn setup with handmade flair.
Why You’ll Love This Crochet Pattern
- Uses basic stitches that are perfect for beginners or those brushing up on accuracy.
- The flat base and turned sides create a neat, sturdy shape suited to holding lightweight items securely.
- Quick to make with just 10 rounds, ideal for instant seasonal decorating or gifting.
- Made with cotton yarn held double, it’s washable and durable for everyday use.
- Provides satisfying texture and firmness without complicated shaping or seams.
- Works well alongside other fall-themed crochet projects for a coordinated home display.
Finished Size
The finished pumpkin basket bowl measures approximately 6 inches (15 cm) in diameter at the base, with sides standing about 3 inches (7.5 cm) tall. Size may vary slightly depending on your yarn brand, hook size, and crochet tension.
Skill Level
Easy beginner — the project uses only single crochet stitches and simple increases, with no complex shaping or color changes. Working in the back loop for the sides offers a gentle next step for beginners familiar with basic crochet.
Materials Needed
- Worsted-weight cotton yarn in rust-orange, held double (about 50 yards)
- 5 mm (H) crochet hook
- Tapestry needle for weaving in ends
- Scissors
- Stitch markers (optional, to mark round beginnings)
Stitches and Abbreviations
- ch – chain: make a foundation loop
- sc – single crochet: insert hook, yarn over, pull up a loop, yarn over, pull through both loops on hook
- st(s) – stitch(es)
- magic ring – adjustable loop used to start crocheting in the round
- back loop only – insert hook only under the back loop of each stitch instead of both loops
Gauge and Tension Notes
Gauge is not critical for this basket bowl pattern, but maintaining consistent tension is important for structure. A firm but not overly tight single crochet stitch helps the bowl hold its shape well without puckering. Crocheting the sides in the back loop creates a subtle ridge that encourages the bowl to turn up rather than flatten out.
Pattern Notes Before You Start
This project is worked entirely in continuous rounds starting from a magic ring base, expanding the flat circle before turning up the edges. There is no joining of separate pieces — the sides are built up directly from the base in back loop stitches for shaping. The yarn is held doubled throughout, creating thickness and durability without additional lining. Fasten off securely at the end and weave in all ends for a neat finish.
Step-by-Step Crochet Instructions
- Make a magic ring; ch 1 (does not count as stitch here).
- Round 1: 6 sc into ring (6 sts). Pull tight to close the center.
- Round 2: 2 sc in each stitch around (12 sts).
- Round 3: sc 1, 2 sc in next st repeat around (18 sts).
- Round 4: sc 2, 2 sc in next st repeat around (24 sts).
- Round 5: sc 3, 2 sc in next st repeat around (30 sts). This completes the flat base.
- Round 6: Work into the back loop only of each stitch around (30 sts). This starts the turning-up for the sides.
- Rounds 7–10: sc even around in both loops only (30 sts per round) to build the straight sides.
- Fasten off and weave in ends securely with your tapestry needle.
Assembly and Finishing
Once you’ve fastened off, use your tapestry needle to weave in ends neatly on the inside of the bowl. The holding double yarn creates enough firmness that you do not need extra stiffening, but you can gently shape the bowl by pressing the sides upward if the edges want to flatten. Keeping your tension even will help maintain smooth sides without ripples.
Helpful Tips
- Use stitch markers to mark the start of your rounds for easier stitch counting.
- Holding the yarn double can be a bit bulky at first; work slowly to maintain consistent tension.
- When working the back loops in round 6, don’t skip stitches — the ridge helps the bowl stand up.
- Weave ends tightly to prevent any unraveling during everyday use.
- If your bowl seems floppy, try a slightly smaller hook for tighter stitches next time.
- Pair this basket with coordinating fall decor like a pumpkin bunting banner for seasonal charm.
Common Mistakes to Avoid
- Skipping the back loop only round: this step is key to defining the bowl’s shape.
- Inconsistent tension causing wavy or floppy sides.
- Missing stitch increases in the base rounds, which disrupts the flat circle shape.
- Not pulling the magic ring tightly enough, leaving a large hole in the bowl center.
- Weaving in ends loosely, leading to unraveling with use.
Customization Ideas
- Use autumn color variegated cotton yarn or different shades for a multi-colored pumpkin effect.
- Crochet the bowl with sport or DK weight yarn doubled for a slightly smaller, denser basket.
- Add a small crocheted leaf or vine accent sewn onto the side for a cute finishing detail.
- Make larger or smaller baskets by adjusting rounds 2–5 before turning sides up.
How to Use or Display This Crochet Project
This pumpkin basket bowl is perfect for autumn-themed decor on your desk, entryway, or coffee table. Use it to store keys, candy, small crafting supplies, or seasonal trinkets. It also makes a sweet gift container for small presents or homemade treats. Because the yarn is cotton, the bowl can be given as a housewarming or hostess gift that’s both attractive and practical.
Care Instructions
Hand wash your basket bowl gently in cool water with mild detergent and lay flat to dry to maintain shape. Avoid wringing or twisting to preserve the sturdy structure. Store your pumpkin bowl in a dry place to prevent fading or distortion.
Frequently Asked Questions
Q: Can I use acrylic yarn instead of cotton?
A: Yes, but cotton held double generally offers better shape and durability for this design.
Q: What if I want a bigger bowl?
A: Add extra increase rounds in the base before working the sides.
Q: Do I need a stitch marker?
A: It’s helpful but not essential; it keeps your rounds accurate.
Q: Why work back loops only on round 6?
A: This technique creates a ridge that encourages the sides to turn up rather than flatten.
Q: Can I make this in different colors?
A: Absolutely! Switching colors can add charming pumpkin detailing or variety to your fall decor.
Final Thoughts
This simple pumpkin basket bowl is a satisfying little project that brings autumn warmth and practicality to your home. With just a few rounds and straightforward stitches, you’ll create a durable piece that’s as useful as it is charming. Whether you’re decorating your own space or crafting gifts, this crochet pattern offers a cozy way to celebrate the season with handmade style.




Thanks for a free pattern, but please be kind enough to post a photo of a basket that was created from the pattern, not a completely different basket. The basket you display has ribbed sides, which cannot be achieved by rounds of single crochet through both loops.