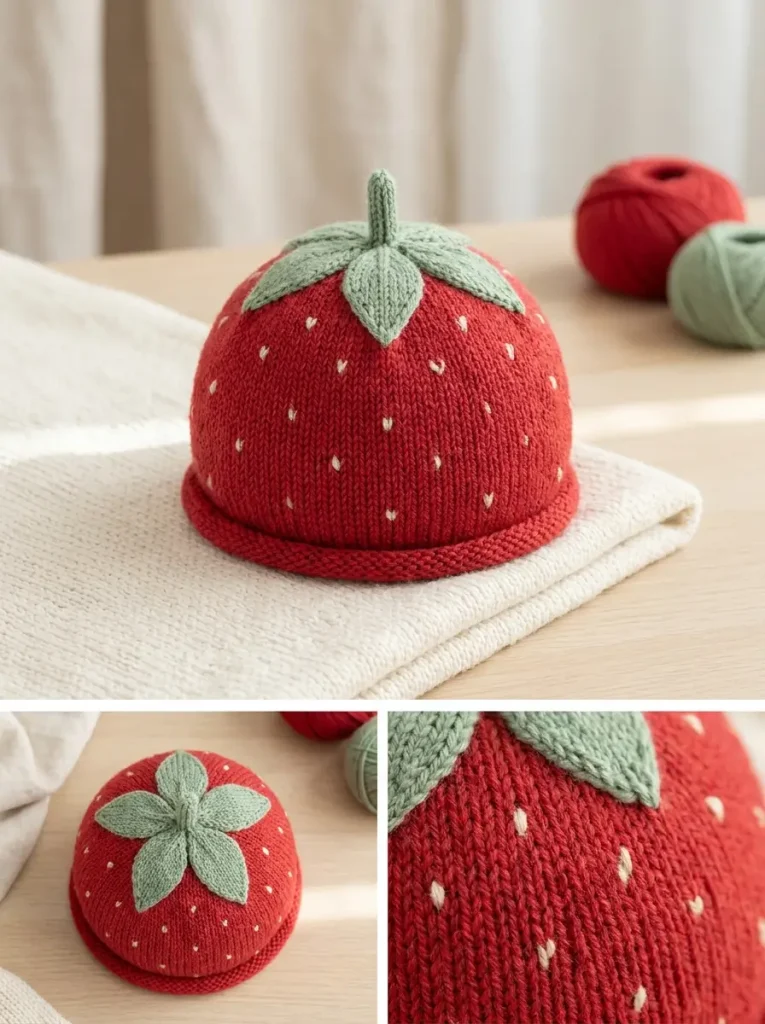
A strawberry baby hat is a charming and cozy knit accessory perfect for keeping little heads warm while adding a fun, fruity touch to any baby outfit. Designed to fit babies around 8 to 12 months old, this pattern uses a simple yet classic rib and stockinette stitch combination that provides great stretch and comfort. One of the delightful features is the textured strawberry "seeds" created with cream duplicate stitch, along with bright green knitted leaves and a stem that crown the hat with playful detail. This project is ideal for knitters who enjoy working with color and shaping techniques to create cute wearable art for babies. If you’re new to shaping or embellishing small knits, this pattern offers a satisfying challenge without being overwhelming. For fellow makers who enjoy adding unique details to accessories, you might also appreciate the approachable flair of the beginner-friendly cherry blossom crochet hair comb pattern, which combines beauty with simplicity.
Why You’ll Love This Crochet Pattern
- The finished hat is soft, stretchy, and comfortable for babies, thanks to the ribbed brim and smooth stockinette body.
- Shaping the crown with stepwise decreases creates a neat, rounded top that fits well without bunching.
- The whimsical strawberry details—leafy crown, stem, and seed stitches—add a personalized, handmade touch.
- Using DK-weight yarn and 4 mm needles strikes a good balance between easy handling and a nicely dense fabric.
- Ideal for knitters at an intermediate or adventurous beginner level looking to practice shaping and duplicate stitch embroidery.
- Clear instructions provide stitch counts and shaping guidance, so you can work confidently even if small details are new to you.
Finished Size
The hat measures approximately 44 to 46 cm (around 17 to 18 inches) in circumference, designed to fit comfortably on an 8 to 12-month-old baby’s head. Keep in mind that size can vary depending on the yarn brand, your knitting tension, and needle size. Swatching beforehand will help ensure the best fit.
Skill Level
Intermediate to advanced beginner. This pattern involves basic ribbing and stockinette stitches, which beginners may know, but also includes shaping using decrease techniques (K2tog and SSK) and finishing details like duplicate stitching and sewn-on leaves, which require some patience and precision.
Materials Needed
- DK weight yarn in strawberry red (main color)
- Sage green DK weight yarn (for leaves and stem)
- Small amount of cream yarn (for seed stitches)
- Set of 4 mm straight knitting needles
- Tapestry needle for sewing and duplicate stitch
- Scissors
- Stitch markers (optional to track decreases)
Stitches and Abbreviations
- K: Knit
- P: Purl
- K2tog: Knit two stitches together (right-leaning decrease)
- SSK: Slip, slip, knit (left-leaning decrease)
- Kfb: Knit into front and back of stitch (increase)
Gauge and Tension Notes
Gauge is moderately important to achieve the correct hat size and a neat finish. Aim for a fabric that is snug but still soft and stretchy. If your stitches are too loose, the hat may be too large or floppy. If too tight, shaping can get strained and uncomfortable for a baby. Make a swatch in K1, P1 rib and stockinette to check your tension before starting.
Pattern Notes Before You Start
This project is worked flat in rows starting with a cast-on of 72 stitches using red yarn. The first 6 rows are K1, P1 ribbing for a stretchy brim, followed by stockinette stitch (knit right side rows, purl wrong side rows). Crown shaping uses evenly spaced decreases on right side rows only, with purl rows slipped without decrease. After crown shaping, the hat is sewn closed with a neat seam at the back. The strawberry leaves are knit separately, then sewn evenly spaced around the crown’s edge. The stem is also knitted separately and attached to the center top of the hat. Seed details are applied last using cream yarn with duplicate stitch embroidery.
Step-by-Step Crochet Instructions
- Using strawberry red yarn, cast on 72 stitches.
- Work 6 rows in K1, P1 ribbing (this creates a stretchy brim).
- Switch to stockinette stitch: knit all right side rows, purl all wrong side rows, until the piece measures about 12 cm from the cast-on edge.
- Begin crown shaping on right side rows (wrong side rows remain purled):
- Row 1: K7, K2tog repeat around, 64 sts remain.
- Row 3: K6, K2tog repeat, 56 sts remain.
- Row 5: K5, K2tog repeat, 48 sts remain.
- Row 7: K4, K2tog repeat, 40 sts remain.
- Row 9: K3, K2tog repeat, 32 sts remain.
- Row 11: K2, K2tog repeat, 24 sts remain.
- Row 13: K1, K2tog repeat, 16 sts remain.
- Row 15: K2tog across, 8 sts remain.
- Purl all wrong side rows between decreases.
- Cut yarn, thread tail through remaining 8 stitches and pull closed. Secure and seam the back of the hat neatly.
- For the 5 leaves: cast on 3 green stitches.
- Knit 2 rows flat.
- Next right side row: Kfb, K1, Kfb (increase to 5 stitches).
- Knit 2 rows.
- Next right side row: SSK, K1, K2tog (decrease to 3 stitches).
- Knit 1 row.
- Next right side row: slip 1, K2tog, pass slipped stitch over (decrease to 1 stitch).
- Fasten off and make 4 more leaves the same way.
- Sew the 5 leaves evenly spaced around the crown of the hat using tapestry needle and green yarn.
- For the stem: cast on 4 green stitches, knit 8 rows (garter stitch), bind off.
- Sew the stem centered on top of the hat.
- Using cream yarn and duplicate stitch technique, add several small seed shapes randomly over the red body of the hat.
- Weave in all loose ends.
Assembly and Finishing
Once the body and crown shaping are complete, pull the top closed and secure with a tidy back seam to create a rounded crown shape. Attaching knitted leaves evenly improves the hat’s strawberry likeness and balances the texture. The small knitted stem positioned at the top center adds the final authentic touch. When adding the seed duplicate stitch, use subtle, small stitches to resemble strawberry seeds without overpowering the knit fabric. Always weave in ends safely inside the hat to avoid any scratchy spots for baby wearing comfort.
Helpful Tips
- Keep your tension even throughout, especially during decreases, to maintain a smooth crown shape.
- Use stitch markers to mark decrease repeats on crown shaping rows for easier counting.
- When sewing leaves and stem, position them before fully finishing the hat so placement feels natural.
- Duplicate stitch seeds using a stranded embroidery needle work best for small, neat seed shapes.
- Select soft DK yarn suitable for babies, and pre-wash yarn if desired for shrinkage control.
- Blocking your finished hat lightly can help even out rows and improve overall shape.
Common Mistakes to Avoid
- Skipping or miscounting decrease stitches will cause uneven shaping—count carefully after each crown shaping row.
- Pulling yarn too tightly when threading through top stitches can gather the crown unnaturally; keep stitches loose enough to form a gentle curve.
- Sewing leaves unevenly can look unbalanced; measure spacing before stitching.
- Duplicate stitch too large or uneven seeds can detract from the look; practice on swatch fabric first.
- Not weaving ends securely could cause unraveling, especially important in baby items.
Customization Ideas
- Try variegated or self-striping red yarn for a subtle variation in strawberry color texture.
- Use a different shade of green for leaves and stem for contrast or seasonal themes.
- Add a tiny crochet flower or bow alongside leaves for a sweeter look.
- Increase stitch count and length for a toddler or older child size.
- Replace duplicate stitch seeds with small sewn beads or French knots for extra texture.
How to Use or Display This Crochet Project
This adorable strawberry baby hat is perfect as a photo prop for newborn or baby photoshoots, as a practical accessory to keep little ones cozy, or as a thoughtful handmade gift for baby showers and birthdays. Its playful design also makes it a charming decorative piece to hang as nursery art when not in use. For knitters who enjoy exploring fun accessory projects, pairing this hat with other themed items like the elegant bluebell drop earrings pattern can inspire a wardrobe of handcrafted delights. Babies can wear this hat throughout cooler months, layering it with sweaters and booties for a complete cozy look.
Care Instructions
Hand wash the hat gently in lukewarm water with mild detergent to protect the soft yarn and stitched details. Avoid wringing; instead, press out excess water by rolling the hat in a towel. Lay flat to dry away from direct heat or sunlight to preserve color vibrancy and shape. If using machine-washable DK yarn, opt for a gentle cycle and a mesh laundry bag to protect the piece, but hand washing is safest to extend the life of delicate embroidery and sewn-on leaves. Store in a dry place to prevent mildew or snagging.
Frequently Asked Questions
Q: Can I knit this hat using a crochet hook instead?
A: This pattern is specifically designed for knitting techniques (ribbing, stockinette, shaping by decrease stitches), so it won’t translate directly to crochet. However, there are similar strawberry hat patterns for crochet if you prefer.
Q: How do I make the duplicate stitch seeds look neat?
A: Use a fine tapestry needle and stitch small ‘V’ shapes over just a couple of stitches at a time. Practice on scrap knits to control sizing.
Q: What if I want a looser or more slouchy hat?
A: Use a larger needle size or a looser tension, but be mindful that the fit will be less snug and shaping may appear less defined.
Q: Can this pattern be adapted for different sizes?
A: Yes, by adjusting cast-on stitches in multiples of the ribbing pattern and length before crown shaping, you can make bigger or smaller hats.
Q: How to prevent the stem or leaves from flopping?
A: Use slightly firmer yarn or add a small interfacing piece by hand-sewing inside the knitted pieces before attaching for more structure.
Final Thoughts
Knitting this strawberry baby hat brings together classic knitting skills with adorable finishing touches that make every stitch rewarding. It’s a wonderful project to challenge yourself with shaping and embroidery while ending up with a delightful, practical garment perfect for gifting or everyday baby wear. With patience and attention to detail, you’ll create a charming little hat sure to brighten chilly days and warm hearts.



