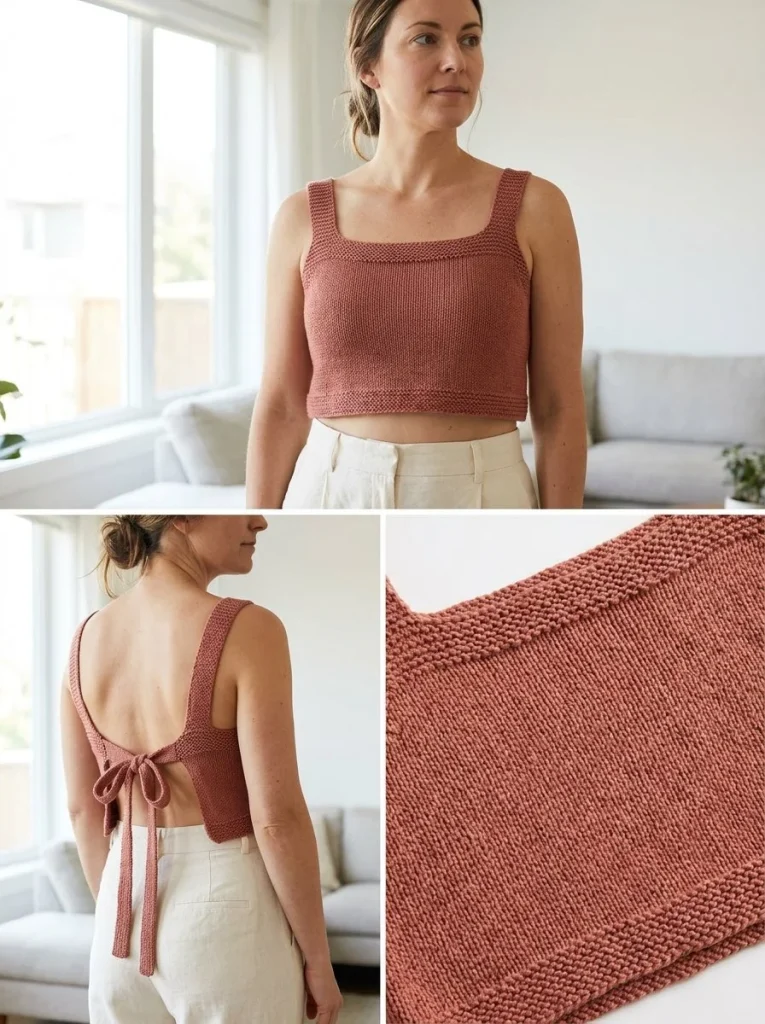
This easy tie-back knit crop top is a fresh, stylish piece perfect for warm days or layering when the weather cools down. Designed for an adult size S/M, this pattern features a cozy cotton-blend yarn that keeps the fabric breathable and soft, ideal for everyday wear. The top’s square neckline and wide shoulder straps with long back ties give it a flattering, adjustable fit that suits various body shapes. While knitting rather than crocheting, this project remains accessible for beginners comfortable with basic knit and purl stitches, making it a great stash-busting project to add charm to your handmade wardrobe. Speaking as someone who loves seasonal projects, I like to pair wearable patterns like this with smaller decorative crafts—for example, exploring easy crochet touches can complement your garment collection nicely, especially with cute designs like mini pumpkins that add a cozy vibe to your craft corner or fall décor (mini amigurumi pumpkin pattern).
Why You’ll Love This Crochet Pattern
- Classic knit stitches make it easy to follow, even for beginners stepping into garment knitting.
- Adjustable back ties ensure a comfortable, personalized fit while keeping the upper back airy and stylish.
- The square neckline and clean garter stitch edges provide a neat, polished look with minimal finishing.
- DK cotton-blend yarn creates a breathable fabric that works well for spring and summer styles.
- Compact construction—knit front panel, separate straps, and back ties—makes assembly straightforward.
- A practical yet chic piece, great for casual outings or layering under jackets and cardigans.
Finished Size
This crop top fits an adult S/M, roughly 30 cm in length for the main body panel before attaching straps and ties. Width at cast-on is 76 stitches (about 38 cm depending on gauge). Keep in mind your sizing may vary due to differences in yarn batch, tension, or needle choice. Adjusting the number of stitches and strap length allows easy customization for other sizes.
Skill Level
Intermediate beginner. While the stitch pattern uses only knit and purl, the shaping through bind-offs, decreases, and working separate shoulder sections requires attention. Some familiarity with picking up stitches or casting on for the narrow shoulder straps and back ties is helpful but not complicated.
Materials Needed
- DK weight cotton-blend yarn (e.g., terracotta or dusty rose for a soft earthy tone)
- 4 mm knitting needles (straight or circular depending on preference)
- Stitch holders or scrap yarn to hold live stitches on shoulders
- Tapestry needle for weaving ends and sewing straps
- Scissors
- Optional: blocking mats and pins to shape finished garment nicely
Stitches and Abbreviations
- Knit (K): knit stitch
- Purl (P): purl stitch
- Bind Off (BO): cast off stitches to finish edges
- Decrease (dec): knit two stitches together (k2tog) or use slip-slip-knit (ssk) for edging
- Stockinette stitch (st st): alternate rows of knit and purl creating smooth fabric on right side
Gauge and Tension Notes
The gauge for this project is about 20 stitches = 10 cm in stockinette. Maintaining consistent tension is important for an even fabric and proper fit, but exact gauge is not critical—adjust stitch count if you tend to knit tightly or loosely. Blocking after assembly will help shape the piece and even out the stitches.
Pattern Notes Before You Start
This top is worked in several parts:
- The main front panel is knit flat in rows with shaping for armholes and a square neckline.
- The shoulders are separated and worked individually, held on stitch holders between sections.
- Wide shoulder straps are knit separately in garter stitch and sewn to the front shoulders and lower back corners to create the open back effect.
- The long back ties are picked up or cast on near the lower back edges and worked separately for tying.
No color changes are required, keeping the fabric uniform and simple. All stitching is done flat with seaming to complete assembly.
Step-by-Step Crochet Instructions
- Front Panel
Cast on 76 stitches. Knit 6 rows in garter stitch for the lower border. - Switch to stockinette stitch (knit one row, purl one row) until the piece measures approximately 22 cm.
- Armhole Shaping: Bind off 5 stitches at the beginning of the next 2 rows (one armhole edge each row), leaving 66 sts.
- Decrease 1 stitch at each edge on the next 4 right-side (RS) rows, working decreases at the start and end of RS rows to shape armholes (reduce to 58 sts). Continue until piece reaches about 30 cm total length.
- Square Neckline: On the next RS row, knit 14 sts, bind off center 30 sts, knit remaining 14 sts to create the neck opening.
- Work each 14-st shoulder section separately for about 6 cm, maintaining outer 3 stitches in garter stitch for clean edges. Bind off when done.
- Shoulder Straps: Cast on 12 sts for each strap. Knit in garter stitch for 32–36 cm. Make two straps. Sew one short end of each strap securely to its corresponding shoulder section on the front panel.
- Attach the other short end of each strap to the back waist corners to keep the upper back open.
- Back Ties: Pick up or cast on 8 sts near each side edge of the lower back line and knit each tie in garter stitch for 45 cm. Bind off.
- Tie both back ties into a single bow at mid-back.
Assembly and Finishing
Sew shoulder straps firmly to both the front panel and back lower corners to ensure stability and the intended open-back look. Weave in all loose yarn ends carefully using a tapestry needle for a neat finish. Lightly block your top to even out stitches and improve drape; this also helps the garment fit more comfortably after knitting.
Helpful Tips
- Keep a stitch marker on the first stitch of each RS row to easily track decreases and shaping.
- Use stitch holders or scrap yarn for the live shoulder stitches to prevent stretching or dropped stitches.
- When sewing straps, pin them in place and try on the piece if possible to confirm fit before final stitching.
- Blocking with gentle steam can smooth edges without flattening the garter stitch texture.
Common Mistakes to Avoid
- Skipping decreases at armholes can result in a tight fit—make sure to reduce stitches exactly as instructed.
- Forgetting to bind off center stitches for the neckline will distort the shape; count carefully before binding off.
- Uneven tension on back ties may affect how nicely the bow lies—keep stitches loose but consistent.
- Not sewing straps securely can cause them to loosen with wear and lose the open back’s effect.
Customization Ideas
- Change yarn colors to mood-rich earth tones or pastels for seasonal variations.
- Modify strap length or width to make the top suitable for different body sizes or styling preferences.
- Add a few decorative stitches or lace edges along the neckline for a feminine touch.
- Use organic cotton or hemp blends for a sustainable wardrobe addition.
How to Use or Display This Crochet Project
Wear this knit crop top on warm days, pairing with high-waisted pants or skirts for a laid-back, stylish look. The open back with tie closure adds visual interest and breathability, making it ideal for layering with jackets or cardigans as temperature changes. It also makes a thoughtful handmade gift for friends who love casual, wearable knitwear. For a seasonal crafting twist, pairing wearable projects like this with decorative crochet additions can brighten your creative space—consider how handmade fall décor complements your clothing pieces, such as using a pumpkin garland string pattern to set a cozy atmosphere.
Care Instructions
Hand wash gently in cool water with mild detergent to preserve yarn softness and avoid stretching. Lay flat to dry away from direct sunlight to maintain color vibrancy and shape. Store folded in a drawer rather than hanging to prevent shoulder stretching.
Frequently Asked Questions
Q: Can I use a different yarn weight?
A: Yes, but you’ll need to adjust stitch counts and needle size accordingly to maintain a good fit.
Q: How do I increase the size beyond S/M?
A: Add extra stitches in multiples of your gauge across the cast-on and adjust length measurements and tie lengths proportionally.
Q: Is this pattern suitable for true beginners?
A: It’s best for intermediate beginners because it includes shaping and working with multiple pieces, but knitters comfortable with knit and purl stitches will find it manageable.
Q: Can I substitute crochet for knitting in this pattern?
A: This design relies on the stretch and appearance of knit stockinette and garter stitch, so it’s not recommended to substitute crochet stitches directly.
Q: How do I keep the edges from curling on this stockinette fabric?
A: The garter stitch borders at bottom and straps help stabilize edges. Blocking also improves edge lie.
Final Thoughts
This easy knit crop top pattern brings together simplicity, comfort, and style in one versatile project. Adjusting the fit with back ties and wide straps means you get a piece tailored just for you without overcomplicated steps. As you gain confidence, you might find yourself blending this wearable technique with charming crochet accents, expanding your handmade wardrobe with both softness and seasonal touches. Enjoy making and wearing your new favorite handmade top!



