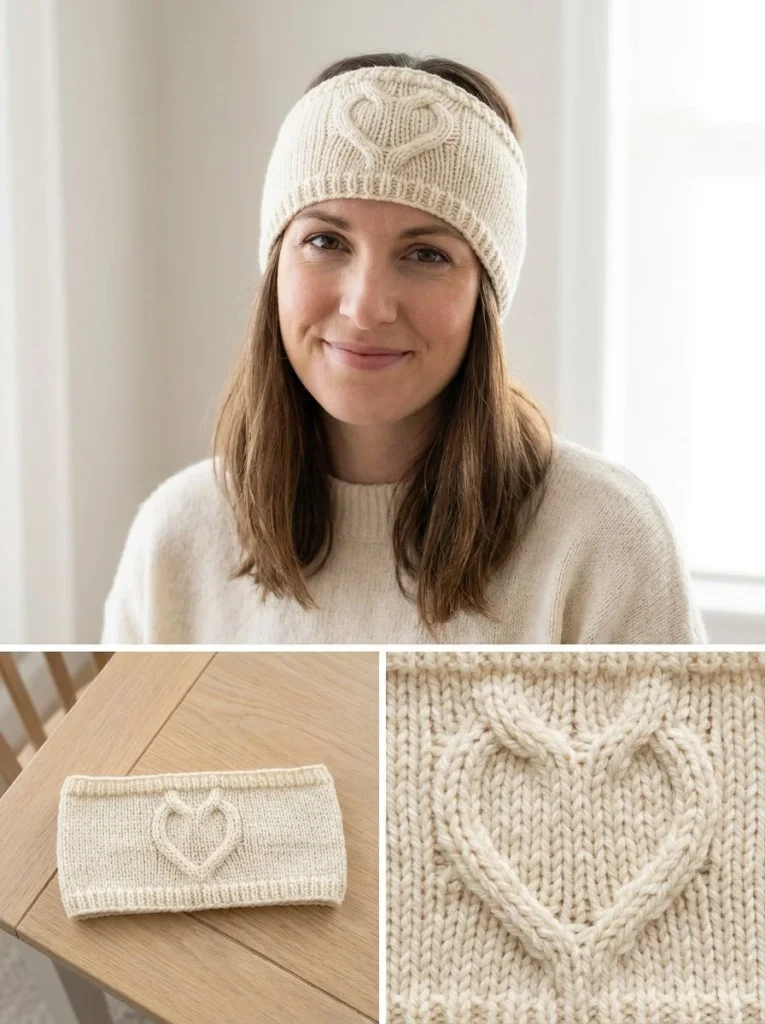
This Raised Heart Cable Ear Warmer combines cozy warmth with a charming, textured detail that’s perfect for chilly days. The design uses classic K1, P1 ribbing to create a stretchy, comfortable band that fits snugly, while the standout feature is the raised heart formed by a knitted I-cord sewn right onto the front. It’s an ideal project for knitters who appreciate simplicity with a touch of personality. I love how the cord adds a subtle 3D effect—the kind of small detail that really elevates a beginner-friendly pattern without complicating it. Plus, it makes a sweet, thoughtful handmade gift. If you enjoy projects that let you practice basic stitches but still create something visually appealing, this ear warmer is a great choice. For inspiration on complementary accessories, you might also like this bluebell drop earrings pattern, which shares the same approachable charm and handmade spirit.
Why You’ll Love This Crochet Pattern
- Uses straightforward stitches, making it beginner-friendly yet visually interesting.
- The ribbed band provides excellent stretch and comfort for various head sizes.
- Raised heart cable adds texture and character without complicated cable knitting.
- Lightweight and easy to wear all day for warmth and style.
- A quick project with minimal finishing but big impact.
- Perfect gifting size: practical, cute, and stylish.
Finished Size
The completed ear warmer measures approximately 10 cm wide and 50 to 52 cm long before seaming. Because the ribbing is stretchy, the final fit will naturally adjust to your head size. Slight variations in yarn weight, needle size, or personal tension might alter dimensions modestly, so it’s best to verify length lightly stretched before binding off.
Skill Level
Advanced beginner. This pattern relies on basic knit stitches (knit and purl) and includes working an I-cord, which is simple but may be new if you haven’t tried it before. The finishing involves sewing the cord into a raised heart shape, requiring some neat hand-stitching. Overall, it’s accessible but encourages skill growth.
Materials Needed
- Worsted-weight yarn in a soft warm cream or dusty blush color
- US 7 (4.5 mm) knitting needles (straight or circular)
- Tapestry needle for weaving in ends and sewing the I-cord heart
- Scissors
- Optional: Stitch markers for marking rows or rib pattern repeats
Stitches and Abbreviations
- K (Knit): Insert needle into next stitch from front to back, wrap yarn around and pull through.
- P (Purl): Bring yarn to front, insert needle from back to front, wrap yarn and pull through.
- I-cord: A narrow knitted cord worked back and forth on a few stitches; creates a flexible, rounded piece ideal for shaping designs like the raised heart.
Gauge and Tension Notes
Gauge is flexible for this project due to the ribbed structure and stretchiness. It’s important to maintain consistent tension so the ribbing lies flat and elastic without being too tight or loose. The length should measure about 48 to 50 cm when stretched lightly before binding off to ensure a comfortable fit.
Pattern Notes Before You Start
This ear warmer is knit flat in rows to form a ribbed band, with the short ends seamed to form a circle. The raised heart cable is made separately by knitting an I-cord, which is then shaped and sewn onto the band’s front. No color changes are involved, keeping the process simple and beginner-friendly. Maintaining even rib pattern tension throughout will help the sewn-on heart rest nicely without distortion.
Step-by-Step Crochet Instructions
- Cast on 22 stitches using long-tail cast-on or your preferred stretchy method.
- Work in K1, P1 ribbing for every row until the strip measures about 48 to 50 cm, measuring gently with slight stretch.
- Bind off loosely to maintain elasticity.
- Seam the short ends together with mattress stitch, positioning the seam at the back.
- For the raised heart: Using the same yarn, cast on 4 stitches.
- Knit a 4-stitch I-cord for about 28 to 32 cm in length.
- Bind off, leaving a long tail for sewing.
- Lay the band flat with the seam centered at the back.
- Shape the I-cord into a heart at the front center: create two rounded top lobes with a shallow dip between, cross the two lower curves toward a pointed bottom. Keep the heart approximately 7 to 8 cm wide.
- Pin or tack the heart shape firmly in place.
- Sew the cord to the band invisibly about every 1 to 2 cm, taking care not to flatten the raised cord.
- Secure the pointed bottom and the top dip well with extra stitches for stability.
- Weave in all ends neatly on the inside.
Assembly and Finishing
Seaming the ribbed band with mattress stitch makes an almost invisible join, keeping the look smooth and professional. When sewing the I-cord heart, use small, neat stitches so the cord stands proud without being squashed. Pinning the shape well before sewing helps maintain symmetry. Weaving in yarn tails on the wrong side will keep the ear warmer comfortable against the skin.
Helpful Tips
- Blocking your ribbed band slightly before seaming can help settle stitches evenly.
- If you’re new to I-cords, practice on a swatch to get comfortable with their smooth tension.
- Use tapestry needles with blunt tips to avoid splitting yarn when sewing.
- When pinning the I-cord heart, adjust gently to get a neat, proportional shape.
- Keep your seam stitches loose enough to preserve elasticity in the band.
- Lighter colors show neat finishing better, so take time to weave in ends carefully.
Common Mistakes to Avoid
- Binding off too tightly—this reduces ear warmer stretch and comfort.
- Not measuring length while stretched can cause sizing issues.
- Flattening the I-cord during sewing, which ruins the raised effect.
- Uneven seaming causing twisted or misshapen band circumference.
- Leaving tails unwoven, which can unravel or irritate skin.
Customization Ideas
- Try using variegated or speckled worsted yarn for a textured look.
- Add small embroidered details around the heart for subtle personalization.
- Make the ear warmer wider or narrower by adjusting cast-on stitches in multiples of two.
- Use a softer, bulky yarn for extra warmth and a squishier feel.
- Experiment with colorful I-cord hearts to contrast or complement the band color.
For an added touch of handmade elegance, consider exploring the metallic thread huggie earrings crochet jewelry pattern, which pairs beautifully as an accessory to cozy handmade wear.
How to Use or Display This Crochet Project
Wear your ear warmer to keep ears cozy during outdoor walks or early morning runs. It’s a stylish alternative to hats when you want less bulk but still need warmth. This piece also makes a heartfelt handmade gift perfect for winter birthdays or holiday swaps. When not in use, store flat or folded gently to keep the ribbing elastic and prevent creasing.
Care Instructions
Hand wash your ear warmer gently in cool water with mild detergent, then lay flat to dry to maintain shape and stretch. Avoid wringing or twisting, as this can distort the rib pattern and I-cord detail. If your yarn is machine washable, use a gentle cycle inside a mesh bag and air dry flat. Storing in a breathable cotton bag will protect the piece from dust when not in use.
Frequently Asked Questions
Q: Can I adjust this pattern for different head sizes?
A: Yes—simply cast on more or fewer stitches in multiples of two to maintain the rib pattern and judge length by stretching gently as you go.
Q: Is knitting experience necessary for this crochet pattern?
A: While this technically uses knitting stitches, the overall construction focuses on simplicity and beginner-friendly techniques, including the I-cord. It’s an easy introduction to integrating simple knit skills.
Q: Can I use different yarn weights?
A: Worsted weight is recommended for fit and warmth, but you can try lighter or bulkier yarns; just keep in mind adjustments to needle size and length will be necessary.
Q: How do I keep the raised heart from flattening over time?
A: Use neat, loose sewing stitches and avoid pulling the cord too tight when attaching. Storing flat also helps preserve shape.
Q: What’s the best way to sew the cord heart invisibly?
A: Use small whip or back stitches along one side of the I-cord, catching only a strand or two of the ribbing band for subtle attachment without visible sewing lines.
Final Thoughts
This Raised Heart Cable Ear Warmer is a delightful blend of cozy comfort and charming design detail, perfect for beginners ready to try a small, manageable addition to their knitting skills. Its simple construction paired with the textured heart motif makes it a unique yet accessible project worth adding to your handmade accessories collection. Enjoy the process and the heartwarming results!



