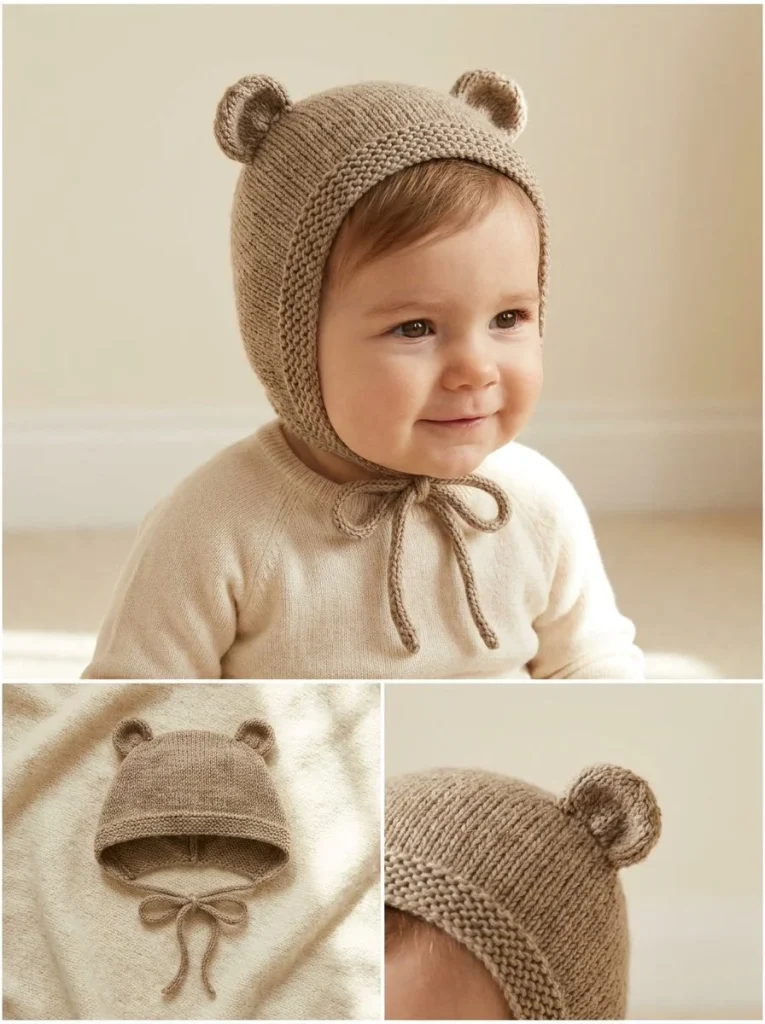
This Woodland Bear Baby Bonnet knitting pattern is a charming and practical project designed to fit babies aged 6 to 12 months. The adorable bonnet features a cozy crown shape with cute, shaped ears that give it a woodland-inspired bear look. It’s a perfect gift for new parents or a delightful addition to your baby’s winter wardrobe. The pattern uses simple techniques like garter stitch, stockinette, and basic decreases, making it approachable even for knitters who are comfortable with the fundamentals but looking to try gentle shaping. One thing I love about this bonnet is how the small details, like folding the lower ear edges slightly before sewing them on, really help the finished shape feel natural and snug without being tight. If you’re also exploring beginner-friendly projects, you might appreciate the clear instructions in the cherry blossom crochet hair comb pattern, which complements small scale wearable accessories nicely.
Why You’ll Love This Crochet Pattern
- It provides a warm, snug fit that’s ideal for babies during chillier months.
- The knitting techniques used help build confidence with shaping and finishing.
- The charming bear ear detail adds playful character without complicated construction.
- The project is fast to knit, making it a satisfying gift to finish quickly.
- Detailed shaping instructions prevent common fit issues often seen in baby bonnet patterns.
- Practical maker-friendly notes help avoid gaps and uneven edges through consistent tension.
Finished Size
The Woodland Bear Baby Bonnet will fit an average baby head measuring about 44 to 46 cm (17–18 in) in circumference, suitable for approximately 6 to 12 months old. Keep in mind that size may vary slightly depending on your yarn choice, knitting tension, and needle size, so a quick gauge check is recommended for the best fit.
Skill Level
This pattern is perfect for an advanced beginner knitter. While the stitch repertoire is basic—mainly knit (K), purl (P), and simple decreases (K2tog, SSK)—working the crown shaping and picking up stitches for the ties and ears introduces helpful intermediate skills without overwhelming complexity.
Materials Needed
- DK weight baby yarn in a warm oatmeal-brown shade (approx. 50g)
- 4 mm straight knitting needles, or size needed to achieve gauge
- Tapestry needle for weaving in ends and sewing seams
- Scissors
- Stitch markers (optional, but helpful for marking crown decreases)
- Optional: stitch holder or scrap yarn to hold stitches if needed
Stitches and Abbreviations
- Knit (K): Knit stitch.
- Purl (P): Purl stitch.
- K2tog (knit two together): A right-leaning decrease.
- SSK (slip, slip, knit): A left-leaning decrease.
Gauge and Tension Notes
While exact gauge is less critical for baby accessories, maintaining even tension will ensure a neat fabric that sits well without too much stretch or tightness. Aim for a comfortable, slightly elastic gauge that matches the feel of your chosen DK yarn on 4 mm needles. Knitting a small swatch before starting helps confirm your tension and avoids surprises with sizing.
Pattern Notes Before You Start
This bonnet is knitted flat in rows rather than rounds, starting with a garter stitch section for the face edge, then moving into stockinette. The crown shaping is done by decreasing on right side rows. After finishing the main piece, separate ears and ties are knitted and sewn on. The back seam is sewn closed to shape the bonnet’s crown. No color changes are involved, keeping construction straightforward and beginner-friendly.
Step-by-Step Crochet Instructions
-
Cast on 72 stitches.
Work 6 rows in garter stitch (knit every row) to create a soft, stretchy face edge. -
Continue in stockinette stitch (K on RS, P on WS rows) until the piece measures about 11 cm from the cast-on edge.
-
Begin crown shaping on right side rows:
Row 1 (RS): K7, K2tog repeat around, ending with 64 stitches.
Row 2 (WS): Purl row. -
Row 3 (RS): K6, K2tog around, ending with 56 stitches.
Row 4 (WS): Purl row. -
Continue decreasing on every RS row by knitting one fewer stitch before each K2tog, purling back on WS rows, until 16 stitches remain.
-
Next RS row: K2tog across all stitches, leaving 8 stitches.
-
Cut yarn, leaving a tail long enough to thread through remaining stitches; pull tight to close the crown tip, secure, and fasten off.
-
Seam the back edge from crown to lower edge using mattress stitch or preferred sewing method for a clean finish.
-
Knitting the ears (make 2):
Cast on 10 stitches.
Knit 2 rows.
On every other row, knit 2 together at the beginning and slip-slip-knit (SSK) at the end until 2 stitches remain. Bind off. -
Slightly fold the lower edge of each ear to create a gentle cup shape and sew near the upper crown, spaced evenly.
-
Ties:
At each lower front corner, pick up 3 stitches and work an I-cord or narrow garter stitch strip about 25 cm long; bind off. -
Weave in all ends neatly.
-
Lightly block the bonnet for shaping and softening the fabric.
Assembly and Finishing
After seaming the back crown and attaching the ears, ensure the ears are sewn symmetrically and securely for durability. Pick up edge stitches for the ties carefully to avoid holes, and keep tension consistent on the I-cords. Ties should be firm enough to hold but flexible to tie comfortably under the chin. A soft blocking steam or wet block helps even out any uneven stitches and sets the shape nicely without flattening the texture.
Helpful Tips
- Use stitch markers at each K2tog location during decreases to track progress and avoid mistakes.
- Fold the ear edges before sewing to mimic natural ear curves—this adds character without extra shaping.
- Keep tension even especially during crown decreases to prevent puckering or loose gaps.
- If your yarn feels slippery, try using needles with a bit more grip for control.
- To keep a neat edge when picking up stitches for ties, insert the needle between rows rather than through loops.
Common Mistakes to Avoid
- Skipping the garter stitch edge can result in a less stretchy, tighter fit around the face.
- Missing decreases or misaligning K2tog with K7, K6, etc., will distort the crown shape—count stitches frequently.
- Uneven tension when knitting ties or ears can make them look mismatched or sloppy.
- Forgetting to weave in ends securely risks unraveling during wear or washing.
- Attaching ears asymmetrically can make the bonnet appear off-balance.
Customization Ideas
- Swap the warm oatmeal-brown yarn for a soft pastel or variegated shade for seasonal personalization.
- Use a slightly bulkier or finer DK weight yarn and adjust needle size to alter the finished size lightly.
- Add a small pom-pom or button nose detail to enhance the bear look further.
- Instead of ties, try a stretchy ribbed band worked in the same yarn for quick on-and-off wear.
How to Use or Display This Crochet Project
This baby bonnet is perfect for outdoor strolls in cooler weather, adding photo-ready charm to milestone pictures or family gatherings. It also makes a thoughtful handmade gift that balances practical use with sweet style. Display it alongside other handmade baby accessories, or safely pack it as part of a newborn care package.
Care Instructions
To maintain the bonnet’s softness and shape, hand wash gently in lukewarm water with mild wool detergent. Avoid wringing; lay flat to dry, reshaping ears and crown lightly while damp. Store in a breathable bag or box away from direct sunlight to prevent fading and preserve yarn quality.
Frequently Asked Questions
Q: Can I substitute crochet instead of knitting for this bonnet?
A: This pattern is designed for knitting, and while you can adapt basic shaping, the texture and stretch will differ in crochet. For crochet beginners, exploring simple accessory projects might be a good starting point before attempting bonnet shaping.
Q: How do I know if the bonnet will fit other baby sizes?
A: Gauge and yarn choice affect sizing. For a smaller or larger fit, adjust needle size or yarn weight and knit a test swatch.
Q: Can I wash this bonnet in a machine?
A: It depends on the yarn fiber. Most DK baby yarns recommend gentle hand washing to avoid felting or shrinkage.
Q: What’s the best way to sew on the ears securely?
A: Use a tapestry needle and matching yarn to whipstitch firmly around the ear edges. Reinforce with a few extra stitches at the base.
Q: Are there any yarn recommendations besides DK weight for this pattern?
A: DK weight provides the right warmth and drape. You can substitute fingering or worsted weights but adjust needle size and test gauge accordingly.
Final Thoughts
This Woodland Bear Baby Bonnet is a sweet, functional piece that blends gentle shaping with playful details. I hope you enjoy making it as much as I enjoyed designing and testing it. Whether for your own little one or as a gift, it’s a cozy, handmade treasure that’s sure to delight any baby and crafter alike. Happy knitting!



