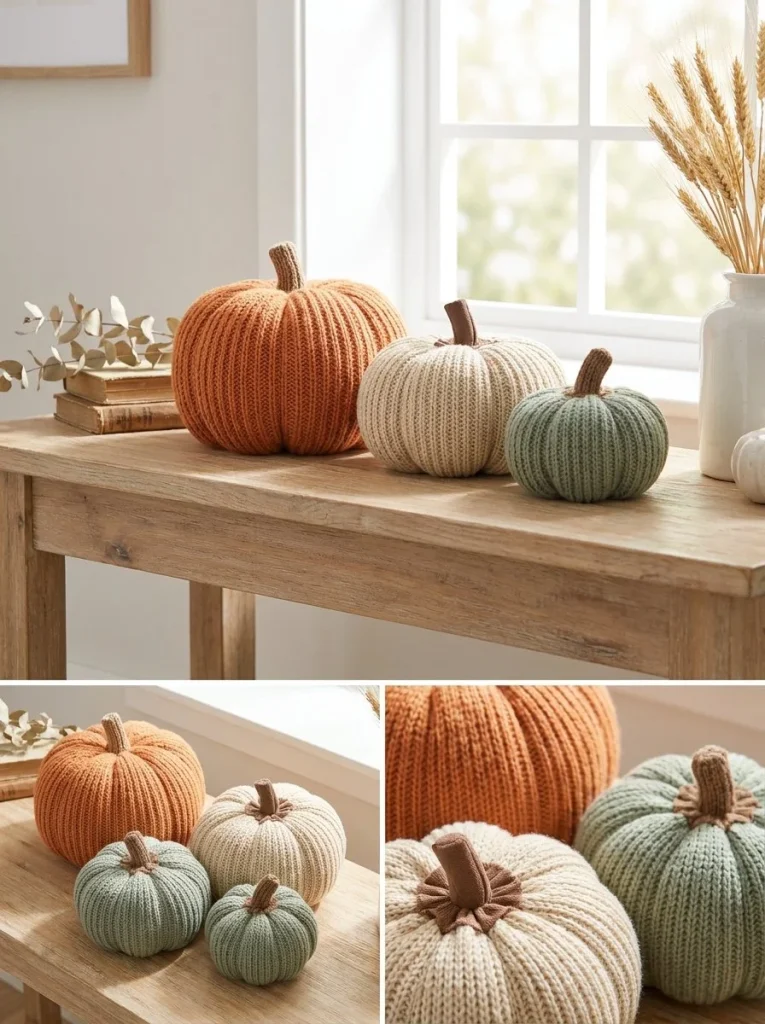
Easy flat-knit pumpkin projects are a charming way to bring seasonal warmth and texture into your home without fuss. This trio pattern lets you knit three pumpkins in different sizes using a simple 2×2 rib stitch, creating cozy, squishable decorations that look fantastic as a group. Using basic knitting—not crochet—techniques, it’s approachable for beginners familiar with knit and purl stitches, and it’s a quick project that rewards you with satisfying results. I love how the ribbing naturally adds some pumpkin-like texture, and the gentle grooves formed by wrapping yarn around the pumpkin segments help define shape without complicated shaping. If you enjoy exploring fall crafts, this pattern pairs wonderfully with beginner crochet pumpkin designs like the mini amigurumi pumpkin tutorial, giving you plenty of options for a seasonal handmade collection.
Why You’ll Love This Crochet Pattern
- Uses only knit and purl stitches, making it easy to master even if you’re new to knitting
- Creates three different sized pumpkins for versatile decor or gifting
- The 2×2 rib stitch texture adds natural pumpkin ridges without extra shaping
- A fast project that finishes quickly with satisfying tactile results
- Offers customization through yarn color and stem styles
- Seamless assembly keeps edges neat and professional-looking
Finished Size
The pumpkins finish approximately as follows, but size may vary depending on your tension and yarn choice:
- Small sage pumpkin: about 16 cm tall
- Medium oatmeal pumpkin: about 20 cm tall
- Large orange pumpkin: about 24 cm tall
Skill Level
This project is suitable for beginners who can knit and purl, as it uses simple ribbing and basic assembly. If you’re comfortable forming tubes and sewing closed ends, you’ll find this pattern straightforward and very rewarding.
Materials Needed
- Worsted-weight yarn in muted pumpkin orange, creamy oatmeal, and sage green
- 5 mm knitting needles (US 8)
- Fiberfill stuffing
- Brown yarn or felt for pumpkin stems
- Tapestry needle for sewing and weaving ends
- Scissors
Stitches and Abbreviations
- K = Knit
- P = Purl
- K2, P2 rib = Knit 2 stitches, Purl 2 stitches, repeat across the row
Gauge and Tension Notes
Gauge is not critical for this pattern; however, maintaining consistent tension while knitting the rib stitch will produce evenly shaped pumpkins with clean ridges. Too loose tension might make stuffing show through; too tight might make the tube stiff and difficult to close.
Pattern Notes Before You Start
Each pumpkin is knit flat as a rectangular piece using the same 2×2 rib pattern but with varying stitch counts and lengths to achieve size differences. After binding off, the rectangle is seamed into a tube, then both ends are gathered and closed to make the pumpkin’s round shape. The shaping is enhanced by wrapping yarn around the circumference to gently pinch grooves. The stem is added afterward as a small roll, i-cord, or felt shape and sewn on.
Step-by-Step Crochet Instructions
-
Small Pumpkin (Sage Green)
- Cast on 28 stitches.
- Work in K2, P2 rib pattern for about 16 cm.
- Bind off, leaving a long yarn tail.
-
Medium Pumpkin (Oatmeal)
- Cast on 36 stitches.
- Work in K2, P2 rib pattern for about 20 cm.
- Bind off, leaving a long yarn tail.
-
Large Pumpkin (Pumpkin Orange)
- Cast on 44 stitches.
- Work in K2, P2 rib pattern for about 24 cm.
- Bind off, leaving a long yarn tail.
-
Seaming Tubes
- Seam the side edges or the first and last rows of each rectangle together using mattress stitch or your preferred seaming method, forming a tube.
-
Closing and Stuffing
- Thread the yarn tail through the stitches at one open edge with a tapestry needle; pull tightly to close.
- Stuff the pumpkin firmly using fiberfill, shaping it hand to keep a soft but rounded form.
- Repeat to close the second open edge securely.
-
Adding Segment Grooves
- With a long piece of matching yarn, wrap around the body vertically 5 or 6 times evenly spaced, pulling gently to form soft grooves that mimic pumpkin segments. Tie the yarn securely at the top.
-
Making and Attaching Stems
- Create a short brown stem by rolling a small knitted rectangle, making a short I-cord, or wrapping felt.
- Sew the stem firmly to the top center of each pumpkin.
-
Finishing Up
- Shape the pumpkins by hand, smooth any seams, weave in all ends to keep the look tidy.
Assembly and Finishing
Complete seaming firmly but gently to avoid puckered edges. When closing ends, pull the yarn evenly without distorting stitches. Stuffing should be squishy but supportive to hold shape. Use the yarn wraps carefully to control pumpkin grooves — pulling too tightly can pucker the fabric unevenly. The stems can be shaped to remain upright or slightly leaning for a natural appearance.
For a fun variation, try combining these flat-knit pumpkins with decorative accents from other fall projects like the pumpkin garland pattern, which offers great inspiration for fall display ideas.
Helpful Tips
- Practice your seaming on scrap ribbing for a clean join before working on pumpkins.
- Use a blunt tapestry needle for easier threading through ribbed stitches.
- Stuff lightly at first, add more for a firmer shape if needed.
- For smoother grooves, wrap the segment yarn wraps evenly spaced and don’t over-tighten.
- When making stems, choose a method that fits your skill level — felt is easiest while knitted stems add texture.
Common Mistakes to Avoid
- Avoid casting on too loosely; loose edges can look sloppy when seamed.
- Don’t skip leaving a long tail for closing edges — short tails complicate finishing.
- Watch that your rib pattern lines up perfectly at seams to prevent twisting tubes.
- Be careful not to overstuff pumpkins, which can distort stitches and seams.
- Don’t pull the groove yarn wraps too tight, which may pucker fabric unevenly.
Customization Ideas
- Experiment with different worsted yarn textures like tweed, chenille, or cotton blends.
- Dye your own yarn in varying autumn shades for unique pumpkin sets.
- Add embroidered leaves or vines for an elegant touch.
- Make smaller or larger pumpkins by adjusting stitch counts and lengths.
How to Use or Display This Crochet Project
These pumpkins make perfect fall mantel decorations, table centerpieces, or cozy shelf accents. Grouping the trio creates a quaint harvest theme. They also make thoughtful gifts for knitters and seasonal decorators alike and work well as soft kid-friendly toys. Pair your pumpkins with matching fall decor, wreaths, or garlands for a complete look.
Care Instructions
To clean, gently hand wash in cool water with mild detergent. Lay flat to air dry to preserve shape. Avoid machine washing or drying as this may distort the ribbing and stuffing. Store away from direct sunlight to prevent fading of yarn colors.
Frequently Asked Questions
Q: Can I use crochet instead of knitting for this pattern?
A: This pattern is designed for knitting using K2, P2 rib. While similar crochet rib patterns exist, the assembly and texture will differ. For beginner crochets wanting similar pumpkins, consider the linked mini amigurumi pumpkin tutorial.
Q: What weight of yarn is best?
A: Worsted weight yarn is recommended for good stitch definition and manageable size. Using thicker or thinner yarn will affect finished pumpkin size and texture.
Q: How tight should I knit to avoid gaping holes when stuffed?
A: Use a firmness in tension that doesn’t leave large gaps but still keeps ribbing stretchy—medium tension works well for smooth stuffing and shaping.
Q: How to fix twisted rib pattern when seaming?
A: Lay tubes flat and check rib alignment before sewing edges. Use pins or stitch markers to hold edges in perfect alignment for neat seams.
Q: Can I add embellishments like buttons or beads?
A: Yes, adding small fall-themed embellishments can personalize pumpkins, but ensure secure attachment to withstand handling.
Final Thoughts
This easy flat-knit pumpkin trio pattern provides a satisfying seasonal project that’s beginner-friendly and quick to finish. The combination of simple stitches and thoughtful shaping techniques means you’ll enjoy both the process and the results. I hope the subtle tips help you achieve neat pumpkins that bring cozy charm to your fall decor for years to come. Happy knitting!



