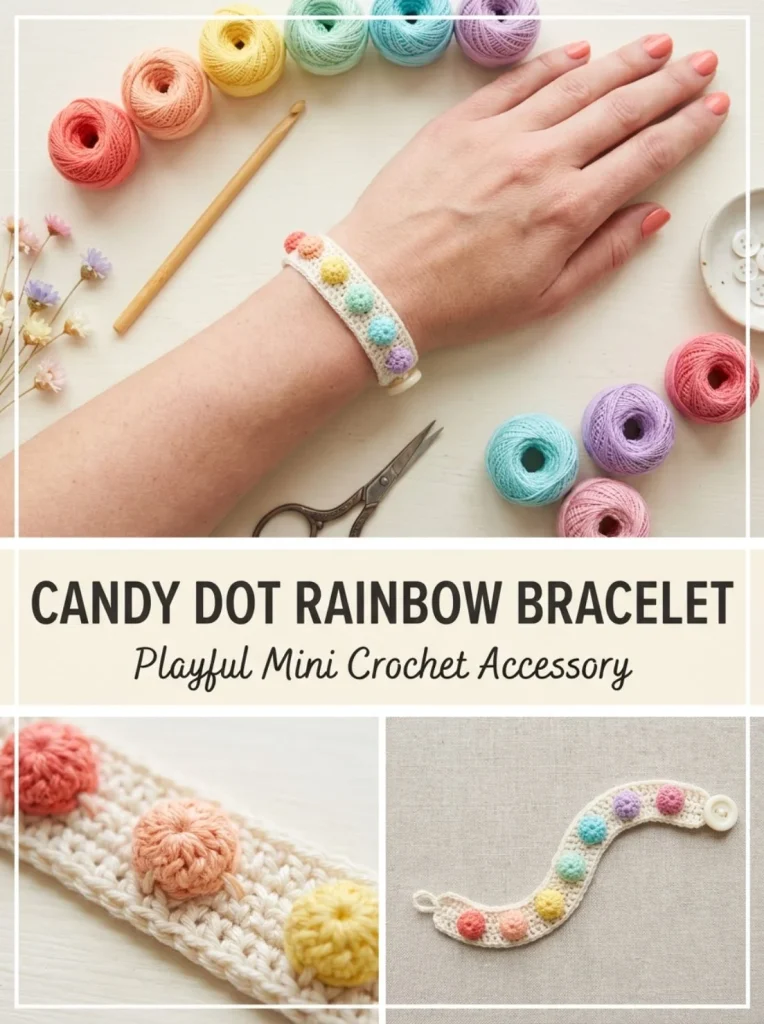
Creating a Candy Dot Rainbow Bracelet is a delightful way to brighten up your accessory collection or gift something special to a loved one. This crochet project showcases the charm of colorful candy dots that add a playful touch to a simple bracelet design. It’s practical and beginner-friendly, making it a great choice for those who are relatively new to crochet. The series of brightly colored dots requires only a bit of yarn, making it an economical and fun project. Additionally, you’ll find that working with multiple colors can help improve your tension and overall crochet skills as you switch between shades.
Why You’ll Love This Crochet Pattern
- Unique and vibrant design with seven colorful candy dots.
- Quick and easy to make, perfect for last-minute gifts.
- Uses minimal materials, making it budget-friendly.
- The button closure adds a touch of practicality and style.
- A wonderful way to practice basic crochet stitches while creating something beautiful.
Finished Size
The estimated finished size of the Candy Dot Rainbow Bracelet is approximately 7.5 inches long. However, size may vary depending on your yarn, hook choice, and personal tension.
Skill Level
This pattern is suitable for easy beginners. It only requires basic crochet skills, such as chaining, single crochet, and sewing pieces together. Even if you are new to crocheting, you’ll find this project manageable and rewarding.
Materials Needed
- Size 10 cotton crochet thread in cream plus seven accent colors (coral, peach, yellow, mint, aqua, lavender, rose)
- 1.25-1.5 mm steel crochet hook
- Tapestry needle
- Scissors
- Tiny amount of fiberfill
- Optional: 8 mm button for closure
- Stitch markers
Stitches and Abbreviations
- sc: single crochet
- ch: chain
- dec: decrease
- R: round
Gauge and Tension Notes
While gauge is not critical for this project, keeping an even tension will ensure the bracelet sits nicely on your wrist. Aim for a flexible and light feel to maintain the bracelet’s comfort and style.
Pattern Notes Before You Start
The bracelet is worked in rows and involves making small candy dots to be attached afterward. As you work through the pattern, remember to keep your stitches tight enough to avoid gaps but not so tight that you struggle to work them.
Step-by-Step Crochet Instructions
-
Create the Band: With cream yarn, chain 46 for an average adult wrist. Starting in the 2nd chain from the hook, single crochet in each chain across, resulting in 45 sc. Chain 1, turn, and single crochet across again. Fasten off, leaving a long tail for sewing.
-
Button Closure: For a button closure, create a 6-chain loop at one end before fastening off. Sew an 8 mm button to the opposite end.
-
Make the Candy Dots: For each candy dot (make 7), start with a magic ring and follow these rounds:
- R1: 6 sc in magic ring.
- R2: 2 sc in each stitch around (12 sc).
- R3: sc around (12 sc).
- R4: (sc in the next st, dec over the next 2 sts) x4 (8 sc).
- R5: dec around (4 sc). Fasten off, leaving a sewing tail, and close the opening. Each finished dot should measure about 0.5-0.6 inches.
-
Assembly: Mark the center 4.5-5 inches of the band. Sew the seven candy dots in rainbow order, spacing them about 0.6-0.7 inches apart. Ensure all dots are centered and facing upward, stitching through the base of each dot and both rows of the band. Weave in all ends securely.
Assembly and Finishing
Once all parts are made and attached, ensure the bracelet is neat by gently shaping it. Check that the dots are evenly spaced and securely sewn. Trim any excess thread from the ends to keep a clean look.
Helpful Tips
- When making the candy dots, don’t overstuff them; a tiny pinch of fiberfill is sufficient to keep them light.
- Keep a consistent tension to ensure your bracelet doesn’t end up too tight or too loose.
- If you’re newer to crochet, try practicing the single crochet stitch before starting the project.
Common Mistakes to Avoid
- Overstuffing the Dots: This can make the bracelet bulky and less flexible. Just use a tiny amount of filling.
- Inconsistent Tension: This can lead to uneven stitches and spacing. Practice maintaining an even tension throughout.
- Misplacing Dots: Ensure you mark the center properly to get an even alignment of the candy dots.
Customization Ideas
- Experiment with different color combinations for the dots to suit your style.
- Adjust the size of the bracelet by adding or removing chains in the initial band.
- Use decorative buttons if you prefer something other than the 8 mm option.
How to Use or Display This Crochet Project
The finished Candy Dot Rainbow Bracelet can be worn as a cheerful accessory or gifted to friends and family who appreciate handcrafted items. It’s perfect for casual outfits or sunny days out.
Care Instructions
To clean your Candy Dot Rainbow Bracelet, gently hand wash it with a mild detergent and lay it flat to dry. Store it in a cool, dry place away from direct sunlight to maintain its colors.
Frequently Asked Questions
-
Can I use different yarn types?
Yes, but keep in mind that the thickness and flexibility may vary, affecting the size and feel of the bracelet. -
What if my dots are misshapen?
Use a smaller crochet hook to tighten your stitches, or adjust the amount of fiberfill used for better shape. -
How can I make the bracelet larger?
You can add additional chains to the initial band to fit larger wrists. -
Can I add beads to my bracelet?
Absolutely! Beads can enhance the overall look of your bracelet, just add them during the assembly stage. -
Is it difficult to sew on the dots?
It can take a little practice, but be sure to secure each dot with tight stitches to keep them firmly in place.
Creating this Candy Dot Rainbow Bracelet will surely bring a smile to your face as you craft. It’s an enjoyable and practical project that showcases your crochet skills beautifully. For additional bracelet inspirations, you might enjoy exploring the crochet rosebud hand chain bracelet pattern or the rose vine bracelet. Happy crocheting!



