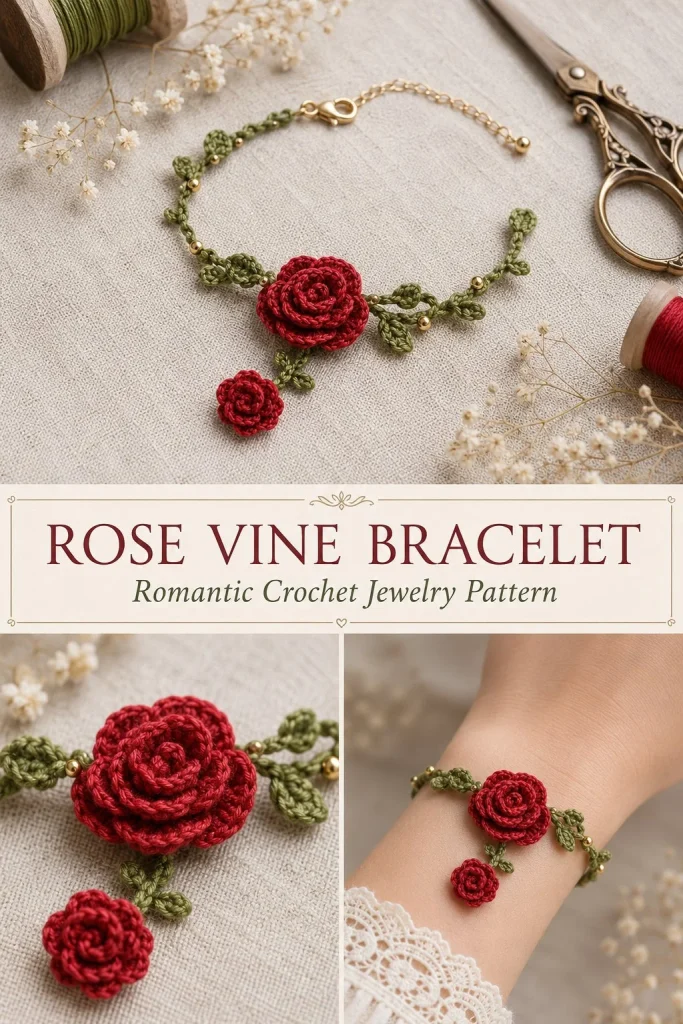
This delicate Rose Vine Bracelet brings a touch of nature’s elegance to your wrist with its handmade floral charm. Crafted with fine mercerized thread and a small steel hook, this lightweight bracelet is perfect for those who appreciate subtle, wearable art. Whether you’re a beginner looking for a manageable project or an intermediate crocheter wanting to experiment with assembly and texture, this pattern guides you step-by-step through creating a lovely spiral rose motif with leaves and gentle sparkles of gold seed beads. The simple slip stitch cord combined with elegant floral details makes this bracelet both sturdy and pretty, perfect for gifting or adding a handmade accent to your accessories collection. One thing I noticed while testing the rose construction is that keeping the spiral tight while securing with the tail really helps the rose shape hold firmly over time without puckering or loosening.
Why You’ll Love This Crochet Pattern
- Clear, beginner-friendly pattern with easy stitches and simple assembly.
- Creates a beautiful floral bracelet that feels lightweight yet durable.
- Uses mercerized cotton thread for a subtle shine and crisp stitch detail.
- Includes small finishing details like gold seed beads for sophistication.
- Offers practical shaping tips to keep roses neat and well-formed.
- Great introductory project for working with crochet motifs and sewing pieces together.
Finished Size
The finished bracelet fits an average wrist circumference of about 16–17 cm (6.25–6.75 inches), depending on your chain length and tension. You can adjust the bracelet cord chain to fit larger or smaller wrists by subtracting approximately 1.5 cm from your wrist measurement. Size may vary slightly due to yarn thickness, hook size, and your individual tension.
Skill Level
Advanced beginner. The stitches themselves are simple, but the pattern requires some basic assembly skills like sewing the rose spiral, attaching leaves, and finishing with beads and a clasp. It’s straightforward once you get going, and perfect for progressing beyond basic scarves or dishcloths.
Materials Needed
- Size 10 mercerized crochet thread in olive green (for bracelet cord and leaves)
- Size 10 mercerized crochet thread in deep rose red (for roses)
- 1.00 mm steel crochet hook (or recommended hook for your thread)
- 6 small gold seed beads (2–3 mm) for embellishment
- 1 small lobster clasp and 2 jump rings, or materials for a crochet loop closure
- Fine tapestry needle for sewing parts together and weaving ends
- Sharp scissors
- Jewelry pliers (for attaching jump rings and clasp)
Stitches and Abbreviations
- ch: chain
- sl st: slip stitch (insert hook, yarn over, pull through both loops)
- sc: single crochet (insert hook, yarn over, pull through, yarn over, pull through 2 loops)
- hdc: half double crochet (yarn over, insert hook, yarn over, pull up a loop, yarn over, pull through all 3 loops)
- dc: double crochet (yarn over, insert hook, yarn over, pull up a loop, yarn over, pull through 2 loops, yarn over, pull through last 2 loops)
Gauge and Tension Notes
Gauge is not critical for this project, but consistent tension helps the roses maintain shape and the bracelet lie flat on your wrist. Keep your stitches firm but not tight—especially for the slip stitch cord—to avoid curling. The mercerized cotton thread generally produces crisp, sturdy stitches that hold their shape well.
Pattern Notes Before You Start
This bracelet consists of several separate pieces worked mostly in rows: a flat slip stitch bracelet cord, two rose spirals worked as half double crochet strips then coiled, six small leaves created by crocheting around a chain with variable stitches, and a short dangle cord. All parts are sewn together in the final assembly. Color changes happen only by switching thread for the green bracelet cord and leaves, and the red roses. Be sure to leave long tails when fastening off to secure and sew pieces in place.
Step-by-Step Crochet Instructions
1. Bracelet Cord:
- Using olive green thread, chain until length equals your wrist circumference minus 1.5 cm (e.g., 54 chains for average wrist).
- Starting in 2nd chain from hook, work 1 slip stitch in each chain across (this creates a thin, flat cord).
- Fasten off, leaving long tails for later closure and sewing.
2. Main Rose:
- Using deep rose red thread, chain 22.
- Starting in 2nd chain from hook, work 2 half double crochets (hdc) in each chain across to end (42 hdc total).
- Fasten off leaving a long 20 cm tail.
- Roll the strip tightly into a spiral, securing the coil firmly with the tail by sewing through layers as you wrap to form the rose shape.
3. Small Rose:
- Chain 14 in red.
- Starting in 2nd chain from hook, work 2 hdc in each chain (26 hdc total).
- Fasten off with a 20 cm tail, roll into a tight spiral and secure as with the main rose.
4. Leaves (make 6):
- Chain 6 with olive green.
- Work slip stitch, single crochet, half double crochet, double crochet, single crochet in sequence along the chain.
- At last chain, work 3 single crochets to turn, then continue on opposite side of chain with single crochet, double crochet, half double crochet, single crochet, and slip stitch to finish leaf shape.
- Fasten off leaving tails for sewing.
5. Dangle Cord:
- Chain 9 with green thread.
- Slip stitch back across chain.
- Fasten off leaving tails for sewing.
Assembly and Finishing
- Center the main rose on the olive green bracelet cord and sew it securely using the tail left when fastening off. Pass needle through multiple layers to firmly anchor the rose.
- Attach two leaves beneath the main rose for a natural foliage effect. Place them symmetrically for balance.
- Sew the dangle cord just below the main rose on the bracelet cord.
- At the end of the dangle cord, attach the small rose and sew two leaves beneath it.
- Arrange the remaining two leaves evenly on either side of the main rose along the bracelet cord.
- Sew three gold seed beads along each side of the bracelet cord, near the rose and leaves, to add subtle sparkle. Use the tapestry needle to attach beads securely.
- Add jump rings and a lobster clasp to one end of the bracelet and a chain loop or button closure to the other. Alternatively, crochet a loop closure with an attached bead for ease.
- Weave all yarn tails thoroughly through bracelet cord and rose bases for a neat, durable finish before trimming excess.
Helpful Tips
- Keep your roll of the rose spiral tight and uniformly layered to avoid a loose, floppy flower shape.
- Use mercerized thread for added durability and a subtle sheen that enhances the floral look.
- When sewing the leaves and roses to the bracelet, stitch repeatedly through multiple points for strength.
- Work slip stitches evenly for the bracelet cord to maintain a smooth, flat base—avoid pulling too tight to prevent curling.
- Use small gold seed beads sparingly for elegance without overwhelming the floral motif.
- Test fit clasp placement during assembly to ensure comfortable wear and ease of fastening.
Common Mistakes to Avoid
- Rolling the flower spirals too loosely—this leads to a flower that won’t hold its shape well. Keep the coil tight and sew firmly as you go.
- Missing stitches on the leaf sequence—they create the distinctive shape, so follow the stitch order carefully.
- Using too tight tension on the bracelet cord slip stitches causing curling; keep consistent but relaxed tension.
- Skipping securing the tails deeply before trimming—that can result in stitches loosening over time.
- Making the bracelet cord too short or too long; always measure your wrist carefully and subtract 1.5 cm to allow comfortable closure.
Customization Ideas
- Use different colors for the roses to match your outfit or season (pale pinks, ivory, or vibrant coral).
- Experiment with variegated thread for a multicolor floral effect.
- Replace the gold seed beads with small pearl or crystal beads for extra sparkle.
- Create a matching necklace or earrings using the small rose and leaf motifs.
- Adjust chain length or add extra leaves for a fuller floral cluster look.
How to Use or Display This Crochet Project
This Rose Vine Bracelet is a charming handmade accessory to wear on special occasions or add a delicate touch to casual outfits. It also makes a thoughtful gift for birthdays, Mother’s Day, or as a bridesmaid’s accessory. Because it’s light and breathable, it pairs well with linen or cotton ensembles during spring and summer. When not worn, it can be elegantly displayed on a jewelry stand, keeping the rose spiral intact and ready to showcase your crochet skill.
Care Instructions
Hand wash the bracelet gently in cool water with mild soap. Avoid wringing to maintain shape—press gently between towels to remove excess moisture. Dry flat away from direct sun to preserve colors and prevent thread weakening. Store in a dry box or jewelry pouch to prevent snagging or dust buildup.
Frequently Asked Questions
Q: Can I use yarn instead of thread for this bracelet?
A: You can, but the look will be bulkier and less delicate. Choose a lightweight cotton yarn and a correspondingly larger hook for a similar effect.
Q: How do I keep the rose spiral from unraveling?
A: Make sure to roll tightly and secure the coil firmly with the long tail by sewing through multiple layers as you roll.
Q: Can I make the bracelet longer or shorter?
A: Yes, chain the bracelet cord to fit your wrist minus about 1.5 cm for comfortable closure.
Q: What do I do if my leaves look uneven?
A: Follow the stitch sequence carefully and keep even tension. Blocking your leaves lightly can help even out shape before assembly.
Q: How do I attach the clasp securely?
A: Use jump rings and jewelry pliers to close the rings tightly; if crocheting a loop closure, be sure the loop fits snugly over the closure bead or button.
Final Thoughts
This Rose Vine Bracelet brings together simple stitches, careful shaping, and thoughtful assembly to create a wearable piece of crochet art. I hope you enjoy making it as much as I enjoyed designing it—each rose and leaf is an opportunity to practice precision and patience. The subtle sparkle and delicate stitches make it a lovely gift or personal keepsake, perfect for adding a handmade touch to everyday style. Happy crocheting!



