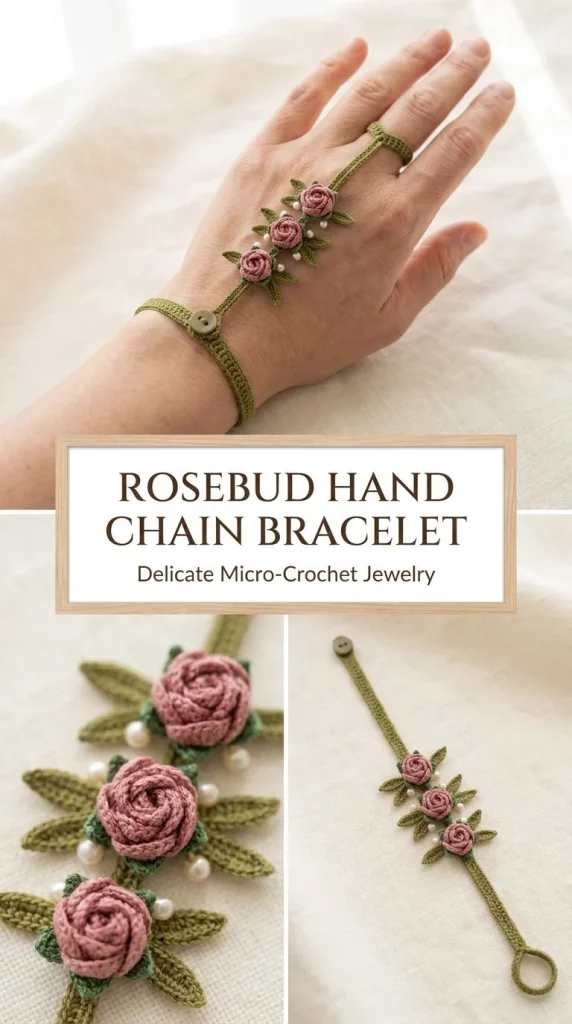
Creating a delicate Rosebud Hand Chain Bracelet using crochet is a wonderful way to add a touch of handmade elegance to your jewelry collection. This design combines a narrow wrist band with a finger loop connected by a flat piece adorned with charming little rosebuds, sepals, and leaves. It’s a wearable piece that feels lightweight and comfortable, making it perfect for everyday wear or gifting to someone special. The construction relies mainly on slip stitches to create firm cords, making it beginner-friendly but satisfying for intermediate makers who enjoy assembling motifs and fine details. A small flat button or clasp fastens the bracelet securely, and there’s room to add optional pearl beads for a subtle shimmer. I’ve found that sewing the rosebuds through their sepals ensures they stay firmly in place and keeps the overall piece neat on the wearer’s hand. If you enjoy this project, you might also like the charming simplicity of the ladybug leaf keychain pattern, which shares lovely nature-inspired motifs.
Why You’ll Love This Crochet Pattern
- The narrow wrist band and finger loop fit comfortably without cutting off circulation or feeling too loose.
- The rosebud cluster adds an elegant focal point that looks impressive but is easy to make.
- Slip stitch cords create a firm, structured base that helps the bracelet retain its shape over time.
- The optional pearl details add a subtle touch of sophistication if you want a little extra sparkle.
- Great practice for learning neat increases, decreases, and sewing textured motifs securely.
- Assembly of separate pieces gives you the satisfaction of building a detailed, custom-fitted accessory.
Finished Size
The finished bracelet fits an average adult wrist circumference around 7 to 7.5 inches (17.5 to 19 cm). The finger loop comfortably encircles the base of the middle finger. Because of the slim construction and corded nature, the size may vary slightly depending on tension, yarn thickness, and hook size. Always check your measurements and adjust the initial chain length to fit your wrist and finger.
Skill Level
Intermediate beginner. While this pattern uses basic stitches like slip stitch and single crochet, the shaping of rosebuds and detailed assembly require careful sewing and a bit of patience to get a clean result. Beginners with some experience in motif joining and shaping will enjoy this manageable challenge.
Materials Needed
- Size 10 mercerized crochet cotton in olive green, dusty rose, and optional soft cream
- 1.25 mm steel crochet hook
- One 8–10 mm flat button or small jewelry clasp
- Optional 3 mm pearl beads, up to three
- Fine tapestry needle and sewing needle
- Matching thread for sewing beads/buttons
- Scissors
- Measuring tape
Stitches and Abbreviations
- ch = chain: yarn over, pull through loop on hook
- sl st = slip stitch: insert hook, yarn over, pull through both loops on hook
- sc = single crochet: insert hook, yarn over, pull up a loop, yarn over, pull through both loops
- inc = increase: 2 sc in the same stitch
- dec = decrease: single crochet two stitches together
- hdc = half double crochet: yarn over, insert hook, pull up loop, yarn over, pull through all three loops
- dc = double crochet: yarn over, insert hook, pull up loop, yarn over, pull through two loops, yarn over, pull through last two loops
Gauge and Tension Notes
Gauge is not critical for this project, but consistent tension is important to ensure the cord pieces are firm enough to hold their shape without stretching or sagging. A tighter tension helps the slip stitch cords feel solid and smooth. If you crochet loosely, your cords may feel floppy and the bracelet might not sit well on the hand.
Pattern Notes Before You Start
This bracelet is worked mostly in firm slip stitch cords created by chaining long lengths then slip stitching back along the chain. The wrist band and finger loop are separate pieces sewn together by a flat connector cord across the top back of the hand. The rosebuds, sepals, and leaves are small motifs crocheted separately and then sewn onto the connector in a neat cluster. All sewing should be done with matching thread or yarn tails to keep knots hidden on the underside. Optional pearl beads can be sewn between the buds for an elegant finishing touch.
Step-by-Step Crochet Instructions
-
Wrist Band: With olive green, chain until it measures your wrist circumference minus 0.5 inch (about 52 chains for an average adult). Starting in 2nd chain from hook, slip stitch in each chain across to make a firm, narrow cord. At the end, chain 6 and slip stitch back into the last stitch to form a button loop. Fasten off. Sew your chosen button to the opposite end so it closes comfortably without stretching tight.
-
Finger Loop: With olive green, chain until it fits snugly around the base of your middle finger (usually 20–24 chains). Join with slip stitch, being careful not to twist. Slip stitch around the loop once more for strength. Fasten off.
-
Center Connector: Chain 28 with olive green. Starting in the 2nd chain from the hook, slip stitch across. Fasten off leaving long yarn tails on both ends for sewing.
-
Rosebuds (make 3 in dusty rose):
- R1: Magic ring, 6 single crochet.
- R2: Increase in each stitch around (12 stitches).
- R3: Single crochet through back loops only (12 stitches).
- R4: (Single crochet, decrease) repeat 4 times (8 stitches).
Fasten off leaving a long tail. Pinch open edge into 3 shallow folds, pass tail through all folds once, then secure at base to close the rosebud.
-
Sepals (make 3 in olive green):
- R1: Magic ring, 5 single crochet, join.
- R2: Chain 3, slip stitch in 2nd chain, single crochet in next chain, slip stitch in next base stitch – repeat 5 times.
Fasten off. Push each rosebud through the sepal center and sew firmly around the base.
-
Leaves (make 4 in olive green):
Chain 6.
Starting in 2nd chain from hook, work:
slip stitch, single crochet, half double crochet, double crochet, 4 single crochets in last chain,
then work on the opposite side of the chain: double crochet, half double crochet, single crochet, slip stitch.
Fasten off.
Assembly and Finishing
Sew one end of the center connector cord to the exact midpoint of the wrist band and sew the other end to the underside of the finger loop. The connector should lie flat across the back of the hand without pulling or distorting the band or ring loop. Arrange the three rosebuds vertically along the connector: one centered, one about an inch above, and one about an inch below. Sew each bud securely through its sepal base to the connector. Position two leaves beside the center bud and one leaf on each side by the outer buds. If you choose, sew a small pearl bead between each pair of buds for extra detail. Make sure all knots are hidden on the underside beneath the connector cord, and weave in all ends neatly.
Helpful Tips
- Measuring your wrist and finger before starting chains avoids stretchy or too-tight fits—testing as you sew helps ensure comfort.
- Use a fine tapestry needle for easier weaving of ends and locating stitches when sewing motifs.
- Keep tension consistent on slip stitched cords to avoid uneven thickness that affects fit and appearance.
- Pin motifs in place on the connector before sewing to visualize the final look and adjust spacing comfortably.
- If beads are added, secure them with a strong thread and consider adding a dab of fabric glue for extra hold.
Common Mistakes to Avoid
- Don’t twist the finger loop chain when joining; twist will make the loop uncomfortable.
- Avoid skipping stitches in the slip stitch cords, which can cause uneven width or weak spots.
- When closing rosebuds, failing to pinch folds evenly can make buds look misshapen.
- Sewing connectors too tightly can pull the band and finger loop out of alignment.
- Forgetting to check button loop size can result in a loop too small or too big to fit the button.
Customization Ideas
- Try using pink or cream yarns for the rosebuds for a softer look.
- Substitute the olive green with a metallic thread for subtle shimmer in the leaves and band.
- Add more or fewer leaves and rosebuds to suit your personal style or wrist size.
- Use small gemstone or glass beads in place of pearls for color-specific accents.
How to Use or Display This Crochet Project
Wear this hand chain bracelet as a delicate everyday accessory layered with rings and watches. It’s perfect for a garden party, wedding, or as a thoughtful gift to a friend who loves floral-themed jewelry. You can also display it on a decorative jewelry stand or inside a glass box to preserve its intricate beauty. Paired with other handmade accessories, such as the elegant rose vine bracelet, it creates a lovely cohesive look.
Care Instructions
Because this piece uses mercerized cotton, it can be gently hand washed with mild soap and lukewarm water. Avoid wringing or twisting; instead, press out water gently and lay flat to dry. Store in a dry place away from direct sunlight to keep colors vibrant and maintain the shape of the delicate motifs.
Frequently Asked Questions
Q: Can I use a different thread weight?
A: Thicker yarns will create a bulkier bracelet; you’d need to adjust chain lengths and button size accordingly for fit.
Q: How do I fix a loose button loop?
A: Sew a tighter button loop by adding a few more chains or tightening your tension when slip stitching back the loop.
Q: Can I make this bracelet adjustable?
A: Yes, you can add extra chains or a small clasp with a length of cord to allow size adjustment.
Q: What if my rosebuds look flat?
A: Make sure to pinch the folds evenly and pull the tail firmly through the folds before securing the base.
Q: Is this pattern suitable for left-handed crocheters?
A: Absolutely. All instructions apply equally; just mirror the steps naturally as you work.
Final Thoughts
This Rosebud Hand Chain Bracelet pattern offers a sweet introduction to combining crochet cord techniques with motif assembly, creating a wearable piece that’s both elegant and comfortable. It’s a great way to practice neat finishing and explore delicate floral details in crochet jewelry. I hope you enjoy making it as much as I have, and if you’re looking for other handmade charm accessories to pair with your pieces, check out beautiful, nature-inspired designs that add personality and grace to your collection.
Conclusion
For a uniquely elegant touch to your accessory wardrobe, consider exploring the craftsmanship behind the Pearl Snake Necklace – Anchovy, which combines intricate design with delicate materials much like this rosebud bracelet. It’s a perfect complement to handmade jewelry and offers inspiration for wearing artful, stylish pieces every day.



