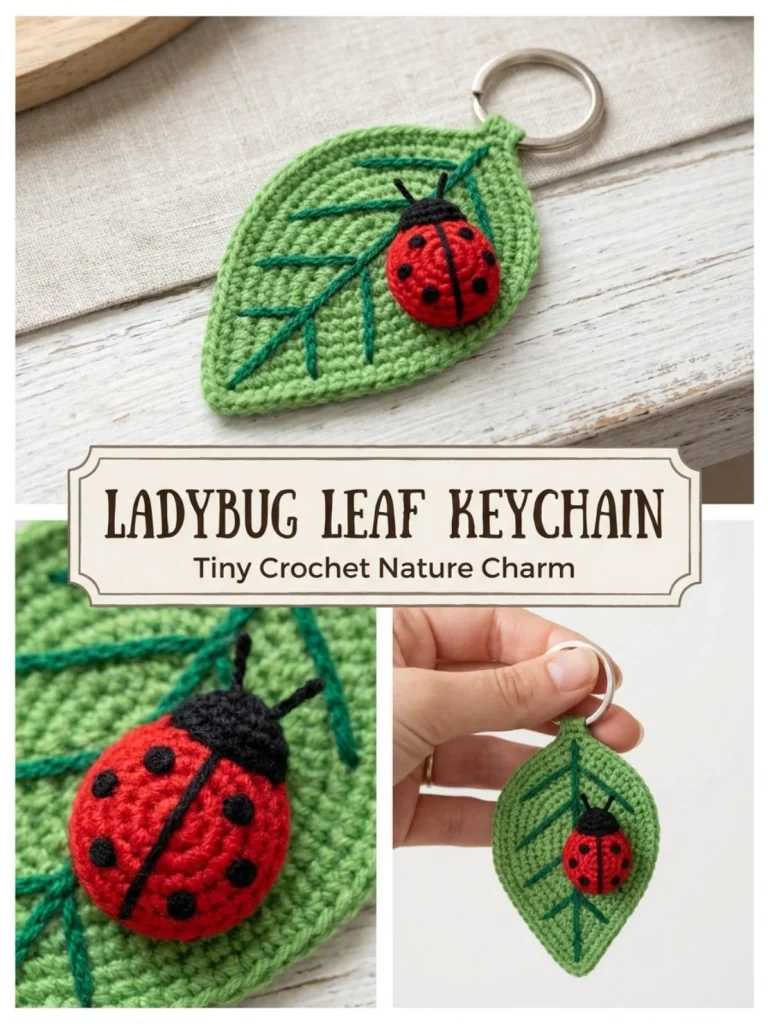
Creating a charming Ladybug Leaf Keychain with crochet is a delightful project for makers who love to craft small, practical accessories. This keychain combines a simple leaf motif with an adorable ladybug, making it a perfect gift or personal charm. The pattern uses easy stitches and a straightforward construction that’s beginner-friendly but still satisfying for more experienced crocheters. One trick I’ve found helpful is embroidering the veins in the leaf and spots on the ladybug to add a lot of character without complicating the stitches. Plus, the finished piece is sturdy enough to handle everyday use, yet soft and lightweight. For those familiar with crafting petite accessories, this project sits nicely alongside sweet add-ons like the Pink Lily Bell Anklet, giving you a chance to expand your handmade collection in a coordinated style.
Why You’ll Love This Crochet Pattern
- Combines basic crochet stitches for easy learning and quick progress.
- Results in a cute and functional keychain, ideal for personal use or gifting.
- Offers hand-embroidered details to enhance texture and visual appeal.
- Small size makes it portable and fast to complete.
- Lightweight but durable thanks to strategic stuffing and neat finishing.
- Useful for developing skills in shaping, color changes, and assembly.
Finished Size
The Ladybug Leaf Keychain measures roughly 3.5 inches (9 cm) from the leaf tip to the key ring attachment. Actual size may vary depending on yarn choice, hook size, and individual tension.
Skill Level
This is an advanced beginner pattern. While basic stitches like slip stitch, single crochet, half double crochet, and double crochet are used, shaping the leaf and creating the ladybug with increases, decreases, and color changes requires some focus. Embroidery details add a nice finishing touch but are optional for true beginners.
Materials Needed
- DK weight cotton yarn in leaf green, red, black, and a small amount of white
- 2.75 mm crochet hook
- Light fiberfill stuffing
- Key ring
- Yarn needle for weaving ends and embroidery
- Scissors
- Stitch marker (optional, but helpful to mark rounds or joins)
Stitches and Abbreviations
- ch: chain
- sl st: slip stitch
- sc: single crochet
- hdc: half double crochet
- dc: double crochet
- inc: increase (2 sc in one stitch)
- dec: decrease (single crochet two stitches together)
- R#: round number
- magic ring: technique to start rounds in the round with adjustable loop
Gauge and Tension Notes
Exact gauge is not critical for this keychain, but maintain even tension to keep the leaf flat and the ladybug nicely shaped. Too tight tension can make assembly tricky and the leaf less flexible; too loose may cause gaps or floppy fabric that doesn’t hold shape well.
Pattern Notes Before You Start
This project is made from separate pieces: a leaf worked as a flat shape in rounds starting on a chain base, and a ladybug body crocheted in rounds with color changes. The antennae are small crocheted chains sewn on afterward. Pieces are sewn together and embroidered after stuffing. Pay close attention to finishing embroidery for best results.
Step-by-Step Crochet Instructions
-
Leaf (green):
- Ch 13.
- Starting in 2nd ch from hook, work the following along the top chain edge: sl st, sc, hdc, dc in next 6 chains, hdc, sc, sl st.
- At the last chain, work 5 sc to turn the corner.
- Continue down the opposite side of the chain: sl st, sc, hdc, dc in next 6 chains, hdc, sc, sl st.
- Join with a sl st to the first stitch, fasten off, leaving a tail for sewing if needed.
- Using darker green yarn, embroider a straight vein down the center and two short veins branching off sides.
-
Ladybug body (red):
- R1: Create a magic ring, 6 sc inside.
- R2: Inc around (2 sc in each stitch) = 12 sc.
- R3: (sc 1, inc) repeat 6 times = 18 sc.
- R4: Sc around (18).
- Change to black yarn for head.
- R5: Sc around (18), begin light stuffing inside.
- R6: (sc 1, dec) repeat 6 times = 12 sc.
- R7: Dec around = 6 sc.
- Fasten off and close hole with yarn needle.
-
Head detail:
- The black round (R5-R7) forms the head.
- With white yarn, embroider two tiny eyes on the black head area.
- Using black yarn, embroider a central dividing line down the red back and add three small black spots on each side.
-
Antennae (make 2):
- Using black yarn, ch 4.
- Sl st in 2nd ch and next 2 ch.
- Fasten off and leave long tail for sewing.
-
Assembly:
- Sew antennae to the top of the black head securely.
- Attach the ladybug slightly off-center on the upper half of the leaf, head pointing toward the leaf tip.
- Create a green loop by chaining 8 stitches or sew a loop at the leaf stem, attach it to a key ring.
- Weave in all ends securely.
Assembly and Finishing
Take care to place the ladybug so it balances attractively on the leaf. Using light stuffing keeps the ladybug firm but not bulky, preserving the keychain’s slim profile. When embroidering veins and spots, keep your stitches neat and consistent in size to avoid puckering the fabric. Don’t forget to weave in ends after each step to maintain a clean finish.
If you enjoy making delicate handmade accessories, this project complements other crochet jewelry items like the Rose Vine Bracelet, which similarly blends texture and cute motifs.
Helpful Tips
- Use a stitch marker to track rounds, especially in the ladybug body, to avoid losing your place.
- Lightly stuff the ladybug as you crochet to maintain shape without overfilling.
- Embroider veins on the leaf last to prevent distortion of the crochet fabric.
- Block the leaf flat gently with a warm, damp cloth if it curls.
- Attach antennae with small, secure stitches to avoid loss during daily use.
Common Mistakes to Avoid
- Skipping the turning 5 sc at the leaf tip; it’s essential for shaping the leaf point properly.
- Overstuffing the ladybug, which will distort the shape and make sewing the head difficult.
- Uneven tension when changing colors; keep stitches consistent to maintain a smooth surface.
- Forgetting to fasten off properly on rounds, which can leave holes.
- Not securing embroidery tails, resulting in loose threads that catch or come undone.
Customization Ideas
- Make the leaf larger by increasing initial chains and rows, adjusting stitches proportionally.
- Substitute yarn colors for a different bug, like a blue beetle or yellow butterfly on the leaf.
- Use a variegated green yarn for a variegated leaf effect.
- Add a small bell or bead to the key ring loop for sound and decorative interest.
How to Use or Display This Crochet Project
This keychain is perfect for adding a handmade touch to handbags, backpacks, or keys. It doubles as a thoughtful gift for nature lovers or as a cute decoration clipped onto zipper pulls. Lightweight and durable, it suits daily wear and can be styled alongside other delicate crochet pieces for a coordinated look.
Care Instructions
Hand wash your Ladybug Leaf Keychain gently in cool water with mild detergent. Avoid wringing to prevent distortion. Lay flat to dry, reshaping the leaf and ladybug while damp if needed. Store away from direct sunlight to preserve yarn colors.
Frequently Asked Questions
Q: Can I use worsted weight yarn instead of DK?
A: Yes, but expect a larger keychain and adjust hook size accordingly; tighter tension is needed to keep details defined.
Q: How do I make the embroidery spots evenly?
A: Use a ruler or mark spots lightly with a water-soluble pen before stitching for consistent placement.
Q: Can I skip stuffing the ladybug?
A: You can, but stuffing helps maintain a cute rounded shape and prevents the piece from flattening over time.
Q: What if I struggle with the magic ring?
A: There are many tutorials online, but if not comfortable, you can start with a small adjustable loop or chain 2 and work into the second chain from hook.
Q: How do I attach the key ring securely?
A: Use a strong hand-sewn loop with matching yarn, double knotting and weaving in ends thoroughly to avoid slipping.
Final Thoughts
This Ladybug Leaf Keychain is a sweet, compact crochet project that blends simple shaping with pretty embroidered details for a charming accessory. Whether gifting or keeping, it’s a great way to practice technique and create something both decorative and practical. Happy crocheting!



