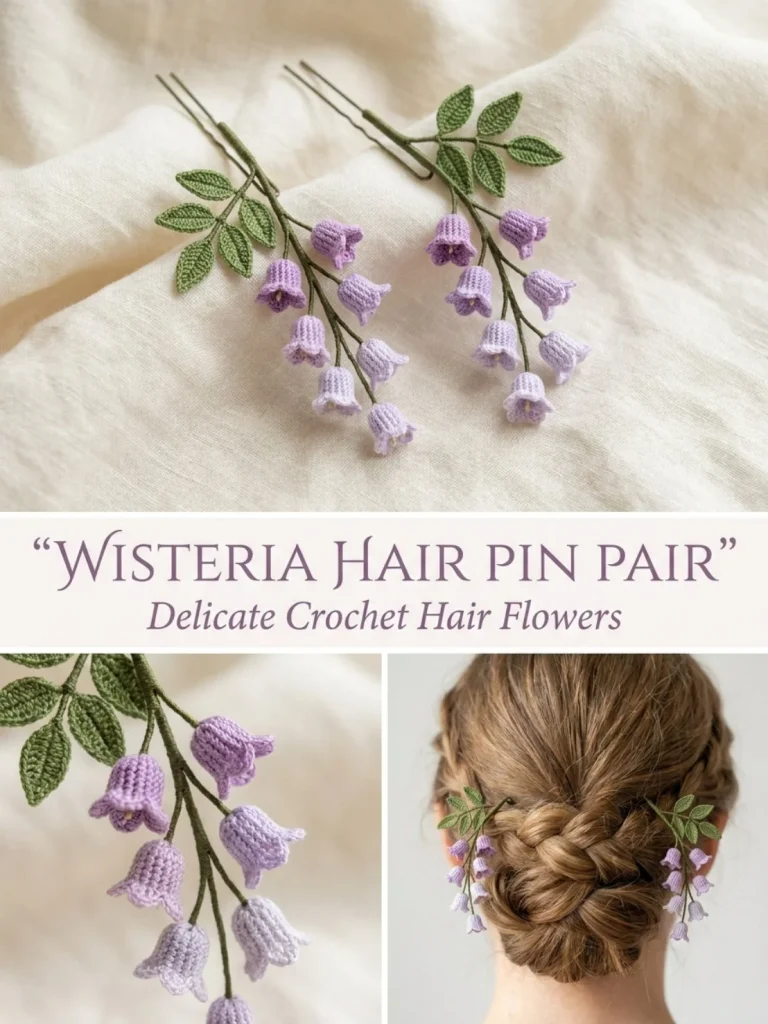
Crocheting delicate accessories like hair pins adds a charming handmade touch to everyday hairstyles or special occasions. This project creates a lovely pair of Wisteria Hair Pins featuring green stems, softly shaped leaves, and clusters of lilac and pale lavender bell-like blossoms. The lightweight design sits nicely on bobby pins or hair clips, making it a practical way to personalize your look or gift someone a thoughtful, wearable craft. Even beginners can enjoy this project with straightforward stitches like single crochet and slip stitch, and a few shaping tips help the small bells flare beautifully, capturing the wisteria’s natural elegance. For those who love making beautiful floral hair accessories, this pattern complements other delicate creations such as a blossom pearl hair vine that brings the same feminine charm on a larger scale.
Why You’ll Love This Crochet Pattern
- Creates a delicate, wearable floral accessory perfect for gifts or self-use.
- Uses simple stitches suited for beginners and intermediate crocheters alike.
- Small size and minimal materials make it quick and easy to work up.
- Clear assembly tips ensure a neat, secure finish that holds well in hair.
- The subtle shaping of the bells enhances the natural look of blossoms.
- Practical design works well on bobby pins or clips for everyday styling.
Finished Size
Each finished hair pin measures approximately 4 inches (10 cm) in length. The actual size may vary slightly depending on your tension, yarn thickness, and crochet hook size.
Skill Level
Advanced beginner to intermediate. The stitches are simple, but shaping the bells and arranging the components requires some attention to detail. Beginners comfortable with single crochet and slip stitches will find this pattern a lovely step into more decorative accessories.
Materials Needed
- Size 10 crochet cotton thread in olive green, lilac, and pale lavender
- Steel crochet hook, size 1.0–1.25 mm (small enough for fine thread)
- Fine yarn needle for sewing pieces together
- Scissors
- 2 plain metal bobby pins or small hair clips
- Sewing thread (matching green) for assembly
Stitches and Abbreviations
- Ch = Chain: Yarn over, pull loop through.
- Sl st = Slip stitch: Insert hook, yarn over, pull through both loops on hook.
- Sc = Single crochet: Insert hook, yarn over, pull up a loop, yarn over, pull through both loops.
- Hdc = Half double crochet: Yarn over, insert hook, pull up a loop, yarn over, pull through all loops on hook.
- Dc = Double crochet: Yarn over, insert hook, pull up a loop, yarn over, pull through two loops, yarn over, pull through remaining two loops.
Gauge and Tension Notes
Gauge is not critical, but maintaining consistent tension is important to keep the small pieces neat and uniform. Use a tight but comfortable crochet tension since loose stitches may cause the small bells and leaves to lose their shape.
Pattern Notes Before You Start
The project is worked from separate parts that are sewn together after crocheting:
- The green stems are flat crochet strips made in rows.
- Leaves are crocheted in a flat oval shape with stitches increasing then decreasing.
- The wisteria bells are worked in small rounds and shaped individually.
- There are no color changes within individual pieces; colors are changed by finishing pieces separately.
- Assembly involves arranging and sewing pieces onto bobby pins, so a sewing needle and thread are essential.
Step-by-Step Crochet Instructions
-
Make the Green Stems (Make 2):
Ch 22, turn. Starting in 2nd ch from hook, work 1 sl st in each ch across (21 sl st total). Fasten off, leaving a long sewing tail for assembly. -
Make the Leaves (Make 6):
Ch 6, turn.
Row 1: Starting in 2nd ch from hook, work 1 sl st, 1 sc, 1 hdc, 1 dc.
In last ch, work 4 sc stitches to curve the tip.
Row 2: Work down the opposite side of the foundation chain with 1 dc, 1 hdc, 1 sc, 1 sl st.
Fasten off, leaving a long tail for sewing. -
Make the Wisteria Bells (Make 12 total — 6 lilac and 6 pale lavender):
Ch 4, join with a slip stitch to form a ring.
Round 1: Work 6 sc into the ring. (6 sts)
Round 2: Work 2 sc in each stitch around. (12 sts)
Round 3: Working in back loops only, alternate 1 sc then 1 hdc around (sc in next st, hdc in next). (12 sts)
Fasten off, leaving a long tail for shaping and sewing.
Pinch the top closed slightly and secure with one stitch so the lower edge flares out softly in a bell shape. -
Repeat steps for all pieces to achieve 2 stems, 6 leaves, and 12 bells.
Assembly and Finishing
- Sew 3 leaves neatly along one side of each green stem, spacing evenly.
- Attach 6 bells onto each stem in a descending cluster: 2 near the top, 2 mid-length, and 2 near the bottom.
- Use short loops of green sewing thread of different lengths to secure the bells, allowing subtle natural variation in placement.
- Lay each stem onto a plain bobby pin or hair clip and sew firmly at three points: near the top, middle, and bottom of the stem.
- Be careful not to cover or block the bobby pin opening so it retains full function.
- Weave in all ends to prevent thread tails from catching in hair or unraveling.
Helpful Tips
- Maintain consistent tension during the round stitches for evenly sized bells.
- Use a fine yarn needle for sewing small pieces, which helps avoid gaps and loosening.
- Pin your assembly first using sewing pins to adjust leaf and bell placement before permanently stitching.
- Slightly pinch and stitch top of bells to create natural flare; it helps the wisteria blossom effect stand out.
- Avoid bulky knots at join points to keep the pins comfortable and lightweight.
- If threads seem slippery during sewing, use fabric glue sparingly on knots for extra security.
Common Mistakes to Avoid
- Skipping the “pinch and stitch” step for the bell shape may leave them flat and less realistic.
- Working loose stitch tension can cause leaves and bells to look sloppy or droop.
- Overcrowding the bells or leaves on the stem makes the pin heavy and uneven.
- Sewing too close to the bobby pin opening can restrict pin movement or catch hair.
- Leaving long loose thread tails unsecured can snag hair and ruin the neat look.
Customization Ideas
- Experiment with shades of purple or blue for the bells to create different wisteria color variations.
- Use a soft metallic thread for leaves or stems for subtle shimmer in special occasion accessories.
- Attach the finished stems on larger clips, such as French barrettes, for more secure hold in thick hair.
- Add tiny seed beads or pearl accents sewn to the bell tops for an extra touch of elegance.
How to Use or Display This Crochet Project
Wear your wisteria pins to add a fresh spring feel to casual or formal hairstyles. They make charming gifts for friends who appreciate handmade florals or can be used to decorate gift wrapping or bouquet arrangements. When not in use, store them carefully in a small jewelry box or fabric pouch to protect the delicate thread and shaped pieces.
Care Instructions
Hand wash gently in cool water with mild soap. Avoid wringing to maintain bell shape. Lay flat to dry on a towel, reshaping if needed. Store away from direct sunlight or moisture to preserve thread color and structure over time.
Frequently Asked Questions
Q: Can I use yarn instead of crochet cotton thread for this project?
A: It’s best to use fine crochet cotton or similarly fine thread to maintain the delicate size and shape. Thicker yarn will alter the size and make the pins bulky.
Q: How do I keep the small bells from flattening during wear?
A: Pinching and securing the top edge firmly helps the bell flare. Avoid crushing when storing and handle gently when inserting in hair.
Q: Can this pattern be adapted to clips instead of bobby pins?
A: Yes, simply sew the finished stem securely onto the clip base, ensuring you don’t cover the clip mechanism.
Q: What hook size works best for beginners on this pattern?
A: Starting with a 1.25 mm hook is ideal since it’s slightly larger and easier to handle than 1.0 mm.
Q: How do I hide thread tails during assembly?
A: Weave them back and forth through crocheted stitches and knot securely inside the stitches to keep all ends discreet and secure.
Final Thoughts
This Wisteria Hair Pin Pair is a delightful way to add handmade charm to your accessories collection. The careful shaping of bells and leaves paired with simple stitches makes it both a satisfying project and a pretty finish for your hair styling. For makers who enjoy floral themes, pairing these pins with other elegant accessories like the pink lily bell anklet can create coordinated looks that showcase your crochet skills beautifully. Happy crocheting!



