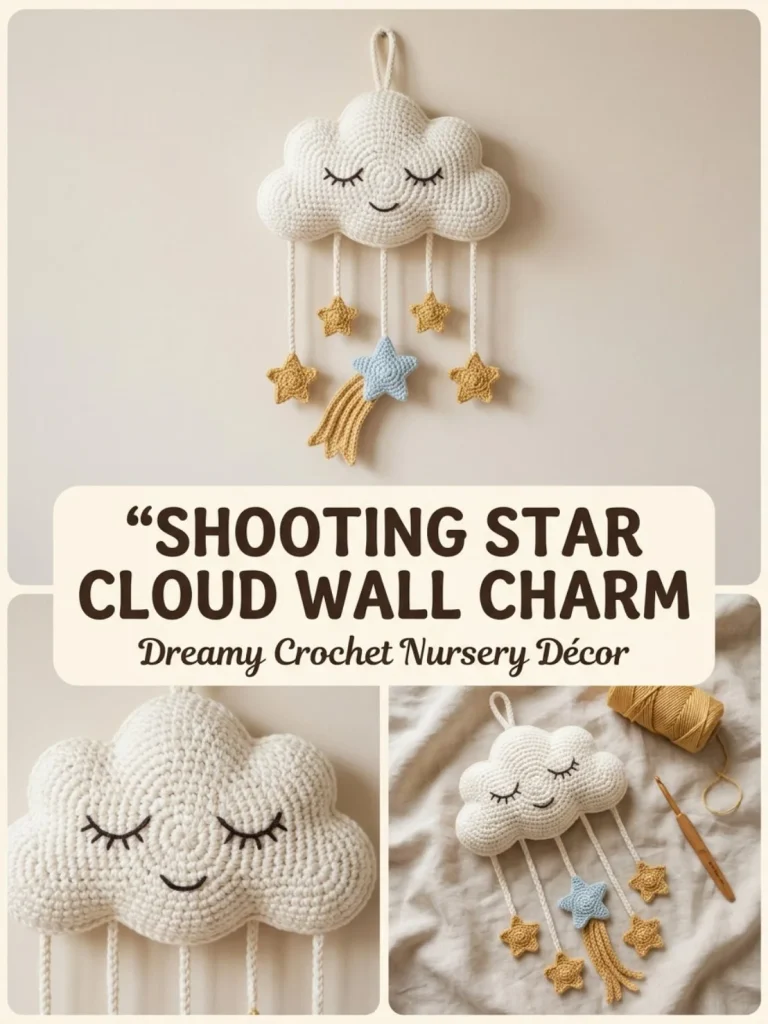
Creating a delightful crochet charm like the Shooting Star Cloud Wall Charm brings a touch of whimsy to any room, nursery, or cozy corner. This charming piece features a soft, puffy cloud silhouette paired with shimmering stars and a trailing shooting star, making it a perfect gift for baby showers, children’s room decor, or anyone who loves celestial-themed crafts. Despite its intricate appearance, the pattern is crafted with beginner-friendly stitches and clear shaping, ensuring even those new to crochet can enjoy making it. One tip from my hands-on experience: overlapping the small cloud circles slightly behind the large oval base helps the cloud shape look naturally fluffy and dimensional without extra bulk, keeping it neat and light. For those who love working with soft textures, this project pairs beautifully with cozy yarns similar to other baby and lap blankets, like the comforting feel you get from the Cloud Puff Baby Blanket.
Why You’ll Love This Crochet Pattern
- Uses straightforward stitches perfect for beginners who want to build confidence with shaping and assembly.
- Results in a visually striking yet lightweight decorative charm, ideal for hanging on walls or doors.
- Incorporates fun elements like a shooting star tail and layered clouds which add texture and interest.
- Makes a thoughtful handmade gift that’s both practical and decorative.
- Allows for creativity with color choices and yarn types to suit any style or room theme.
- Detailed instructions help keep your project neat, ensuring a professional look even on your first try.
Finished Size
The finished cloud charm measures approximately 7 inches (18 cm) wide and 5 inches (13 cm) tall, not including the hanging cords. Size may vary slightly depending on the yarn, hook size, and individual tension, but the gentle oval and round shapes remain consistent.
Skill Level
Easy to intermediate beginner. The project uses basic stitches like single crochet and simple increases, but involves multiple parts crocheted separately and sewn together, offering a soft challenge to build your joining and assembly skills.
Materials Needed
- Sport or DK weight cotton yarn in: white (cloud), pale blue (shooting star), soft gold (stars and tail), and a small amount of black (for face details)
- 3.0 mm crochet hook
- Light fiberfill stuffing (optional, for padded charm)
- Yarn needle for sewing and embroidery
- Scissors
- Small wooden ring or hanging cord for display
- Stitch markers (optional, for keeping track of rounds)
Stitches and Abbreviations
- Ch = Chain
- Sc = Single Crochet: Insert hook, yarn over, pull loop through, yarn over, pull through both loops
- Inc = Increase: 2 single crochets in the same stitch
- Sl st = Slip Stitch: Insert hook, yarn over, pull through both stitch and loop
- Hdc = Half Double Crochet: Yarn over, insert hook, pull loop through, yarn over, pull through all loops on hook
Gauge and Tension Notes
Gauge is not critical for this project but maintaining consistent tension will ensure your clouds and stars keep a smooth, even shape. Avoid overly tight stitches which can make the cloud stiff, or too loose stitches that cause gaps. Practicing a few rounds of single crochet beforehand will help you find a comfy tension balance.
Pattern Notes Before You Start
This project is worked in separate pieces: one large cloud oval, two smaller cloud circles, multiple stars, and a shooting star with a tail. The cloud pieces are overlapped and sewn together to create a dimensional silhouette. The stars and shooting star are made in rounds and then attached along the bottom edge of the cloud with hanging cords. Color changes are guided by the pattern — the tail is crafted in soft gold yarn attached to the blue star. For a padded charm, you’ll create a second cloud silhouette and stuff lightly before joining.
Step-by-Step Crochet Instructions
Large Cloud Oval (Make 1 in white)
- Chain 11.
- Starting in 2nd chain from hook, single crochet in next 9 chains.
- Work 3 single crochets in last chain (turning the oval).
- Continue down the opposite side with single crochet in next 8 chains.
- Work 2 single crochets in final chain; join with slip stitch to first sc. (22 stitches)
Round 2
- Chain 1, increase in first stitch (2 sc in same st).
- Single crochet in next 8 stitches.
- Increase in each of the next 3 stitches.
- Single crochet in next 8 stitches.
- Increase in each of the last 2 stitches.
- Join with slip stitch to beginning stitch. (28 stitches)
- Fasten off.
Small Cloud Circles (Make 2 in white)
- Create a magic ring.
- Round 1: Single crochet 6 into ring.
- Round 2: Increase in each stitch around (12 stitches).
- Round 3: (Single crochet in next stitch, increase in next stitch) repeat 6 times (18 stitches).
- Fasten off.
Stars (Make 4 in soft gold)
- Create magic ring.
- Repeat 5 times: Chain 4, slip stitch in 2nd chain from hook, single crochet in next chain, half double crochet in next chain, slip stitch into ring.
- Pull ring tight and fasten off.
Shooting Star (Make 1 in pale blue with gold tail)
- Make star as above with pale blue yarn.
- Join soft gold yarn to one lower point for tail.
- Chain 18, slip stitch back along this chain.
- Fasten off.
Assembly and Finishing
Overlap each small cloud circle behind the large oval on the upper-left and upper-right edges so the three parts form a single cloud silhouette. If a padded look is desired, repeat the entire three-piece cloud to create a backing, adding a thin layer of stuffing between the two cloud silhouettes. Join together by single crocheting around the outside edge. Embroider two small closed eyes and a gentle curved smile in black on the center front of the main cloud piece.
Cut five hanging cords of varying lengths using chain stitches or doubled yarn. Attach four gold stars and the single blue shooting star along the lower edge of the cloud silhouette. Place the shooting star central with the longest hanging cord, arranging smaller stars evenly on each side. Sew or attach a hanging loop or wooden ring at the top for display. Weave in all yarn ends neatly.
Adding padding helps the charm hold a plush shape like the soft textures of blankets, reminiscent of the kind featured in the Moonbeam Star Lap Blanket, bringing a cohesive cozy vibe to your handmade space.
Helpful Tips
- Use stitch markers when working increases to mark changes in stitch count easily.
- When sewing the cloud pieces together, place pins first to ensure alignment before stitching.
- Keep embroidery stitches light and even for a sweet, delicate facial expression.
- Opt for a lightweight yarn stuffing to avoid bulking the charm and causing misshapen edges.
- Work the hanging cords a little looser for flexibility and natural movement when the charm is hanging.
- If new to magic rings, practice separately to get an even, tight center for your stars.
Common Mistakes to Avoid
- Missing increases will distort the oval cloud shape; count stitches after each round to stay on track.
- Joining the small cloud circles off-center can make the cloud awkward; visually align carefully before sewing.
- Overstuffing padding can cause seams to stretch or fray; use thin amounts and adjust as necessary.
- Forgetting to weave in ends securely may lead to yarn unraveling over time—secure knots and weave through multiple stitches.
- Not tensioning the hanging cords evenly can make the stars hang crookedly; measure lengths before attaching.
Customization Ideas
- Switch up colors for seasonal decor, like soft pastels for spring or deep blues and silvers for winter themes.
- Use textured or boucle yarn for a fluffy cloud effect.
- Add tiny seed beads or glitter yarn to the stars for an extra sparkle.
- Adjust the size by increasing the initial chain and rounds, making a larger wall hanging.
How to Use or Display This Crochet Project
This Shooting Star Cloud Wall Charm is perfect for hanging in nurseries, children’s bedrooms, or cozy reading nooks. Attach it to a wooden hoop or ring for easy mounting on walls or doors. It also makes a unique baby shower gift or a delicate ornament for holiday decor. Pairing it with other celestial-inspired crochet projects adds thematic charm to a room.
Care Instructions
Hand wash the crochet charm gently in cool water with mild detergent suitable for cotton yarn. Avoid wringing; instead, gently press out excess moisture and lay flat to dry. Store in a dry place away from direct sunlight to maintain color brightness and yarn integrity.
Frequently Asked Questions
Q: Can I use acrylic yarn instead of cotton?
A: Yes, acrylic will work, but cotton keeps the charm firmer and less prone to stretching.
Q: How do I make the charm flat instead of padded?
A: Simply crochet one cloud silhouette only and skip the stuffing and second piece.
Q: Can I use a larger hook size for a softer look?
A: Using a larger hook will create looser stitches, making shapes softer but less defined.
Q: What if my star tails are too floppy?
A: Add a small amount of fabric stiffener or starched glue to help hold shape.
Q: How do I embroider the face neatly?
A: Use a tapestry needle and secure the yarn ends inside, embroidering with small, even stitches.
Final Thoughts
This Shooting Star Cloud Wall Charm is a charming project that blends simple crochet techniques with whimsical design touches. Whether adding to a nursery or gifting to a loved one, it’s a delightful piece that brings soft skies and twinkling treasures to your handmade decor collection. With a bit of practice and patience, you’ll enjoy both making and displaying this sweet crochet creation.



