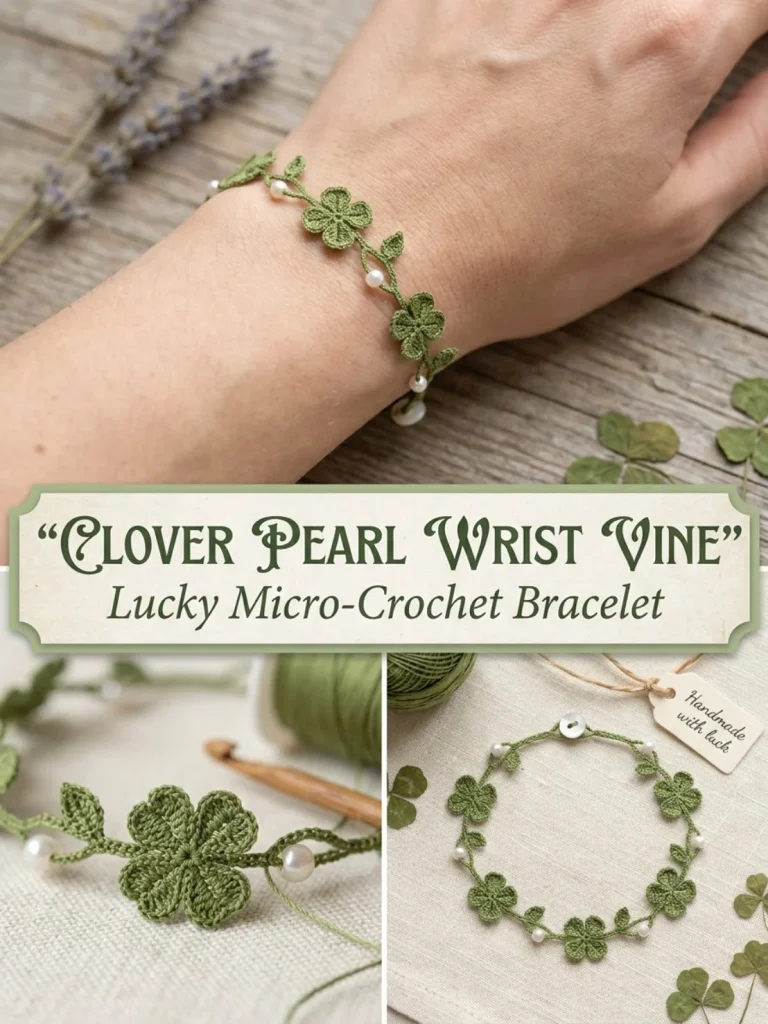
This charming Clover Pearl Wrist Vine is a delicate crochet bracelet vine that combines simple stitches with a touch of elegant detail, making it perfect for both beginners and those with some experience. Designed with petite four-leaf clovers and sunflower-shaped connector leaves sewn onto a slender green band, it offers a lovely handmade accessory that feels fresh and natural. The addition of small pearl beads between each motif elevates the bracelet with a subtle shimmer, making it ideal for gifting or as a special personal keepsake. I particularly appreciate how shaping each clover leaf gently by hand really brings the design to life and keeps the finished vine softly dimensional rather than flat. If you enjoy floral crochet motifs, this project pairs beautifully in style and technique with other accessories like the Blossom Pearl Hair Vine, making a cohesive handmade set.
Why You’ll Love This Crochet Pattern
- Simple stitch techniques combined to create an elegant bracelet design.
- A compact project suitable for beginners who want to practice motif assembly.
- The crochet vine sits comfortably on the wrist, shaped by gentle finger work.
- Pearls add a refined decorative touch without complicated beadwork techniques.
- Can be customized with buttons or jewelry clasps for personalized closures.
- Suitable for gift-giving or special occasion wear, adding a handmade touch.
Finished Size
The finished bracelet measures approximately 7.5 to 8 inches long, depending on your crochet tension and the thickness of the thread used. The width is about 1 to 1.25 inches with the clover motifs and leaves attached. Since this pattern uses fine size 10 cotton thread, your stitch tightness will influence the final dimensions, so it’s worth checking as you work.
Skill Level
This project is ideal for advanced beginners. It involves basic stitches like chain, slip stitch, single crochet, half double crochet, and double crochet, alongside motif construction and assembly skills that help build confidence in joining separate pieces neatly.
Materials Needed
- Size 10 crochet cotton thread in moss green and a small amount of cream.
- 1.25 mm steel crochet hook.
- Fine yarn needle for sewing motifs and weaving ends.
- Scissors.
- Six small pearl beads.
- Small pearl button or regular small button for closure, or alternatively a jewelry clasp.
Stitches and Abbreviations
- Ch = Chain
- Sl st = Slip stitch
- Sc = Single crochet
- Hdc = Half double crochet
- Dc = Double crochet
- Magic ring = Adjustable ring used to work circular motifs tightly
Gauge and Tension Notes
Gauge is not critical for this pattern but maintaining consistent tension is important for even, neat stitches. If your tension is too loose, the bracelet may feel floppy and the motifs won’t hold their shape well. Too tight and the pieces might become stiff and less comfortable to wear. Aim for stitches that lie flat but still feel flexible.
Pattern Notes Before You Start
The bracelet base is worked in a simple row to create a flexible vine shaped band. The four-leaf clover motifs and small connector leaves are crocheted separately then sewn onto the band. Pearls are sewn on last to decorate and space the motifs evenly. The closure is adjustable, made either with a button loop or a clasp attached to the ends. Using a fine tapestry needle and careful sewing helps keep the finish neat. No color changes are required, though you can choose to add some by substituting thread colors for the clovers or pearls.
Step-by-Step Crochet Instructions
-
Bracelet Vine Base: Chain 48 stitches. Starting in the 2nd chain from the hook, slip stitch in each chain across (47 slip stitches). Fasten off and leave a long tail for sewing.
-
Four-Leaf Clovers (Make 5):
- Create a magic ring.
- For each leaf, ch 3, work 2 double crochets into the ring, ch 3, sl st into the ring. Repeat this sequence 4 times to form four leaves.
- Tighten the ring to close the center.
- For a short stem: chain 4, sl st into the 2nd chain and the next 2 chains, then sl st back into the ring. Fasten off, leaving a tail for sewing.
-
Small Connector Leaves (Make 4 pairs):
- Chain 4.
- Starting in the 2nd chain from the hook, work slip stitch, single crochet, half double crochet; then work 3 single crochets in the last chain.
- Continue down the opposite side of the chain with half double crochet, single crochet, and slip stitch.
- Fasten off leaving a tail for sewing.
Assembly and Finishing
Mark the center of the bracelet vine base. Sew one four-leaf clover at this center, then sew two more clovers evenly spaced on each side. Between each pair of clovers, sew a pair of connector leaves. Attach one pearl bead between each neighboring motif and place one pearl near each end to total six pearls. It’s best to keep beads lying flat on top rather than hanging below so the bracelet feels smooth against the skin. To finish the closure, at one end, join the green thread and chain 6, slip stitch into the same end stitch to make a button loop. Sew a small pearl or regular button to the opposite end, or attach a jewelry clasp for easy wear. Weave in all ends securely and gently shape each clover leaf with your fingers to keep their gentle rounded form.
Helpful Tips
- Use a sharp fine yarn needle to avoid splitting the thread when sewing motifs and beads.
- Gently steam or wet block the clover leaves before assembly to help shape them more easily.
- Keep your chains and slip stitches consistent in tension so the bracelet base remains flat and flexible.
- When sewing pearls, knot the thread several times inside the bead hole to make them secure but avoid pulling too tight or distorting the vine.
- If you struggle with the magic ring, practice separately to get clean, tight circles before adding petals.
Common Mistakes to Avoid
- Don’t skip tightening the magic ring; leaving it loose can cause the clover center to gape open.
- Avoid uneven stitching when sewing motifs; mark placement carefully to keep spacing uniform.
- Be careful not to twist the bracelet band before sewing the motifs on, or the finished vine won’t lie flat on the wrist.
- Don’t use thick yarn or a larger hook than suggested, as this will alter size and could make the delicate pattern bulky.
- Omitting the shaping of each clover leaf may cause the bracelet to look flat and less refined.
Customization Ideas
- Substitute metallic or variegated thread for a shimmering or multicolor effect on the leaves and vines.
- Replace pearl beads with tiny seed beads or glass beads for different sparkle or texture.
- Use colored buttons or decorative charms for the closure to match your style or outfit.
- Create a matching set with complementary pieces like earrings or rings; for instance, check out this Cherry Pearl Flower Ring which shares a similar motif and pearl embellishment style.
How to Use or Display This Crochet Project
This wrist vine is perfect as a delicate everyday bracelet or a charming accessory for spring and summer outfits. It works as a thoughtful handmade gift for friends who appreciate unique jewelry or handmade accessories. You can style it layered with other bracelets or alone for a subtle natural look. Because of its fine detail and lightness, it is also a flattering option for brides or bridesmaids seeking floral-themed crochet jewelry.
Care Instructions
Since this bracelet is made from fine crochet cotton thread, hand washing in cool water with mild detergent is best to preserve bead and stitch integrity. Gently reshape the leaves and vine while damp and lay flat to dry. Avoid wringing or twisting to maintain the delicate form. Store it separately, ideally in a soft pouch or box, to prevent crushing or bead damage.
Frequently Asked Questions
Q: Can I make this bracelet larger or smaller?
A: Yes, adjust the chain foundation length for the vine base to fit your wrist. Keep the number of motifs proportional for best balance.
Q: Is it possible to substitute yarn for crochet thread?
A: You can, but use a similarly fine yarn and adjust your hook size. The delicate look will change, becoming chunkier.
Q: How do I secure the beads so they don’t fall off?
A: Stitch through each bead multiple times and finish with secure knots. Using a fine yarn needle helps.
Q: What if I don’t want to use a button?
A: A jewelry clasp or hook closure works just as well and gives a more polished finish.
Q: Is the four-leaf clover difficult to crochet?
A: It’s fairly simple once you get comfortable with the magic ring and counts — practice makes smooth petals.
Final Thoughts
This Clover Pearl Wrist Vine is a sweet project that brings a touch of nature’s charm to your crochet collection. It balances straightforward stitches with intricate assembly, perfect for crafting a personal wearable that’s both beautiful and practical. I hope it inspires you to explore combining motifs and beads in your own creative ways. Happy crocheting!



