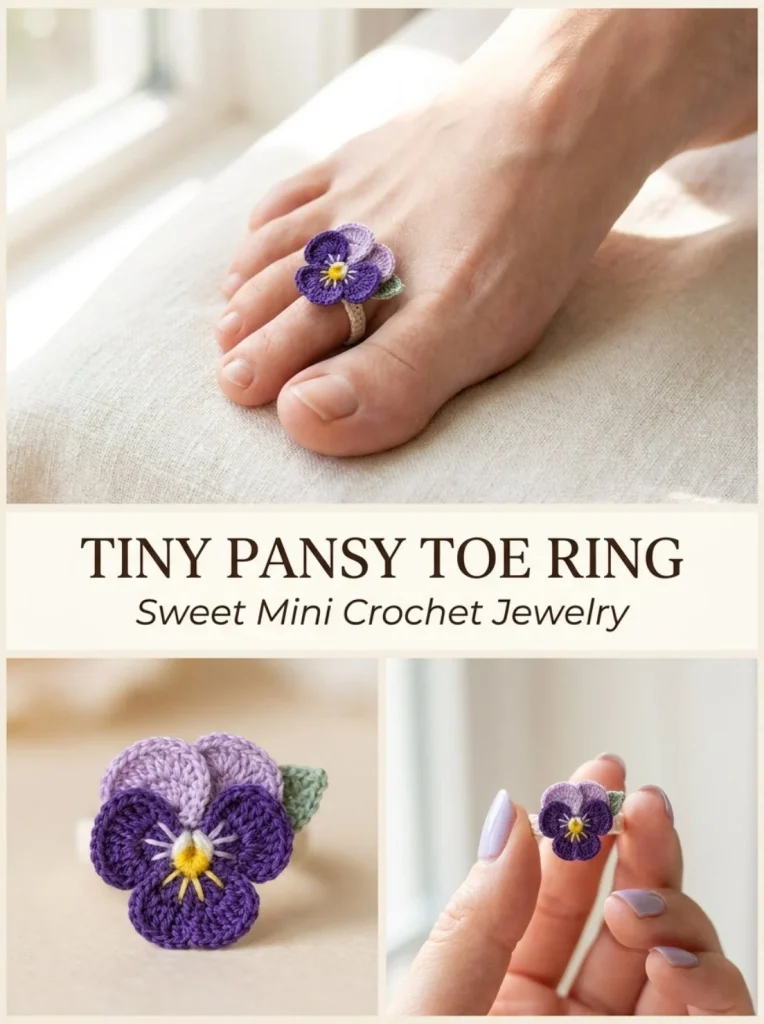
Creating a Tiny Pansy Toe Ring is an excellent way to add a touch of floral charm to your summer wardrobe. This crochet project is not only practical but also makes for a thoughtful gift or a delightful accessory for yourself. The small flower design sits beautifully on your toe, adding a unique flair to sandals or bare feet. If you’re a beginner or intermediate crocheter, you’ll appreciate the clear, straightforward instructions that guide you through making this lovely piece. A little tip: gently shaping the petals after crocheting will help them form a natural, appealing look.
Why You’ll Love This Crochet Pattern
- The Tiny Pansy Toe Ring is a quick project perfect for adding a unique accessory to your collection.
- It’s an ideal gift for friends or family who love handmade jewelry.
- The design allows for color variations, so you can personalize it according to your style.
- Using size 10 cotton crochet thread gives a delicate, refined look.
- This toe ring is beginner-friendly and provides a satisfying crochet experience.
Finished Size
The finished flower measures approximately 0.9-1.1 inches (2.3-2.8 cm) wide. The ring size can vary based on how tightly you crochet, the materials you choose, and your personal foot size.
Skill Level
This project is classified as easy, making it suitable for beginners and those with some crochet experience. The instructions are straightforward and guide you through each step.
Materials Needed
- Size 10 cotton crochet thread in deep violet, lavender, yellow, and sage green
- 1.25 mm steel hook
- Yarn needle
- Scissors
- Optional: Thin clear elastic thread for a stretchable band
Stitches and Abbreviations
- sc: single crochet
- dc: double crochet
- ch: chain
- sl st: slip stitch
- hdc: half double crochet
Gauge and Tension Notes
Gauge is not crucial for this project; however, ensure your tension allows the toe ring to fit comfortably. A tighter tension will make it harder to wear, while too loose could compromise the shape.
Pattern Notes Before You Start
The Tiny Pansy Toe Ring is worked in rounds, starting with the flower and finishing with the toe band. You will join color changes in specific stitches, so pay attention to the instructions for shaping the petals and the toe band.
Step-by-Step Crochet Instructions
- Flower Center: Using yellow, make a magic ring and work 5 sc into it. Join with a sl st to the first sc and fasten off.
- Petals: Join deep violet to any center stitch. For Petal 1, make (ch 2, 3 dc, ch 2, sl st) in the same stitch. Repeat in the next stitch for Petal 2. Change to lavender and in the next two center stitches, work the same petal. For the last center stitch, with deep violet, work (ch 2, 4 dc, ch 2, sl st) for a fuller lower petal. Fasten off.
- Shape Petals: Gently manipulate the petals, arranging three violet petals on the lower side and two lavender petals on top.
- Optional Leaf: With sage, ch 5. Starting in the 2nd ch from the hook, work (sl st, sc, hdc, sl st). Fasten off and sew behind one side of the pansy if desired.
- Toe Band: With sage or violet, ch 16-22 depending on the toe circumference. Join carefully into a ring without twisting. Work 1 round of sc evenly around the band and join. Ensure the finished ring fits comfortably around your second toe.
- Assembly: Center the pansy on top of the toe band and sew it in place with multiple stitches through the yellow center and band. Weave in any ends. Optionally, for extra stretch, sew a short section of clear elastic thread inside the band instead of making it tight.
Assembly and Finishing
To join pieces, thread your yarn needle and secure the flower to the band with multiple passes through both the flower center and toe band. After assembly, ensure all ends are woven in securely to keep your piece looking neat.
Helpful Tips
- When working the petals, ensure your loops are even to maintain a beautiful shape.
- Use a larger hook for looser tension if you find the toe band constricting.
- A thin layer of clear elastic can help maintain the toe ring’s shape without compromising comfort.
- Keep a consistent tension throughout to avoid warped sections.
Common Mistakes to Avoid
- Skipping the shaping step can lead to flat petals; ensure you take the time to adjust them.
- Joining the ring incorrectly can cause it to twist. Double-check before joining.
- Not using a magic ring for the flower center can result in a gap; always pull it snug.
Customization Ideas
- Change the colors of the flower and band to match your personal style.
- Use thicker yarn for a more robust look, or different textures for added character.
- Add embellishments like beads or buttons at the center of the flower for a unique touch.
- Experiment with different sizes for the flower to create a set of toe rings.
How to Use or Display This Crochet Project
Wear your Tiny Pansy Toe Ring as a playful accessory during the summer months. It can be a charming detail for beach outings or casual gatherings. It also makes a lovely gift to surprise someone special.
Care Instructions
To clean your finished crochet item, hand wash gently in cold water with mild soap and lay flat to dry. Store it in a cool, dry place away from direct sunlight to maintain its look.
Frequently Asked Questions
-
Can I use different yarn types?
Yes, just keep in mind that different yarns may affect the size and design of your flower. -
What’s the best way to increase the size of the toe band?
Simply add more chains depending on your toe circumference while ensuring it stays comfortable. -
How can I ensure the flower stays attached?
Secure the flower to the toe band using several stitches through both parts, ensuring it’s sturdy. -
Is this pattern suitable for kids?
Absolutely! Adjust the size of the toe ring for children by decreasing the chain length.
Final Thoughts
The Tiny Pansy Toe Ring is a simple yet delightful project that showcases the beauty of crochet accessories. I hope you enjoy making this charming flower ring as much as I did! For additional inspiration, consider exploring other projects such as the Tiny Daisy Ring or a fun pouch like the Berry Basket Drawstring Pouch. Happy crocheting!



