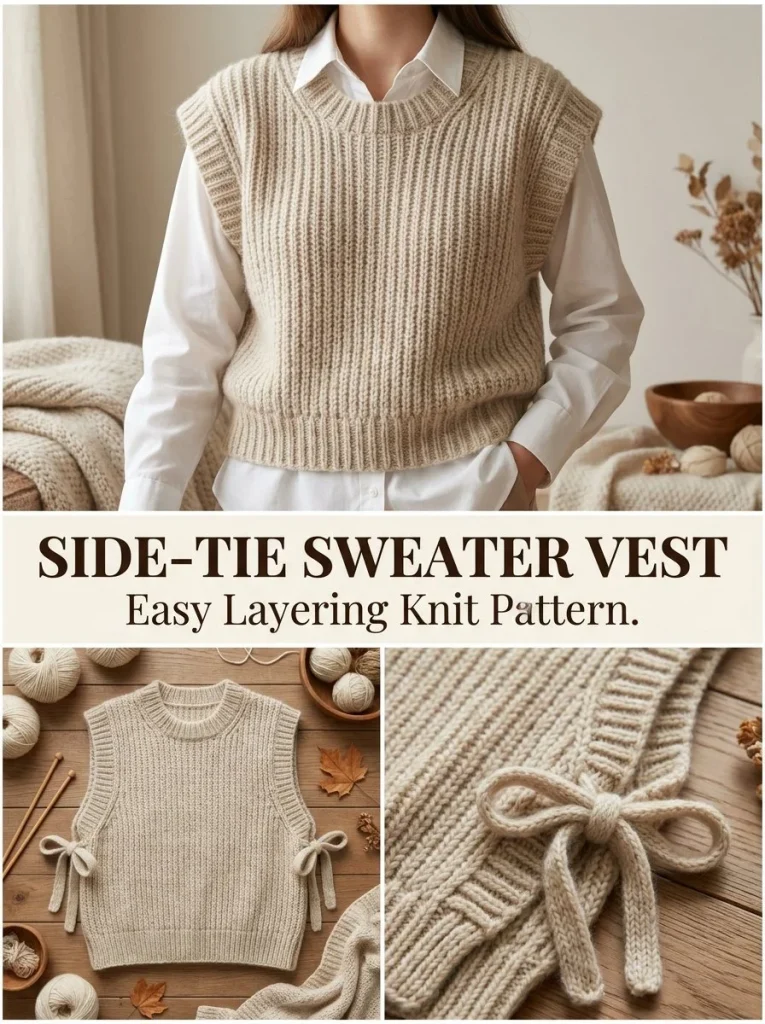
The Side-Tie Ribbed Sweater Vest is a stylish and functional addition to any wardrobe, combining warmth and versatility in a classic knitted design. This captivating piece features a unique side tie detail, enhancing its structure, while maintaining a cozy and casual aesthetic. Perfect for layering over any outfit, it showcases a beautiful ribbed texture that adds depth and dimension, making it not just practical for chilly days but also a fashion statement.
Crafted primarily using a worsted-weight wool or wool-blend yarn, this vest is relative easy to construct, requiring only basic knitting techniques. The combination of stockinette and rib stitches makes it an engaging project for those looking to enhance their knitting skills. Additionally, the project measures approximately 17-18 inches in width and 21 inches in length, making it suitable for various body types. Whether worn over a simple t-shirt or a light blouse, it provides warmth while allowing for freedom of movement.
Pattern at a Glance
Skill level: Intermediate
Terminology: Standard knitting terminology
Construction: Two main panels (back and front)
Finished size: Approximately 17-18 in width, 21 in length
Yarn weight: Worsted-weight wool or wool-blend
Needles: US 8 / 5 mm
Main stitch: K2, P2 rib and stockinette
Gauge: About 18 sts x 24 rows = 4 in / 10 cm
Layout: Front and back panels
Seaming: Shoulder seams only, side edges left open
Materials
For this project, you will need the following materials:
- Yarn: Worsted-weight wool or wool-blend yarn in a soft oatmeal color, approximately 650-750 yards for adult medium.
- Needles: US 8 (5 mm) knitting needles.
- Notions:
- Stitch holders or waste yarn (for binding off sections).
- Tapestry needle (for weaving in ends).
- Scissors (for trimming yarn).
The combination of yarn and needles specified will produce a soft texture suitable for both comfort and elegance.
Yarn and Color Notes
Choosing the right yarn is crucial for achieving the desired texture and drape in this vest. A wool or wool-blend will provide warmth and breathability, essential for transitional weather. Consider using a solid color for a timeless look or a subtle variegated yarn to add dimension without being overwhelming. Avoid fuzzy or highly textured yarns, as these may obscure the stitch definition integral to the vest’s ribbing and stockinette sections.
Finished Measurements
The approximate finished dimensions for this vest are as follows:
- Width: 17-18 inches
- Length: 21 inches
These measurements are based on achieving the correct gauge, so ensure to check your gauge before beginning to knit, as this will affect the fit.
Gauge
Before starting, check your gauge to ensure that your knitted fabric meets the desired measurements. The gauge for this vest is:
Gauge: About 18 stitches x 24 rows = 4 inches / 10 cm in stockinette.
To check gauge, knit a swatch of at least 4 inches by 4 inches, then measure the number of stitches across and rows down within a 4 inch square. If your stitch count is larger than 18 stitches, consider using larger needles. Conversely, if it’s less than 18 stitches, switch to smaller needles to maintain the correct dimensions.
Abbreviations
- K: Knit
- P: Purl
- RS: Right side
- St(s): Stitch(es)
- BO: Bind off
Important Pattern Notes
- Remember that in ribbing, the stitches will change depending on whether the row is worked on the right side or the wrong side.
- For clarity, make sure to maintain correct tension throughout the project to avoid pulling or stretching.
- Always check your stitches at the beginning and end of each row to ensure a consistent stitch count.
- When binding off, be mindful to do so loosely to prevent the edge from being too tight.
Special Stitches and Techniques
This vest primarily utilizes standard knitting techniques. Here are key components to focus on:
- K2, P2 Rib: This stitch creates a stretchy and textured fabric that is great for necklines and hems.
- Stockinette Stitch: A simple combination of knit on the right side and purl on the wrong side produces a smooth, flat surface.
- I-Cord: Techniques used in making the side ties, providing a neat and finished edge.
Understanding the Construction
The Side-Tie Ribbed Sweater Vest is constructed from two main panels: a back and a front. Each panel is worked separately back and forth. After the pieces are knitted, the front and back are joined at the shoulder seams, while the side edges remain open for easy wearability. The neckband is then picked up and knitted directly onto the neckline, completing the stylish finish.
Full Pattern Instructions
BACK
- Cast on 78 stitches.
- Work in K2, P2 ribbing for 2 inches.
- Continue in stockinette stitch until the piece measures 19 inches from the cast-on edge.
- For the back neck, knit 28 stitches, bind off the center 22 stitches, and knit the remaining 28 stitches.
- Work each shoulder separately for 2 inches, then bind off.
FRONT
- Work as for back until the piece measures 17.5 inches from the cast-on edge.
- Knit 28 stitches, bind off the center 22 stitches, and knit the remaining 28 stitches.
- Work each shoulder separately, decreasing 1 stitch at the neck edge on the next 2 right-side rows.
- Continue straight until the front matches the back length, then bind off.
SHOULDER SEAMS
- Seam the front to the back at the shoulders only, ensuring that both side edges are left completely open.
NECKBAND
- With the right side facing, pick up approximately 88 stitches evenly around the neckline.
- Work in K2, P2 rib for 1-1.25 inches, then bind off loosely in pattern.
SIDE TIES
- Make 6 ties. For each tie, cast on 4 stitches and work a 4-stitch I-cord for 12 inches, then bind off.
- Sew 3 ties to each side edge of the front at approximately 4, 10, and 16 inches above the hem.
- Sew the matching 3 ties to the back at the same heights.
- Tie each front/back pair in a small bow when worn.
FINISHING
- Weave in all ends and block flat, paying careful attention to keeping the open side edges straight and the ribbed hem unstretched.
Checkpoints
- After completing the back, it should measure approximately 19 inches.
- You should still have 78 stitches on the needle when beginning the front.
- The neck edge should have approximately 88 stitches picked up evenly.
Assembly
In this project, the assembly process is straightforward. After finishing the two main panels, simply align the front with the back at the shoulders and seam them together. Because the sides remain open, no additional seaming is necessary, allowing for easy movement and comfort.
Resizing
To resize the vest, consider the following:
- Widening/Narrowing: Adjust the cast-on number while ensuring to keep it an even number to maintain ribbing.
- Lengthening/Shortening: Modify the body length by adding or reducing the number of rows worked before binding off for the neck.
Variations
Consider these variations for a personalized touch:
- Use a single solid color for a classic look or multiple colors for a fun, playful design.
- Adjust the length of the vest for a cropped version suitable for warmer months.
- Incorporate a decorative border around the hem for added flair.
Troubleshooting
Why Is My Fabric Curling?
The stockinette stitch tends to curl at the edges. This is normal; blocking your work will help flatten the piece.
Why Is My Gauge Off?
If your gauge is different, it may be due to knitting too tightly or loosely. Adjust your tension or use larger or smaller needles as needed.
Frequently Asked Questions
Can I use a different yarn weight?
Yes, but ensure you adjust your needle size according to the yarn weight for proper gauge.
Can I make it larger?
Yes, by increasing the cast-on number and adjusting the length as necessary, you can customize the fit.
Is the pattern reversible?
Due to the nature of the ribbing and stockinette stitch, this vest is not fully reversible but has a clean look on both sides.
How should I block it?
Gently wash the garment in cool water, lay flat on a towel to dry, and shape to desired dimensions.
In crafting the Side-Tie Ribbed Sweater Vest, you will create a versatile piece that showcases both comfort and style. The straightforward construction allows for creative freedom in choices of yarn and color, ensuring a unique addition to your wardrobe perfect for any season. For more inspiration, check out this classic ribbed cardigan pattern or get inspired by this easy ribbed knit fall pumpkin project!



