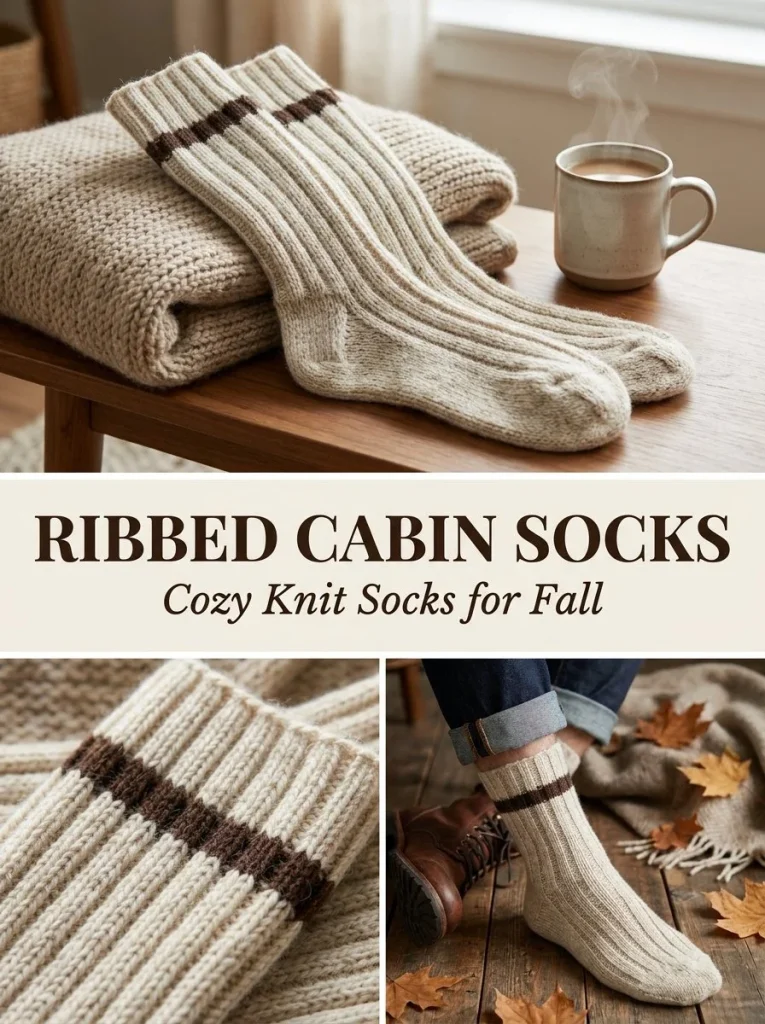
This project takes the classic knee sock design and enhances it with a textured ribbing that not only provides comfort and warmth but also adds visual appeal. Perfect for chilly evenings or cozy days at home, these knee socks are both functional and stylish, transcending the usual sock design. The ribbed texture allows for a stretchy fit, ensuring that the socks hug the leg comfortably without slipping down. You may also find Classic Ribbed V Neck Button Crochet Cardigan Pattern useful.
The construction primarily utilizes knit stitches, creating a snug and fitting knee-high sock that can be made in two contrasting colors to elevate its aesthetic. The use of DK-weight wool or wool/nylon sock yarn ensures durability and softness, making these socks ideal for everyday wear. Furthermore, the pattern is designed for adult women with a shoe size ranging from 7 to 9, making it a perfect gift for yourself or a loved one. You may also find Easy Ribbed Knit Fall Pumpkin useful.
Pattern at a Glance
Skill level: Intermediate
Terminology: English knitting terminology
Construction: Circular with ribbing, flat heel flap, and Kitchener stitch for the toe
Finished size: Fits adult women’s US shoe size 7-9
Yarn weight: DK-weight
Needles: US 4 / 3.5 mm DPNs or long circular needle for magic loop
Main stitch: K2, P2 ribbing and stockinette
Gauge: Approximately 24 sts x 32 rounds = 4 in / 10 cm in stockinette
Motifs: None
Layout: Socks constructed in one piece from cuff to toe
Joining: No joining required, seamless knitting
Border: None
Materials
To create these delightful knee socks, you will need the following materials:
- DK-weight wool or wool/nylon sock yarn: approximately 360-420 yards of heathered cream plus 25 yards of espresso brown
- Needles: US 4 / 3.5 mm DPNs or a long circular needle suitable for magic loop technique
- Stitch markers: to keep track of rounds and for ease of knitting
- Tapestry needle: for weaving in ends once your project is complete
These materials were chosen to ensure that the finished socks are soft, warm, and durable.
Yarn and Color Notes
When selecting yarn for your Ribbed Cabin Knee Socks, consider the following:
- Fiber Characteristics: Wool and nylon blends are recommended for their elasticity and durability. Wool offers warmth, while nylon adds strength, making the socks long-lasting.
- Color Choices: The contrast between the heathered cream and espresso brown provides a beautiful visual appeal. You can also experiment with other color combinations as desired, but be mindful that the ribbing effect will be most pronounced with contrasting shades.
- Gauge and Texture: A smooth yarn will create a more refined look, while a fluffier yarn may result in a bulkier sock.
Finished Measurements
The finished socks should fit comfortably on adult women’s feet. Keep in mind that the lengths may vary depending on individual foot size and knitting tension:
- Cuff to toe length: Approximately 15 inches (varies based on foot measurement)
- Leg length: Approximately 13 inches
- Note: Measurements may differ based on personal preference for snugness or looseness.
Gauge
Getting the correct gauge is essential to ensure your socks fit properly. The gauge for this project is approximately 24 sts x 32 rounds over 4 inches (10 cm) in stockinette stitch.
Why Gauge Matters
- Proper Fit: If your gauge is larger than specified, your socks may end up being loose and ill-fitting. Conversely, a smaller gauge will result in tighter socks that may not stretch comfortably.
- Adjustments: If adjustments are necessary, it is usually easiest to change the needle size. Larger needles will result in a looser knit; smaller needles will create a tighter knit.
Abbreviations
- St(s): Stitch(es)
- K: Knit
- P: Purl
- Sl: Slip
- SSK: Slip, slip, knit (a left-leaning decrease)
- P2tog: Purl two together (a decrease)
- DPNs: Double-pointed needles
Important Pattern Notes
- Turning Chains: In this pattern, there are no turning chains as we work in rounds.
- Color Changes: Whenever changing colors, ensure you carry the yarn not in use loosely along the side of your work to avoid tension issues.
- Stitch Markers: Use markers to designate the beginning of your round, particularly during the leg and gusset sections where the stitch count can change due to decreases.
Special Stitches and Techniques
K2, P2 Ribbing
This stitch alternates two knit stitches with two purl stitches, creating a textured fabric that is stretchy and snug. This ribbing serves not only decorative purposes but also enhances the fit of the sock.
Kitchener Stitch
This technique is used for grafting the toe stitches together seamlessly. It creates an invisible join which is essential for comfort in the final product.
Understanding the Construction
The Ribbed Cabin Knee Socks are constructed from the cuff downwards, beginning with a ribbed cuff followed by the leg, heel flap, gusset, foot, and finally, the toe. This method allows for adjustments to the leg length if needed, catering to individual preferences for how high the sock rises on the leg.
Workflow Overview
- Cuff: Begin with ribbing to create an elastic opening.
- Leg: Continue with ribbing until reaching the desired length, incorporating calf shaping.
- Heel Flap: Create a back-and-forth section for the heel for added structure.
- Gusset: Pick up stitches along the heel flap and decrease to shape the foot.
- Foot and Toe: Finish with the foot length of your choice, then shape the toe using the Kitchener stitch to complete the sock.
Full Pattern Instructions
Cuff
With heathered cream, cast on 64 stitches. Join in the round and work in K2, P2 rib for 1 inch. Change to espresso brown and knit 4 rounds in K2, P2 rib. Switch back to cream and knit another 1 inch in K2, P2 rib.
Leg
Continue ribbing in cream until the leg measures 6 inches from cast-on. Begin shaping the calf by decreasing 1 stitch at each side of the back-of-leg marker every 10th round twice, working decreases into the ribbing pattern as neatly as possible (totaling 60 stitches). Work until the leg measures about 13 inches. Decrease 2 more stitches evenly (totaling 58 stitches).
Heel Flap
Work back and forth over 29 heel stitches, leaving the remaining 29 stitches for the instep.
Row 1
Knit 1, slip 1, across, knit 1 if needed.
Row 2
Purl across.
Repeat these 2 rows for a total of 28 rows.
Heel Turn
Purl 16, then P2tog, P1, and turn. Slip 1, knit 4, SSK, K1, turn. Continue turning the heel by working to one stitch before the gap, decreasing across the gap, working one more stitch, and turning until all side heel stitches are used.
Gusset
Pick up 14 stitches along each heel-flap edge. Rejoin in the round. Decrease at each side of the gusset every other round until 58 stitches remain.
Foot
Continue in stockinette on the sole and maintain K2, P2 rib across the instep if desired. Work until the foot measures about 2 inches shorter than the desired finished length.
Toe
Arrange 29 stitches for the top and 29 stitches for the sole. Decrease 1 stitch at each side of the top and sole every other round until 22 stitches remain in total, then decrease every round until 10 stitches remain. Graft the remaining stitches using the Kitchener stitch.
Second Sock
Make a second sock exactly the same. Weave in ends and block lightly.
Checkpoints
As you progress, ensure:
- The initial cast-on should lie flat and be snug but comfortable around the calf.
- The leg’s ribbing should keep its elasticity and not sag.
- Gauge checks throughout the process will ensure that the fit remains true to size.
Assembly
There’s no complex assembly required for these socks. Simply complete each section as directed and ensure that transitions between sections (for instance, from the leg to the heel flap) are seamless.
Finishing
Once both socks are completed, gently weave in any loose ends using a tapestry needle. Lightly block the socks to retain the shape and even out stitches. You can block them by washing them in cool water with a mild detergent, gently squeezing out excess water, and laying them flat to dry.
Resizing
If you need to adjust sock size:
- Measure the foot circumference and add stitches accordingly, ensuring the total cast-on number remains a multiple of 4 for the ribbing.
- For length adjustments, simply increase or decrease the inches of ribbing prior to switching to the leg section.
Useful Variations
- Experiment with a single color for a more classic look.
- Try various patterns or textures on the leg for added design interest.
- Create a shorter version for ankle socks, reducing the leg length by 5-6 inches.
Troubleshooting
Why Is My Project Getting Wider?
If your socks are becoming wider, check the tension and ensure you are not inadvertently loosening your stitches.
Why Is My Edge Wavy?
This often occurs from incorrect tension. Ensure that your ribbing is not stretched excessively and maintain consistent tension throughout.
Why Is My Fabric Curling?
Curling might result from using a mismatched yarn weight or incorrect tension. Check your gauge and switch to a larger needle if needed.
Frequently Asked Questions
Can I use a different yarn weight?
While this pattern is designed for DK weight yarn, you may try heavier yarn, but adjustments to stitch counts and calculations will be necessary.
Can I use cotton?
Cotton yarn can create a different texture and drape but may sacrifice some warmth compared to wool blends.
Can a beginner make this?
This pattern is suited for intermediate knitters due to the techniques involved. However, a determined beginner could also attempt it with guidance.
How should I block it?
Block by gently washing in cool water, shaping to the desired size, and laying flat to dry.
The Ribbed Cabin Knee Socks are perfect for the cozy, cold months ahead. By following this pattern, you’ll enjoy making your own handmade footwear that not only keeps you warm but also showcases your unique style. Happy knitting!



