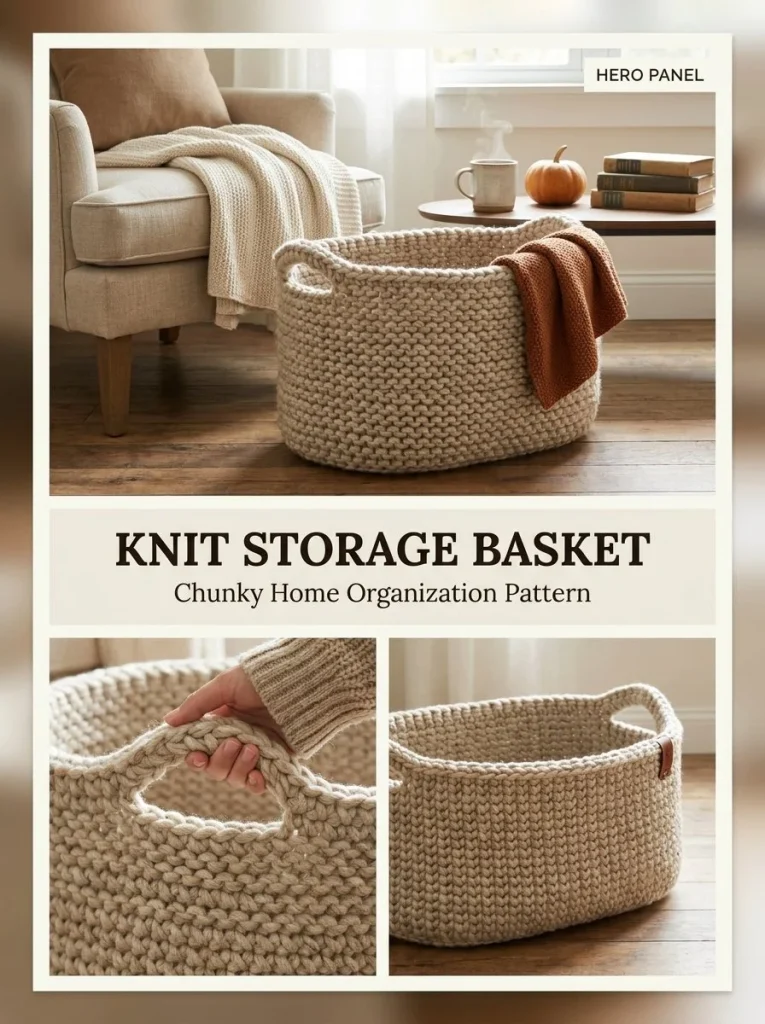
This beautifully textured storage basket is perfect for tidying up your space while adding a touch of handmade charm. The Harvest Handle Storage Basket is not just a practical item; it’s also a decorative piece that can enhance any room. Thanks to its soft, rounded shape and tactile fabric created with jumbo yarn, it’s both visually appealing and functional. Whether used to organize craft supplies, children’s toys, or household items, this basket showcases how easy it is to combine utility and style in your crochet projects.
The project features a straightforward knit pattern that involves a few key techniques. Beginning with a sturdy base, you then pick up stitches around the sides to form the walls of the basket. The basket’s construction emphasizes a simple garter stitch, creating ridged sides that add strength and aesthetics. Additionally, the handles are designed to be both stylish and practical, allowing for easy transport. Perfect for beginners and seasoned crafters alike, this project is not only a rewarding experience but results in a lovely piece perfect for any home.
In the following sections, we will delve deeper into the specifics of the materials and techniques used, ensuring a laid-back approach to creating your own storage basket.
Pattern at a Glance
Skill level: Intermediate
Terminology: Standard knitting terminology
Construction: Bottom-up with joined circular sides
Finished size: Approximately 14 in wide x 9 in high
Yarn weight: Jumbo #7
Needles: US 19 / 15 mm circular needle (32 in or longer)
Main stitch: Garter stitch
Gauge: About 7 sts x 11 rounds = 4 in / 10 cm
Layout: Circular basket
Joining: Stitches joined in the round
Rim: Reinforced with knit/purl ridges
Materials
To craft your Harvest Handle Storage Basket, you will need the following materials:
- Yarn: Jumbo #7 wool-blend yarn, recycled cotton cord, or knit tube yarn in a natural flax/oatmeal color, approximately 250-320 yards.
- Needles: A US 19 / 15 mm circular needle that is 32 inches or longer.
- Notions: A stitch marker and tapestry needle are essential for finishing your project.
- Measurement: The finished dimensions of the basket will be approximately 14 inches wide x 9 inches high.
These materials are fundamental to ensuring that your basket holds its shape and looks cohesive in design.
Yarn and Color Notes
When selecting yarn for your basket, it’s important to consider both texture and color. A wool-blend or recycled cotton yarn will provide a good balance of sturdiness and flexibility while offering aesthetic appeal. The natural flax or oatmeal color will give a minimalist feel, making it versatile in a variety of decor environments. Smooth yarns can enhance the appearance of the ridges, while textured yarns may add extra visual interest to the final product.
Finished Measurements
The completed basket will measure approximately 14 inches in width and 9 inches in height. These dimensions are crucial for ensuring your basket is functional as a storage item, and they hinge on achieving the correct gauge when working the pattern.
Gauge
Maintaining consistent tension is key in creating a sturdy basket. The required gauge is approximately 7 sts x 11 rounds = 4 inches (10 cm) in garter stitch fabric. An accurate gauge ensures that the basket holds its shape effectively. To achieve this, it’s advisable to measure your gauge over a 4-inch square before beginning. If your gauge is larger, the basket may be too loose and floppy; if smaller, it may be too tight and distorted.
Abbreviations
- sts: stitches
- K: knit
- P: purl
Important Pattern Notes
Before starting, consider the following important aspects:
- The base is constructed from garter stitches; be sure your cast on count is exact to maintain the right proportions.
- Always mark your rounds using the stitch marker when you begin joining to create a seamless look.
- It’s helpful to keep the finished basket flat and structured by making sure your tension remains consistent throughout the project.
Special Stitches and Techniques
- Garter Stitch: Created by knitting every row, this stitch pattern produces a texture that is stretchy and flexible, ideal for the structure of the basket.
- Cable Cast-On: This cast-on method is useful when creating the handles of the basket, permitting easy expansion without affecting the overall tightness.
Understanding the Construction
The construction of the basket begins with a flat base, where you’ll knit until achieving the specified dimensions. Once the base is knit, stitches are picked up along the edges to form the sides, allowing for a seamless transition into the wall structure. The addition of the handle rounds modifies the structure to include practical elements, while the closing rounds reinforce the rim for added durability. The overall silhouette is rounded, giving that soft oval shape everyone loves in a decorative basket.
Full Pattern Instructions
Foundation
- Cast On: Start by casting on 18 sts.
- Base Construction: Knit every row for a total of 24 rows or until the base measures approximately 10 x 7 inches. Once completed, bind off loosely.
Picking Up Sides
- With your circular needle, pick up 18 sts across each long end and approximately 12 sts along each short side for about 60 sts total. Place a marker and join in the round. Keep in mind that your pick-up count could vary slightly depending on your yarn or gauge.
Ridged Sides
- Round 1: Knit all stitches.
- Round 2: Purl all stitches.
- Continue repeating these two rounds to form the ridges until the side wall measures about 7 inches from the base.
Handle Round
- Identify the center 6 sts on each long side. Knit to the first handle section, then bind off 6 sts. Continue knitting around and bind off the centered 6 sts on the opposite side.
Next Round
- Knit to the first gap and cast on 6 sts using a cable cast-on method. Continue knitting to the opposite gap and cast on another 6 sts. You will continue in the established pattern from here.
Reinforced Rim
- Work 4 more rounds in alternating knit and purl ridges, followed by 2 rounds of knit. Ensure to bind off firmly but not so tight that the rim puckers.
Finishing
- Weave in ends securely on the inside. Lightly steam or wet-block the basket over a box or basket form—rounding the corners slightly while the material is damp to ensure a soft oval silhouette. Allow it to dry completely before removing the form.
Checkpoints
- After completing the base, it should measure approximately 10 x 7 inches.
- Ensure you still have 60 stitches after picking up the sides.
- The side walls should reach about 7 inches in height before proceeding to the handle.
Assembly and Joining
Since this pattern is worked in the round from the start, minimal assembly is required. Just ensure that the base aligns evenly with the side walls and the stitches are consistent throughout. The handles created through the bind-off method at the top will help facilitate lifting and moving your basket easily.
Finishing
Finishing techniques play an important role. Given the structure of the basket, you should focus on weaving in loose ends carefully to avoid any unsightly gaps. The blocking method will help transition the basket into a rounded shape, promoting a polished final appearance.
How to Resize
Should you wish to modify the size of your basket, consider the following:
- You can add rows to the sides if you desire a taller basket, maintaining the original stitch count.
- For width adjustments, increase or decrease the base stitch count, keeping in mind the ratio of rows to stitches for stability.
- Always test with gauge swatches to ensure any adjustments yield results that remain both functional and aesthetic.
Useful Variations
Feel free to play around with this basic pattern for exciting variations, such as:
- A deeper basket by adding extra rounds.
- A multicolored basket by changing yarns every few rounds for a unique color blend.
- A flat version for use as a decorative tray, instead of a tall basket.
Troubleshooting
Why Is My Project Getting Wider?
This may occur if your tension loosens over time. Try to maintain a consistent tension as you work, or revisit your gauge to ensure it matches the required stitch count.
Why Are My Edges Wavy?
Wavy edges typically indicate too loose of a tension. Make sure to keep your tension snug while working the foundation and base stitches.
Why Is My Fabric Curling?
Curling could be due to knitting in the round incorrectly or working with too small of a needle. Ensure you’re using the correct size needle and maintaining even tension.
Frequently Asked Questions
Can I use a different yarn weight?
While the pattern calls for Jumbo #7 yarn, you could consider substituting with a similar weight yarn, but keep in mind it may alter the basket’s final dimensions.
Can I make it larger?
Yes, resizing is possible through the methods described above, especially by altering the starting chain or increasing rounds.
Is the pattern reversible?
The interior is not designed to be reversible due to the finishing finishes, although it’s still visually appealing on both sides.
How should I block it?
Block the basket using a damp cloth and a form to ensure the shape is maintained while drying.
This project combines practicality with the fun of crochet, translating yarn into a beautiful storing solution with ease and charm. With attention to detail throughout the process, you’ll create a piece that not only looks great but also serves its purpose well. For additional crochet inspiration, you might enjoy exploring the Berry Basket Drawstring Pouch or the Cocoa Basketweave Cushion Cover.



