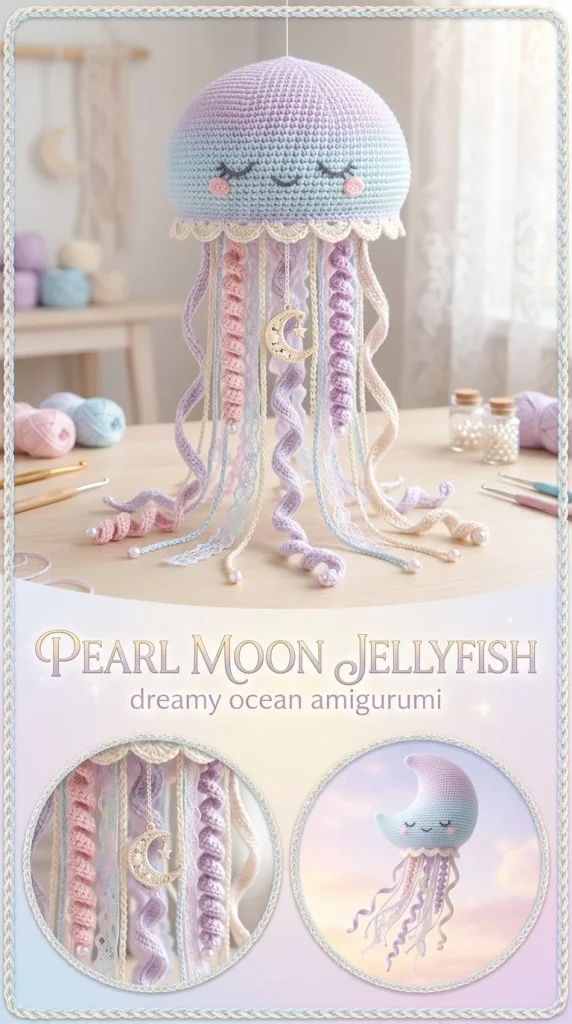
Pearl Moon Jellyfish Amigurumi is a charming and delicate crochet project that brings the ethereal beauty of the sea right to your hands. This free pattern is perfect for crafters who want to create a soft, decorative jellyfish plushie that combines subtle colorwork with playful tentacle textures. Using lightweight DK cotton yarn and a small 2.5 mm hook, this project results in a neat and cozy amigurumi that works beautifully as a gift or a whimsical addition to your home display. The gentle ruffled dome and varied-length tentacles add realism and character, while the simple construction makes it accessible even to those expanding their amigurumi skills. One detail that helps the finished shape hold nicely is working the dome in back loops only at the final stage—this prevents stretching and keeps the ruffle edge delicate. If you enjoy intricate but manageable designs, this project is a lovely next step, much like learning how to craft charming motifs in patterns such as the pastel jellyfish keychain amigurumi.
Why You’ll Love This Crochet Pattern
- Easy-to-follow instructions using US crochet terms, suitable for intermediate beginners
- Beautiful textured dome with a soft bloom edge that creates visual interest
- Mix of spiral, wavy, and straight tentacles for a dynamic look
- Small, lightweight finished size perfect for display or gifting
- Practical shaping tips to maintain the piece’s round form
- Uses gentle DK cotton yarn that’s enjoyable to crochet and soft to touch
Finished Size
The finished jellyfish measures approximately 3.5 inches (9 cm) in diameter, though this will vary slightly depending on your tension, hook size, and yarn choice. Using a 2.5 mm hook with DK cotton produces a tight enough gauge to hold the shape well without being stiff.
Skill Level
Intermediate beginner. This pattern is great for makers confident with basic stitches like single crochet and increases but introduces more detailed elements like front and back loop stitching and varied tentacle textures. It’s also a wonderful way to practice stuffing and assembling small amigurumi parts with care.
Materials Needed
- DK weight cotton yarn: pearl white (approx. 25 g), pale lavender (10 g), powder blue (10 g)
- 2.5 mm crochet hook
- 7 mm safety eyes or embroidery thread for eyes
- Fiberfill stuffing
- Tapestry needle for sewing and weaving ends
- Optional small pearl beads (adult use only)
- Scissors
- Stitch marker (optional, but helpful)
Stitches and Abbreviations
- sc: single crochet
- inc: increase (2 sc in the same stitch)
- hdc: half double crochet
- dc: double crochet
- sl st: slip stitch
- MR: magic ring
- FLO: front loops only
- BLO: back loops only
- ch: chain
Gauge and Tension Notes
Gauge is flexible here but aim for tight stitches to keep the dome firm and maintain shape during stuffing. If your stitches are too loose, the stuffing may show through, or the dome could flatten. Practicing tension on a small swatch using DK yarn and a 2.5 mm hook can help you match the ideal firmness.
Pattern Notes Before You Start
This amigurumi is worked mainly in rounds. The dome and underside disc are worked separately and joined later. Tentacles are attached before closing the bottom disc. The bloom edge is crocheted in front loops only to create a lightly ruffled effect around the dome’s edge. Placement of safety eyes is between rounds 7 and 8 of the dome, spaced 7 stitches apart. Use back loops only for joining the underside disc to keep a neat seam.
Step-by-Step Crochet Instructions
- Dome:
- R1: 6 sc in MR (6)
- R2: inc around (12)
- R3: (sc, inc) x6 (18)
- R4: (2 sc, inc) x6 (24)
- R5: (3 sc, inc) x6 (30)
- R6–9: sc around (30)
- Insert safety eyes between R7–8, 7 sts apart.
- Bloom Edge: (worked in FLO only)
- (sc, hdc, 3 dc in next st, hdc, sc), sl st in next st * repeat evenly around to form the soft ruffle. Fasten off.
- Underside Disc:
- R1: 6 sc in MR (6)
- R2: inc around (12)
- R3: (sc, inc) x6 (18)
- R4: (2 sc, inc) x6 (24)
- R5: (3 sc, inc) x6 (30)
- Tentacles: Attach 8–10 strands around the underside disc edge before closing. Make a mix of:
- A) ch25, 2 sc in each ch back for a tight spiral
- B) ch30, work (sl st, sc, hdc) repeating for a wavy strand
- C) ch22, sl st back for a fine straight strand
- Use white, lavender, and blue in varied lengths.
- Stuff the dome lightly before sewing the underside disc to the dome using back loops only. Sew securely.
- Embroider a tiny mouth with embroidery thread on the dome below the eyes.
- Optionally sew tiny pearl beads to the tentacle tips for decoration, ensuring the piece is for adult display only.
Assembly and Finishing
To join the dome and underside disc neatly, sew through back loops only to create a subtle ridge that complements the bloom edge. Make sure to stuff the dome before closing to give the jellyfish its soft, rounded shape. Tentacles are pre-attached before the bottom is fully closed for easier handling. After sewing, weave in all ends carefully and trim excess yarn for a polished finish. Embroidering a small mouth adds personality without overwhelming the delicate face.
Helpful Tips
- Mark your rounds with a stitch marker to keep track, especially around the bloom edge where stitch counts can be tricky.
- Use tight stitches on the dome so stuffing doesn’t peek through, but don’t over-tighten or the piece may become stiff.
- When making tentacles, experiment with different strand lengths and stitch patterns for more natural movement.
- Securing safety eyes firmly is crucial for durability if the amigurumi is for children (though beads are decorative only).
- Pinning the bloom edge and tentacles before sewing can help keep spacing even and neat.
You might also enjoy working on a more beginner-friendly floral accessory to complement your aquatic amigurumi, like the cherry blossom crochet hair comb pattern, which introduces delicate ruffles and pretty shapes with ease.
Common Mistakes to Avoid
- Missing stitch counts when increasing can alter dome shape; count carefully each round.
- Crocheting bloom edge too tightly may cause puckering—keep stitches consistent and loose in FLO.
- Stuffing too firmly flattens the dome; aim for firm but gentle stuffing.
- Skipping tentacle attachment before closing the disc makes it harder to sew evenly.
- Placing safety eyes unevenly affects the jellyfish’s cute expression; measure spacing before attaching.
Customization Ideas
- Substitute yarn colors to create a more vibrant or monochrome jellyfish—glowing neons or soft creams work well.
- Use cotton-blend or acrylic yarns for different texture and finish, suitable for gifts or play.
- Vary tentacle stitch types or lengths to create a unique silhouette.
- Stitch on additional facial embroidery like eyelashes or blushing cheeks for extra charm.
How to Use or Display This Crochet Project
This amigurumi jellyfish is ideal as a small decorative object on shelves, desks, or in nurseries. It can also make a thoughtful handmade gift for ocean lovers or children with adult supervision due to bead use. Pair it with other soft amigurumi or marine-themed decor for a charming collection. It’s lightweight and portable, so perfect for soft toy enthusiasts who enjoy crafting sea creatures.
Care Instructions
Hand wash gently in lukewarm water with mild detergent, reshape while damp, and lay flat to dry to preserve the shape and softness of the yarn. Avoid machine washing and tumble drying to prevent distortion. Store in a dry place away from direct sunlight to keep colors fresh.
Frequently Asked Questions
Q: Can I use a different yarn weight for this pattern?
A: You can, but it will change the size and tightness of the jellyfish. A lighter DK is ideal for the delicate texture and detail, while heavier yarns may result in a bulkier amigurumi.
Q: How do I secure safety eyes if I want this for a child’s toy?
A: Use safety eyes with secure washers and consider adding embroidery thread over the back for extra security. Avoid beads near children.
Q: What if I don’t want to use beads on the tentacles?
A: The beads are optional and purely decorative for adult displays. The jellyfish looks lovely without them.
Q: Is it possible to make this pattern using only embroidery for eyes?
A: Yes, embroidering the eyes and mouth allows a softer look and makes it fully child-safe.
Q: How important is it to crochet the bloom edge in front loops only?
A: This technique creates the delicate ruffled edge. Using full stitches here will lose the bloom effect.
Final Thoughts
Creating the Pearl Moon Jellyfish Amigurumi is a rewarding way to explore shaping, textural contrast, and color blending in amigurumi crochet. Its graceful form and soft colors make it a gentle delight whether for display or gifting. As you stitch the ruffled dome and playful tentacles, you’ll find a satisfying balance of simplicity and beautiful detail that showcases your growing crochet skills.



