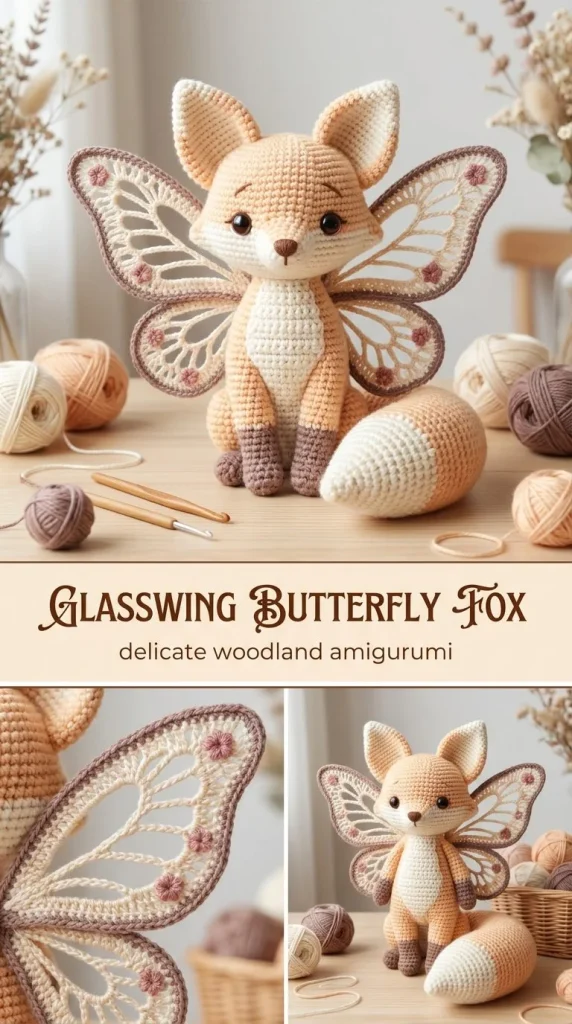
This Glasswing Butterfly Fox Amigurumi is a delicate and charming crochet project perfect for makers who love unique, whimsical creatures. The lightweight mesh wings create a lovely translucent effect, capturing the ethereal beauty of a glasswing butterfly paired with the coziness of a tiny fox amigurumi. Ideal as a gift, a decorative piece, or simply a sweet handmade companion, this pattern is approachable even for those new to amigurumi shapes. Working the mix of solid parts and airy wing panels offers a satisfying challenge without overwhelming beginners. I found that using cotton yarn with a slightly smaller hook helped the wings stay soft yet defined, giving a crisp contrast to the stout body. If you’re exploring easy crochet creatures, this pattern complements other gentle amigurumi projects well—similar to the pastel tones and playful shapes found in the pastel jellyfish keychain amigurumi pattern.
Why You’ll Love This Crochet Pattern
- Combines solid and mesh stitches creating interesting texture and lightness.
- Uses accessible US crochet terms suitable for beginners and intermediate crocheters.
- Detailed shaping instructions ensure a neat, nicely rounded fox shape.
- A satisfying project without large or overwhelming parts.
- Great for gifting or displaying as a charming accent in any room.
- Clear directions on assembly and embroidery give professional finishing touches.
Finished Size
The finished Glasswing Butterfly Fox measures approximately 5 inches (12.5 cm) tall from base to tip of ears, with wingspan about 6 inches (15 cm) across. Sizes can vary slightly depending on yarn thickness, hook choice, and personal tension, so adjust accordingly if you prefer a smaller or larger amigurumi.
Skill Level
Easy to intermediate. The basic amigurumi parts use straightforward single crochet with simple increases and decreases, ideal for beginners with some experience. The mesh wings require following written instructions carefully, but they use only double crochet chains and slip stitches, making them accessible with a bit of practice.
Materials Needed
- DK weight cotton yarn in warm cream (approx. 30 g), soft rust (20 g), charcoal brown (5 g), pale lilac (10 g), and icy blue (10 g)
- Size 2.5 mm crochet hook
- 8 mm safety eyes or embroidery thread for eyes
- Fiberfill stuffing
- Tapestry needle for sewing and embroidery
- Stitch marker to mark rounds
- Scissors
Stitches and Abbreviations
- sc = single crochet: Insert hook, yarn over, pull through, yarn over, pull through both loops
- inc = increase: 2 single crochets in the same stitch
- dec = decrease: single crochet two stitches together
- ch = chain stitch: yarn over, pull through loop
- hdc = half double crochet: yarn over, insert hook, pull through, yarn over, pull through all loops
- dc = double crochet: yarn over, insert hook, yarn over, pull through, yarn over, pull through two loops, yarn over, pull through two loops
- tr = treble crochet: yarn over twice, insert hook, pull through, yarn over, pull through two loops thrice
Gauge and Tension Notes
Gauge is not critical but maintaining a slightly tighter tension on the solid parts helps keep the fox’s shape well-defined. For the wings, a looser tension on the double crochet mesh creates the delicate, airy effect needed. If wings feel too tight, they won’t look as light and flexible.
Pattern Notes Before You Start
This amigurumi is worked in separate pieces then assembled: the head, muzzle, ears, body, tail, and wings. The wings are made of four mesh panels—two upper and two lower—worked flat with slip stitch edging and surface slip-stitch veins for detail. Color changes happen primarily on the tail for a subtle tip highlight. Safety eyes can be used or embroidered if preferred for a softer look.
Step-by-Step Crochet Instructions
Head
- R1: 6 sc in magic ring (MR) (6 sts)
- R2: inc all around (12 sts)
- R3: (sc 1, inc) x6 (18 sts)
- R4: (sc 2, inc) x6 (24 sts)
- R5–8: sc around (24 sts)
- R9: (sc 2, dec) x6 (18 sts)
- R10: (sc 1, dec) x6 (12 sts) – Stuff firmly as you finish
- Fasten off and close the opening.
Muzzle
- R1: 6 sc in MR (6 sts)
- R2: inc all around (12 sts)
- R3: sc around (12 sts) – Stuff minimally, flatten slightly
- Sew muzzle beneath the lower face on head; embroider charcoal nose detail.
Ears (make 2)
- Ch7
- From 2nd ch: sc, hdc, dc, tr, dc, sc
- Fasten off and sew ears high on the head.
Body
- R1: 6 sc in MR (6 sts)
- R2: inc all around (12 sts)
- R3: inc all around (18 sts)
- R4–7: sc around (18 sts)
- R8: (sc, dec) x6 (12 sts)
- R9–10: sc around (12 sts) – Stuff firmly
- Fasten off and close.
Tail
- R1: 6 sc in MR (6 sts)
- R2: (sc, inc) x3 (9 sts)
- R3–10: sc around (9 sts) – Stuff lightly
- Optional: change to cream for last 3 rounds
- Fasten off.
Wings (make 4 mesh panels)
Upper Wings
- Ch13
- Row 1: dc in 4th ch from hook, ch1, skip 1 ch, dc in next ch repeat across
- Row 2: ch4, turn, dc in next dc, ch1 across
- Row 3: repeat Row 2 reducing one mesh space each side by skipping first and last ch1 spaces
Lower Wings
- Ch9
- Work 2 rows following same mesh pattern as upper wings
Finish Wings
Work a firm sc border in lilac around each panel, then surface slip-stitch one or two icy blue veins across the mesh pattern for a delicate effect.
Assembly and Finishing
Sew the head securely to the body. Attach ears high on the head for a perky look. Position the tail at the back of the body. For wing attachment, sew the upper and lower wings symmetrically on the back with slight overlap to mimic butterfly wings while maintaining their flexibility. Weave in all loose ends carefully. Embroider any desired facial details or veins with a tapestry needle to finish cleanly.
Helpful Tips
- Use stitch markers to keep track of your rounds, especially on body and head shaping.
- Stuff firmly but not overfilled to keep smooth shapes without lumps.
- Blocking the wings gently on a flat surface can help set their shape before attachment.
- When sewing wings, use a whip stitch for secure but subtle seams.
- If you find lace or mesh wings intimidating, practice a few rows on scrap yarn. You might also enjoy the beginner-friendly decorative pieces like the cherry blossom crochet hair comb pattern for light lacy textures.
Common Mistakes to Avoid
- Avoid stuffing the muzzle too much—it should be lightly filled to stay flat and neat.
- Make sure increases and decreases in the head and body are counted carefully to maintain shape.
- Don’t skip blocking or edging the wings; unblocked mesh panels can curl or lose shape.
- Be cautious when attaching the wings; uneven placement can affect the balance and overall look.
- Incorrect hook size can make wings too tight or loose—stick to recommended 2.5 mm for best effect.
Customization Ideas
- Substitute yarn colors to create different butterfly-wing color combinations or fox fur shades.
- Experiment with variegated yarn for the body or wings for a marbled effect.
- Try using a softer or fuzzier yarn for a fluffier fox look.
- Add tiny embroidered accents on wings for a unique “stained glass” butterfly effect.
How to Use or Display This Crochet Project
This amigurumi makes a lovely collectible or desk buddy to brighten your craft space or child’s room. It’s small and light enough to gift as a thoughtful handmade present or to display on bookshelves, mantelpieces, or pinned to a decorative wreath. Because of its delicate wings, it’s best kept in a protected spot or in a glass cabinet to avoid crushing.
Care Instructions
Spot clean gently with a damp cloth as needed. If using cotton yarn, hand wash carefully in cool water and reshape while damp. Avoid wringing or harsh agitation to keep wings delicate. Dry flat and away from direct sunlight to preserve the colors.
Frequently Asked Questions
Q: Can I substitute acrylic yarn instead of cotton?
A: Yes, acrylic works but will produce a slightly softer wing texture. Cotton keeps the mesh crisp.
Q: How do I avoid lumps when stuffing?
A: Add stuffing gradually in small amounts, pressing evenly to avoid bumps.
Q: Can I skip the wings?
A: You could, but the wings are a key part of the Glasswing effect and add charm.
Q: How do I attach safety eyes if I want embroidered instead?
A: Simply embroider eyes using black or dark brown yarn before closing the head.
Q: Are the mesh wings difficult to crochet for beginners?
A: They can be new but only involve chains and double crochets; simple practice rows help.
Final Thoughts
This Glasswing Butterfly Fox Amigurumi is a delightful mix of whimsy and cozy charm, perfect for any crocheter seeking a rewarding yet manageable amigurumi project. Carefully following the pattern results in a neat, delicate creature with elegant wings and a friendly fox face, ideal for gifting or keeping as a personal treasure. Enjoy creating this unique stitch adventure!



