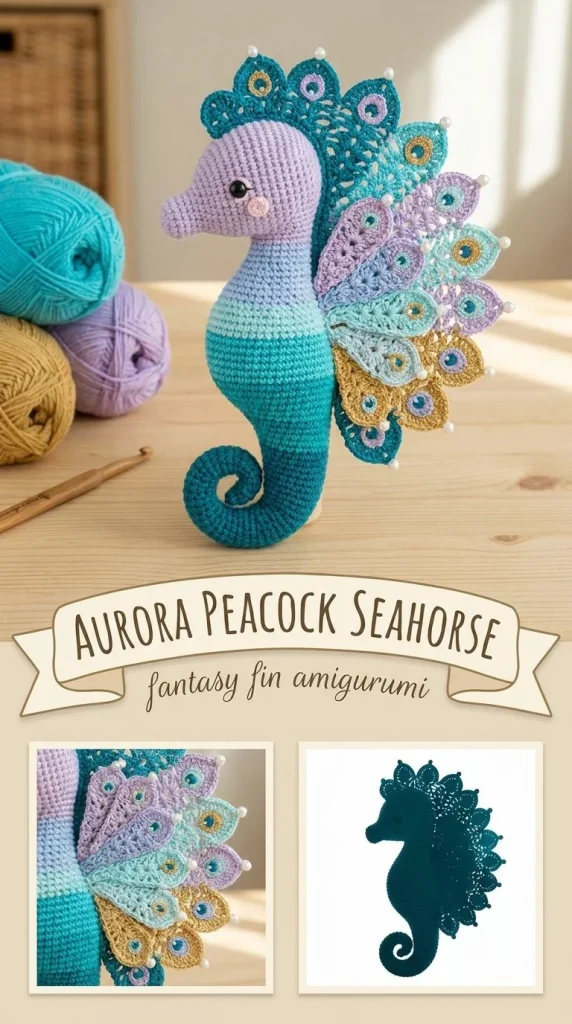
This Aurora Peacock Seahorse Amigurumi is a charming and delicate crochet project that beautifully captures the graceful curves and vibrant colors of a peacock-inspired seahorse. Designed with simplicity in mind, this free pattern uses sport or light DK cotton yarns and a small hook to create a compact, tightly stitched figure that’s perfect for gift-giving, home decoration, or simply expanding your amigurumi collection. The pattern is easy enough for adventurous beginners, focusing mainly on basic stitches worked in rounds, with charming details like a scalloped dorsal fan and crown tufts that give it personality. I found that shaping the body into a gentle S-curve with hidden stitches really brings this piece to life without the complexity of wire armatures. If you enjoy playful sea-themed projects, this pattern offers satisfying texture and shape work, much like other marine amigurumis; you might also appreciate similar patterns like the pastel jellyfish keychain amigurumi for more soft underwater friends.
Why You’ll Love This Crochet Pattern
- The pattern blends simple rounds with easy shaping to create a lifelike seahorse form.
- Its size makes it a great small gift or a sweet decorative accent.
- Focuses on sport or light DK yarn for a neat, detailed finish.
- Introduces surface slip stitch detailing for subtle texture on the fins.
- The assembly is straightforward with clear placement directions.
- Perfect for creators wanting to practice increases, decreases, and color changes in a manageable project.
Finished Size
The finished Aurora Peacock Seahorse measures approximately 4.5 inches (11.5 cm) tall from tail tip to crown tuft. Size may vary depending on your yarn choice, hook size, and personal tension, so feel free to adjust accordingly.
Skill Level
This pattern suits an advanced beginner. The stitches themselves are basic, mostly single crochet with common increases and decreases, but the shaping and assembly require some careful attention. It’s a great step up for beginners ready to try amigurumi with multiple parts and subtle shaping.
Materials Needed
- Sport or light DK cotton yarn in these colors: seafoam (25 g), sky blue (15 g), lilac (10 g), blush pink (10 g), cream (5 g)
- 2.25 mm (B or C) crochet hook
- 6 mm safety eyes or embroidery thread for eyes
- Fiberfill stuffing
- Tapestry needle
- Stitch marker
- Scissors
Stitches and Abbreviations
- sc = single crochet: Insert hook, yarn over, pull through the loop, yarn over, pull through both loops on hook.
- inc = increase: 2 single crochet stitches in the same stitch.
- dec = decrease: single crochet two stitches together to reduce stitch count.
- ch = chain: yarn over and pull through loop on hook.
- sl st = slip stitch: insert hook, yarn over, pull through stitch and loop on hook.
- hdc = half double crochet: yarn over, insert hook, pull up a loop, yarn over, pull through all 3 loops.
- dc = double crochet: yarn over, insert hook, pull up a loop, yarn over, pull through 2 loops, yarn over, pull through last 2 loops.
- tr = treble crochet: yarn over twice, insert hook, pull up a loop, yarn over, pull through 2 loops three times.
- MR = magic ring (adjustable ring)
Gauge and Tension Notes
Gauge isn’t critical for this amigurumi, but your stitches should be tight enough to prevent stuffing from showing through. Using a smaller hook than usual for your yarn helps keep the fabric dense and neat. Maintaining consistent tension will ensure a balanced, smooth shape.
Pattern Notes Before You Start
This seahorse is worked mostly in continuous rounds or joined rounds for flat parts. The pieces — head, snout, body/tail, dorsal fan, side fins, and crown tufts — are crocheted separately then sewn together. Color changes happen on the dorsal fan to create scalloped points, adding the peacock flair. The torso is gently shaped into an S-curve at the end using hidden stitches for a lifelike posture without wire.
Step-by-Step Crochet Instructions
Head:
R1: 6 sc in MR (6)
R2: inc around (12)
R3: (sc, inc) x6 (18)
R4–7: sc around (18)
R8: (sc, dec) x6 (12)
Stuff firmly and close.
Snout:
R1: 6 sc in MR (6)
R2–5: sc around (6)
Stuff lightly, flatten open edge and sew horizontally to the lower front of the head.
Body/Tail:
R1: 6 sc in MR (6)
R2: inc around (12)
R3: (sc, inc) x6 (18)
R4–7: sc around (18)
R8: (sc, dec) x6 (12)
R9–12: sc around (12)
R13: (sc, dec) x4 (8)
R14–22: sc around (8)
Stuff upper body firmly and tail lightly.
R23: dec x4 (4), close.
Curl the narrow tail into a spiral and secure with a few hidden stitches.
Dorsal Fan:
ch 12
Row 1: sc in 2nd ch and across (11)
Row 2: ch3, turn, work 2 dc in each st (22)
Row 3: change color; (sl st, ch4, sl st in same st) in every other stitch to create scalloped peacock points.
Side Fins (make 2):
ch 8
From 2nd ch, work sc, hdc, dc, tr, dc, hdc, sc.
Add a contrasting surface slip stitch line for subtle detail.
Crown Tufts (make 3):
ch 5
sl st back down the chain.
Assembly and Finishing
Sew the head to the broad end of the body with sturdy but invisible stitches. Attach the snout neatly on the lower front of the head. Position and sew the dorsal fan along the upper back, aligning scallops evenly. Attach side fins behind the head for balance. Sew three crown tufts spaced evenly on top of the head to mimic a regal crest. Embroider a small blush pink dot on each cheek for a soft blush effect. Finally, use hidden stitches to gently shape the torso into a graceful S-curve; this makes the seahorse look natural and dynamic without needing wire supports. Weave in all ends securely.
Helpful Tips
- Use a stitch marker to mark your rounds for precise stitch counting.
- Stuff the upper body firmly but keep the tail stuffing light to help with curling.
- When sewing on the dorsal fan and fins, use small stitches to keep the edges neat.
- Try surface slip stitching on your fins to elevate the texture—practice on a scrap first if new to this technique.
- To keep edges crisp, block your pieces gently before assembly by pinning them to shape on a flat surface.
Common Mistakes to Avoid
- Avoid loose stitches which let stuffing peek through; a small hook helps keep the fabric tight.
- Don’t overstuff the tail; it should remain flexible for curling.
- Take time to flatten and sew the snout carefully—uneven placement can distort the head shape.
- When creating the scalloped dorsal fan, count stitches carefully to keep even spacing.
- Be cautious with safety eyes placement to keep proportions balanced and safe.
Customization Ideas
- Experiment with hand-dyed or variegated yarn for a shimmer effect on the seahorse’s scales.
- Swap the color palette to warmer tones like coral, gold, and peach for a tropical feel.
- Use fuzzy or textured yarn for a plush, whimsical look.
- For a smaller size, use fingering weight yarn and a 2 mm hook. Larger size? Try DK yarn with 3 mm hook.
How to Use or Display This Crochet Project
This delicate amigurumi makes a charming desk companion, nursery decor, or a thoughtful gift for ocean lovers. Place it on a shelf with other marine amigurumis or use it as a playful ornament tied to a bag or keyring. It also pairs beautifully with other small accessories like the beginner-friendly cherry blossom crochet hair comb pattern for a coordinated handmade gift set.
Care Instructions
Since the seahorse is made with cotton yarn, gently hand wash with mild soap and air dry flat to maintain shape. Avoid rough handling to keep the surface slip stitches and embroidery intact. Store in a cool, dry place away from direct sunlight to prevent colors from fading.
Frequently Asked Questions
Q: Can I substitute yarn weight or hook size?
A: Yes, though stitch tightness affects stuffing visibility and final size. Stick to sport or light DK for best results.
Q: Are safety eyes necessary?
A: You can use embroidery for eyes if preferred, especially for baby-safe toys.
Q: How do I keep the tail curled?
A: Light stuffing and securing with hidden stitches after curling help hold the spiral shape without wire.
Q: What if I struggle with surface slip stitching on fins?
A: Practice on scrap yarn first and use a contrasting but smooth yarn to make the stitches easier to see.
Q: Can this pattern be adapted for other sea creatures?
A: The shaping and fan details can inspire adaptations, though this pattern is specifically tailored for the seahorse’s form.
Final Thoughts
Crocheting this Aurora Peacock Seahorse amigurumi is a rewarding project that brings a little bit of underwater magic to your craft space. Its thoughtful shaping and charming details make it satisfying to complete and proudly display. Whether you’re gifting it or keeping it as a sweet collectible, this pattern balances simplicity and personality beautifully. Happy crocheting!



