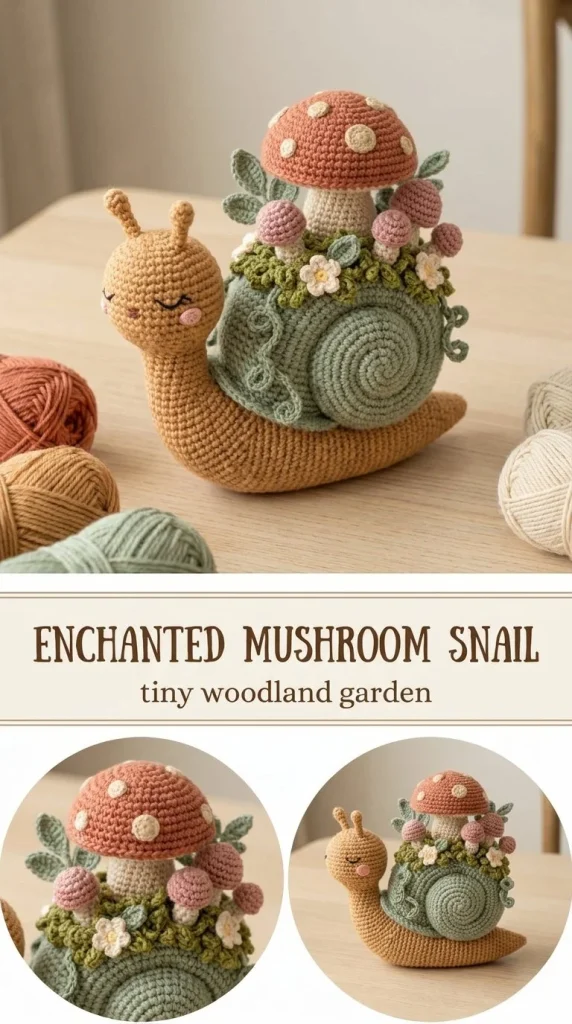
Crocheting an Enchanted Mushroom Snail Amigurumi is a delightful project that brings a touch of whimsy and charm to your handmade collection. This cozy little amigurumi combines a softly shaped snail body with a dusty rose spiral shell topped by a cute mushroom cap, making it a perfect decorative piece or a thoughtful handmade gift. Its compact size fits nicely on shelves or desks, adding a gentle earthy vibe to any room. The pattern uses easy US crochet terms and mostly simple stitches, making it accessible even if you’re somewhat new to amigurumi. One tip from experience: gently bending and securing the snail’s body into an S-shape gives it a lifelike, dynamic posture instead of a stiff toy. If you enjoy assembling creative motifs, you might also appreciate the craftsmanship shared in the pastel jellyfish amigurumi pattern, which highlights similar techniques for finishing lovely textured creatures.
Why You’ll Love This Crochet Pattern
- Combines basic stitches with simple shaping to create a charming, three-dimensional amigurumi.
- Uses DK cotton yarn and a small 2.5 mm hook for a neat, firm fabric that holds shape well.
- Includes detailed instructions for sewing and shaping the body, shell, mushroom cap, and leaves.
- Offers an enjoyable project suitable for gifting, decorating, or adding to a whimsical collection.
- Helps develop skills in surface slip stitches, French knots, and delicate finishing touches.
- Ideal for makers who appreciate layering crochet motifs and subtle shaping to create lively design.
Finished Size
The finished mushroom snail measures approximately 4 to 5 inches long (about 10 to 13 cm) depending on your yarn, hook choice, and personal tension. Because the pattern involves stuffing and bending the body, minor size differences are expected, allowing your snail’s personality to shine through.
Skill Level
This pattern is best suited for an advanced beginner or easy intermediate crocheter. Most stitches are basic—single crochet, increases, decreases—but shaping the body into an S-curve and working the surface slip stitch spiral require some attention to detail. Beginners willing to take it slow and focus on assembly steps will find this a rewarding experience.
Materials Needed
- DK weight cotton yarn in oatmeal (30 g), mocha (10 g), dusty rose (20 g), cream (10 g), and sage (5 g)
- 2.5 mm crochet hook
- Fiberfill stuffing
- 7 mm safety eyes or embroidery thread for eyes
- Tapestry needle for sewing pieces and weaving ends
- Stitch marker to mark rounds
- Scissors
Stitches and Abbreviations
- ch – chain
- sc – single crochet
- inc – increase (2 sc in one stitch)
- dec – decrease (single crochet two stitches together)
- sl st – slip stitch
- BLO – back loop only (crochet in back loop only)
- hdc – half double crochet
Gauge and Tension Notes
Gauge is not critical for this amigurumi pattern, but maintaining a firm tension throughout crocheting is important to ensure the fabric holds stuffing and shape nicely. Loose stitches will make the snail floppy and can expose stuffing. If you’re new to firm tension, practicing on a small swatch before starting may help you get comfortable with tighter stitches.
Pattern Notes Before You Start
Work the head and body in continuous rounds, starting with a magic ring (MR) for a neat, closed beginning. The antennae and small leaves are crocheted separately before assembly. The shell is created from two flat circles with a slip-stitched spiral detail and joined together with stuffing inside. The mushroom cap and stem are individual pieces sewn on top of the shell, allowing layers to build naturally. Secure shaping stitches gently along the curved snail body to hold the soft S-shape without distorting the fabric.
Step-by-Step Crochet Instructions
- Head/Body (oatmeal yarn):
- R1: 6 sc in MR (6)
- R2: inc around (12)
- R3: (sc, inc) x6 (18)
- R4–6: sc around (18)
- Place eyes between rounds 5–6, 6 stitches apart.
- R7: (sc, dec) x6 (12)
- R8–18: sc around (12). Stuff head firmly and body lightly as you progress.
- R19: dec x6 (6), close.
- Bend body gently into an S-shape and secure with hidden shaping stitches.
- Antennae (mocha yarn), make 2:
- ch8, sl st back to first ch; sew onto the head.
- Shell Sides (dusty rose yarn), make 2:
- R1: 6 sc in MR (6)
- R2: inc around (12)
- R3: (sc, inc) x6 (18)
- R4: (2 sc, inc) x6 (24)
- Surface-slip-stitch a cream spiral from center outward on each circle.
- Join two circles with sc through both layers, stuff lightly before closing.
- Mushroom Cap (dusty rose yarn):
- R1: 6 sc in MR (6)
- R2: inc around (12)
- R3: (sc, inc) x6 (18)
- R4: (2 sc, inc) x6 (24)
- R5: BLO sc around (24)
- R6: sc around (24)
- Fasten off. Sew small cream French knots or tiny embroidered spots over the cap.
- Mushroom Stem (mocha yarn):
- R1: 6 sc
- R2–4: sc around, stuff lightly. Fasten off.
- Leaves (sage yarn), make 2 or 3:
- ch5, sl st, sc, hdc, sc back along chain. Sew near the mushroom base without covering the shell spiral.
Assembly and Finishing
Sew the shell securely to the mid-back of the snail’s body. Next, attach the mushroom stem to the top center of the shell, then position the mushroom cap over the stem. Sew leaves in place carefully, tucking them without flattening the spiral detail on the shell. Tie off and weave all ends neatly on the inside. Final gentle shaping of the body S-curve with hidden stitches ensures the snail’s pose looks natural but stays sturdy.
Helpful Tips
- Use a stitch marker to keep track of rounds, especially through shape changes.
- To improve shape, slightly overstuff the head while keeping the body stuffing lighter for flexibility.
- Practice the surface slip stitch spiral on a scrap piece before applying it to the shell for confident, even swirls.
- When embroidering spots on the mushroom cap, avoid pulling the yarn too tight, which can pucker the fabric.
- If working this pattern excites your creativity, you might enjoy trying the beginner-friendly cherry blossom crochet hair comb pattern for a beautiful floral accessory.
Common Mistakes to Avoid
- Stuffing too loosely can cause the snail to lose shape; aim for firmness without overstretching stitches.
- Forgetting to place eyes precisely between rounds 5 and 6 may make the face look uneven.
- Skipping shaping stitches when bending the body results in a floppy or awkward curve.
- Overly tight slip stitches when making the spiral can create bunching or distortion.
- Not weaving ends inside or under the surface can cause the finished piece to look messy.
Customization Ideas
- Experiment with different color palettes for the shell and mushroom cap to match your style or seasons.
- Use a softer yarn blend to create a cuddly toy version, suitable for gentle play (avoid safety eyes in that case).
- Add additional leaves or small flowers around the mushroom stem for an enchanted fairy garden vibe.
- Scale the pattern up or down by changing hook size and yarn weight for unique display options.
How to Use or Display This Crochet Project
This Enchanted Mushroom Snail is perfect as a whimsical shelf décor, a nature-inspired desk companion, or a charming gift for friends who love handmade crafts. It also works beautifully as a pin cushion for dedicated makers or a playful collectible for children—noting safety eyes should be avoided for toddler use. Place it alongside other amigurumi creatures to create a little crochet ecosystem that brightens your craft space or living area.
Care Instructions
To keep your crochet mushroom snail looking fresh, gently hand wash in cool water with mild soap. Avoid wringing or twisting; instead, press out excess water and reshape it before air drying flat. Cotton yarn tends to soften with washing but maintain stitch definition well. Store in a dry, dust-free area away from direct sunlight to prevent fading.
Frequently Asked Questions
Q: Can I use a different yarn weight for this pattern?
A: Yes, but you’ll need to adjust hook size and be mindful that the final size and firmness will change.
Q: How do I safely attach the eyes for a child’s toy?
A: Use embroidery thread eyes instead of safety eyes to avoid choking hazards.
Q: What is a surface slip stitch spiral and how do I do it?
A: It’s a decorative technique where slip stitches are worked on the surface of the fabric to create spiral patterns. Practice on scrap yarn helps.
Q: Can I add wire inside for a poseable snail?
A: Yes, inserting a thin wire before final stuffing and shaping can make poses adjustable, but handle with care.
Q: How do I keep the mushroom cap spots from unraveling?
A: Secure embroidery knots firmly and weave ends inside to prevent loosening.
Final Thoughts
Crafting this Enchanted Mushroom Snail Amigurumi brings a little joy and artistry to everyday crochet. Its layered construction offers a satisfying challenge while remaining friendly to those still gaining confidence with shaping and finishing. Whether you keep it as a sweet handmade treasure or gift it to brighten someone’s day, this pattern welcomes creativity and gentle whimsy into your craft collection.



