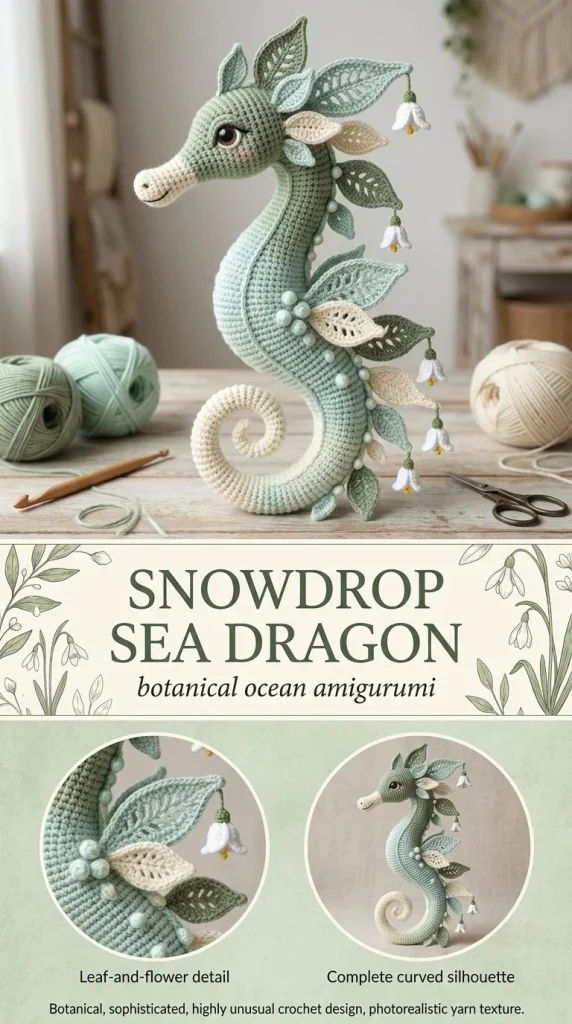
This Snowdrop Leafy Sea Dragon amigurumi is a charming, nature-inspired crochet project perfect for anyone who loves whimsical plush creatures. Shaped like a delicate sea dragon adorned with leafy appendages, this pattern offers a cozy, decorative addition to your collection or a thoughtful handmade gift. Its soft curves and airy leaf details make it a standout piece that’s surprisingly beginner-friendly, despite the intricate look. The pattern’s use of simple stitches combined with creative shaping means you’ll develop new skills, like stitching subtle curves and attaching leaf-like accents that bring the piece to life. As someone who’s tested many toy patterns, I found that shaping the tail with hidden stitches rather than wire keeps the amigurumi soft and cuddly while maintaining its elegant form. If you enjoy amigurumi projects with unique details, this one fits perfectly alongside other playful designs like the pastel jellyfish keychain amigurumi.
Why You’ll Love This Crochet Pattern
- The leafy effects give your amigurumi a fresh, nature-inspired texture without complicated stitches.
- Uses sport-weight yarn with a small hook, producing a neat and delicate plush perfect for display or gifting.
- Great project for developing shaping techniques like increasing, decreasing, and hidden shaping stitches for soft curves.
- Designed to keep the piece soft and cuddly by avoiding wire, making it safe and pleasant to handle.
- Detailed instructions with stitch counts and shaping tips make it accessible for intermediate beginners wishing to challenge themselves.
- Leaves room for creative color choices and leaf sizes, so you can make it yours with subtle customization.
Finished Size
The finished sea dragon measures approximately 7 to 8 inches (18 to 20 cm) long from head to tail tip. Keep in mind, your final size may vary depending on your yarn thickness, hook choice, and personal tension while crocheting.
Skill Level
Intermediate beginner. The stitches are straightforward, but the shaping techniques, leaf appendages, and careful assembly call for some familiarity with amigurumi basics and confidence in sewing and stuffing pieces neatly.
Materials Needed
- Sport weight cotton yarn in pale mint (25g), ivory (15g), sea-glass blue (10g), and soft lilac (5g)
- 2.25 mm crochet hook
- Fiberfill stuffing
- 6 mm safety eyes or embroidery thread for eyes
- Tapestry needle for sewing and weaving ends
- Stitch marker to keep track of rounds
- Scissors
- Optional: small pins to hold leaf placements before sewing
Stitches and Abbreviations
- ch – chain
- sc – single crochet
- hdc – half double crochet
- dc – double crochet
- inc – increase (2 sc in one stitch)
- dec – decrease (single crochet two stitches together)
- MR – magic ring or magic circle
- picot – a small decorative loop, typically ch3 and slip stitch into first chain
Gauge and Tension Notes
Gauge is not critical for this pattern, but maintaining a firm, even tension is important to ensure your amigurumi holds shape well and the stuffing does not show through stitches. Too loose, and your leafy details won’t look crisp; too tight and the fabric becomes hard and less flexible. Aim for a balanced tension that feels comfortable on a 2.25 mm hook with sport yarn.
Pattern Notes Before You Start
This project is worked in separate pieces: head, snout, body and tail, multiple leafy appendages, and side fins. All pieces are crocheted in the round and sewn together at assembly. The leafy appendages vary in size, made with chains and cluster stitches to provide an airy silhouette. Color changes happen mostly in the leafy parts where you can mix pale mint, sea-glass blue, and soft lilac for subtle variation. Tail shaping is done with hidden stitches rather than wire or stuffing alone to maintain softness and gentle curves.
Step-by-Step Crochet Instructions
- Head:
- Round 1: 6 sc in MR (6)
- Round 2: inc around (12)
- Round 3: (sc, inc) x6 (18)
- Rounds 4–6: sc around (18)
- Round 7: (sc, dec) x6 (12)
- Stuff firmly and close.
- Snout:
- Round 1: 6 sc in MR (6)
- Rounds 2–4: sc around (6)
- Stuff lightly and sew onto face.
- Body and Tail:
- Round 1: 6 sc (6)
- Round 2: 12 sc (12)
- Round 3: (sc, inc) x6 (18)
- Rounds 4–6: sc around (18)
- Round 7: (sc, dec) x6 (12)
- Rounds 8–12: sc around (12)
- Round 13: (sc, sc, dec) x4 (8)
- Rounds 14–22: sc around (8)
- Round 23: (2 sc, dec) x2 (6)
- Rounds 24–30: sc around (6)
- Stuff upper body firmly and tail lightly. Close and curve tail with hidden shaping stitches.
- Leaf Appendages (make 12–16):
- Chain 6
- From 2nd ch, work: sc, hdc, dc, hdc, sc
- At last ch: 3 sc
- Mirror stitch pattern back along the chain
- Vary leaf sizes by substituting chain 4 leaves for some smaller ones.
- Side Fins (make 2):
- Chain 9
- Work sc, hdc, dc in next 3 ch, hdc, sc
- Add a picot at the tip (ch3, slip stitch into first ch)
Assembly and Finishing
Sew the head securely to the body and attach the snout to the face with neat stitching. Pin and sew leaf appendages in paired, staggered rows along the crown, back, sides, and tail, mixing large and small leaves for a balanced airy effect rather than bulky coverage. Attach side fins just behind the head. Embroider a tiny ivory mouth using fine yarn or thread. Avoid using wire to keep the plush soft; shape the tail using subtle hidden stitches, which produce a natural curve without stiffening.
Helpful Tips
- Use a stitch marker at the beginning of each round to keep track easily, especially in small pieces like the leaves.
- Stuff firmly but not overly tight; this helps the shape hold while avoiding lumps. Use lighter stuffing for the tail for flexibility.
- When sewing leaves, stagger them carefully to avoid crowding and maintain the leafy silhouette.
- Keep your stitches consistent by practicing the increases and decreases on scrap yarn first—this will help your shaping look smooth.
- If eyes are intimidating, you might try embroidering them instead to maintain a soft surface. For inspiration, check out the beginner-friendly cherry blossom crochet hair comb pattern for simple embroidered flower work you can adapt stylistically.
Common Mistakes to Avoid
- Loose stuffing revealing gaps: Make sure the tension is tight but not so tight that your stitches are hard to work. Filling gaps makes the piece look unfinished.
- Miscounting rounds: Using a stitch marker and counting your stitches regularly prevents unnoticed mistakes in shaping rounds.
- Crowding leaf placements: Leaves too close together make the amigurumi look bulky and lose the delicate effect. Pin them before sewing.
- Using wire for tail shaping: This can cause the plush to poke through and feel stiff—stick to hidden shaping stitches.
- Incorrect finishing of ends: Weave yarn tails in carefully to avoid unraveling or lumps under the surface.
Customization Ideas
- Choose different yarn colors like soft greens, blues, or purples to give your sea dragon a magical or realistic look.
- Use slightly thicker or thinner yarn and adjust hook size to create larger or smaller versions.
- Add subtle glitter yarn in some leaves for a sparkly ocean effect.
- Experiment with embroidery eye shapes or tiny bead decorations for accents.
How to Use or Display This Crochet Project
This leafy sea dragon makes a beautiful shelf accent, an imaginative toy for kids, or a unique gift for ocean lovers. Its soft texture and airy leaves invite gentle handling, so it’s lovely as a cuddly companion or desk decoration. It also pairs nicely with themed displays for beach or marine-inspired decor.
Care Instructions
Handwash gently in cool water with mild detergent and lay flat to dry. Avoid wringing or twisting, which can distort the shape. Store in a dry, dust-free area away from direct sunlight to preserve yarn colors and maintain fiber softness.
Frequently Asked Questions
Q: Can I substitute yarn weight or hook size?
A: You can, but keep in mind that changing yarn thickness and hook size will affect the finished size and the firmness of your plush. Aim for a crochet fabric tight enough to hold stuffing without gaps.
Q: How many safety eyes should I use and where?
A: Use two 6 mm safety eyes placed symmetrically on the head before stuffing and closing. If you prefer embroidery, use dark yarn to stitch simple eyes instead.
Q: Can this pattern be made without stuffing?
A: Stuffing is essential to achieve the rounded, leafy shapes and soft curves, so it’s not recommended to skip.
Q: What if I’m new to amigurumi shaping?
A: Take each section slowly and practice your increases and decreases on small swatches. Following the step counts carefully will help keep your shaping smooth.
Q: How do I keep the leafy appendages from unraveling?
A: Weave in all ends carefully and add at least two secure stitches when sewing leaves to the body.
Final Thoughts
Crocheting the Snowdrop Leafy Sea Dragon is a rewarding way to expand your amigurumi skills while creating a unique, delicate plush with beautiful leafy accents. Its soft shapes and elegant leafy silhouette make it a standout piece to treasure or gift. With thoughtful assembly and gentle finishing, you’ll end up with a cozy creation that embodies both charm and craftsmanship.



