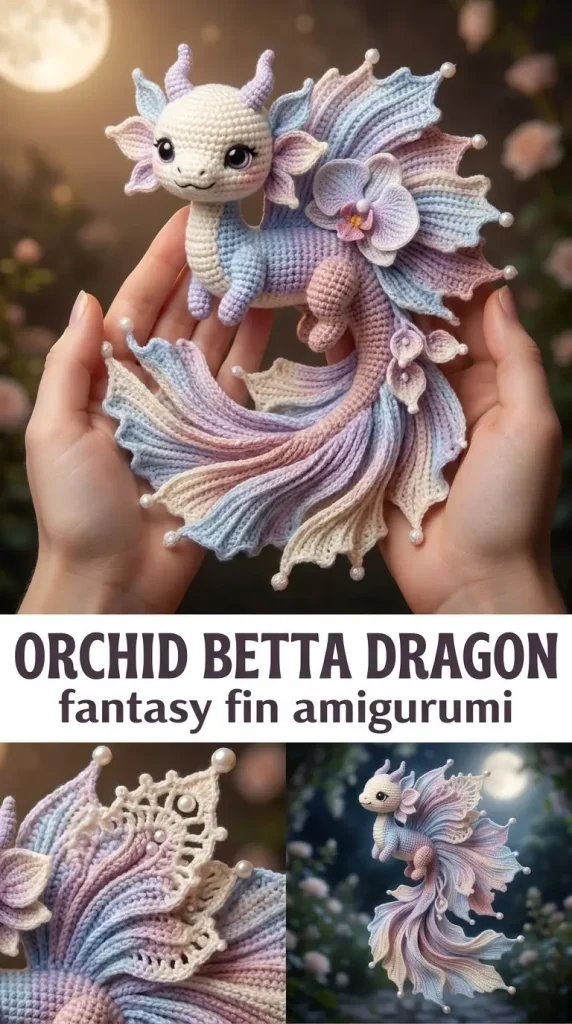
Moonlit Orchid Betta Dragon Amigurumi is a delicate and enchanting crochet project that captures the ethereal beauty of a mythical sea creature with the elegance of an orchid’s hues. This free pattern guides you to crochet a softly textured amigurumi dragon with layered fins and subtle detailing, making it a charming decorative piece or a unique gift. It’s perfect for makers who want a project that looks intricate but is actually manageable, especially if you like assembling parts like fins and tails that add a realistic touch. If you’ve enjoyed whimsical pattern designs such as the pastel jellyfish keychain, you will appreciate how this betta dragon balances softness and structure effortlessly, giving you space to practice shaping and finishing skills without overwhelming complexity.
Why You’ll Love This Crochet Pattern
- Creates a stunning amigurumi with elegant layered fins and rippled fans that truly capture the betta fish aesthetic.
- The pattern uses basic stitches combined in creative ways, making it accessible for an advanced beginner or intermediate crocheter.
- Clear instructions for shaping and assembly ensure a neat, shaped look that holds well without too much stuffing.
- Offers options for adding pearl beads for a sophisticated adult display piece, allowing you to personalize your dragon.
- Plenty of room for color customization using sport cotton yarns, perfect for those who love experimenting with pastel or jewel tones.
- Working in rounds and with separate fin panels improves your finishing techniques, a valuable skill for amigurumi makers.
Finished Size
The completed Moonlit Orchid Betta Dragon will measure approximately 6 to 7 inches (15 to 18 cm) long from head to tail tip. Size may vary depending on your yarn choice, hook size, and tension. Using thinner sport weight yarn and a tighter tension will create a smaller, more detailed model, while looser stitching or a larger hook will produce a slightly bigger amigurumi.
Skill Level
Advanced beginner to intermediate. This pattern involves standard amigurumi techniques such as single crochet rounds, increases, and decreases, along with some lacework and shaping for fins and tails. Beginners confident with basic stitches will find it a rewarding challenge, especially in assembling and layering the multiple tail panels.
Materials Needed
- Sport weight cotton yarn in pearl cream (20 g), lilac (15 g), icy blue (15 g), blush pink (10 g)
- 2.25 mm crochet hook
- 7 mm safety eyes or embroidery thread for eyes
- Light fiberfill stuffing
- Tapestry needle for weaving ends and sewing parts
- Stitch marker to track rounds
- Scissors
- Optional pearl beads for adult display decoration
If you like delicate, wearable crochet accessories, check out the beginner-friendly cherry blossom crochet hair comb pattern for another project using similar yarn weights and lace techniques.
Stitches and Abbreviations
- sc: single crochet — insert hook, yarn over, pull through, yarn over, pull through both loops
- inc: increase — 2 sc in the same stitch
- dec: decrease — single crochet decrease by inserting hook in next two sts and completing as one
- ch: chain stitch
- sl st: slip stitch
- hdc: half double crochet
- dc: double crochet
- tr: treble crochet
Gauge and Tension Notes
Gauge is flexible for this project, but maintain a firm, consistent tension to ensure your betta dragon holds its shape well. Tighter stitches help prevent stuffing from showing through, especially in the body and fins. Using a smaller hook than usual for sport weight yarn may improve the firmness and detail of the fins and tail panels.
Pattern Notes Before You Start
This amigurumi is worked mostly in continuous rounds for the body, with separate pieces crocheted for the horns, pectoral fins, dorsal fin, and tail panels. The fins use lace and scalloped edges for an airy look. Tail panels are worked in leaf shapes with optional mesh openings and surface slip stitches for veins. After crocheting, all parts are sewn onto the body in layers. Color changes are minimal but used for the fin borders to highlight shapes.
Step-by-Step Crochet Instructions
Body
- R1: 6 sc in MR (magic ring) (6)
- R2: inc around (2 sc in each stitch) (12)
- R3: (sc, inc) x6 (18)
- R4: (2 sc, inc) x6 (24) — place eyes between R4–5 near front, about 7 sts apart
- R5–10: sc around (24)
- R11: (2 sc, dec) x6 (18)
- R12: (sc, dec) x6 (12) — stuff lightly here
- R13–16: sc around (12)
- R17: (sc, dec) x4 (8)
- R18–20: sc around (8)
- R21: dec x4 (4), close and fasten off.
Small Horns (make 2)
- ch4, sl st back.
Pectoral Fins (make 2)
- ch9; sc, hdc, dc, tr in next 3 sts, then dc, hdc, sc.
- Border with a second color for contrast.
Large Dorsal Fin
- ch18
- Row 1: sc in 2nd ch and across (17)
- Row 2: ch4, turn, skip 1, dc, ch1 across to create open lace mesh
- Row 3: Work variable-height scallops on outer edge: (sc, hdc, 3 dc, hdc, sc) into successive mesh spaces, creating a rippled fan.
Large Tail Panels (make 5)
- For 3 panels: ch18; for 2 panels: ch14
- Work leaf shape: from 2nd ch, sc, hdc, dc in next 8, hdc, sc, sl st; 5 sc in final ch; then mirror stitches down opposite side.
- On two panels, create mesh openings by replacing every third dc with ch1, skipping 1 on the return.
- Surface slip stitch contrasting veins from base to tip.
Assembly and Finishing
Attach the horns near the top of the head, using your tapestry needle to sew firmly and hide ends neatly. Position the pectoral fins just behind the head, symmetrically on each side. Sew the dorsal fan along the back so it fans out gracefully. Join all five tail panels around the tail base in a layered half-circle pattern, overlapping slightly for fullness.
Add a tiny embroidered smile using a single strand of blush pink or matching embroidery thread for subtle expression. For an elegant adult display, sew tiny pearl beads just to the outer fin tips—take care not to add beads if the piece is intended as a toy or for children.
Helpful Tips
- Use stitch markers to keep track of round starts, especially during body shaping, to avoid losing count.
- Stuff lightly and evenly; overstuffing can distort the delicate shape, especially around the neck and tail base.
- When working fins, maintain consistent tension to keep lace edges from becoming uneven or floppy.
- Contrast edging on fins not only adds beauty but helps define shapes clearly—don’t skip the border rows.
- For neater seams, whipstitch parts together from the inside, pulling ends tight but not so much as to puck the fabric.
- Lacier projects like this benefit from blocking the finished fins lightly with steam to open the scallops and smooth curves.
Common Mistakes to Avoid
- Skipping the magic ring setup can make the body holey and loose at the start—always begin with a tight MR.
- Ignoring stitch counts on tail panels leads to asymmetry; count as you go to keep leaf shapes uniform.
- Stuffing too firmly stretches stitches and creates lumps—keep stuffing light and mold the shape gradually.
- Sewing parts too loosely causes them to flop; ensure secure, tight joining, especially for horns and dorsal fins.
- Neglecting to border fins with the contrasting color can make them blend in and lose their defined shape.
Customization Ideas
- Swap the pastel color palette for jewel tones or vibrant neons for a different mood.
- Use variegated yarns or hand-dyed cotton for a unique shading effect on fins and tail panels.
- Adjust tail panel sizes or add extra panels for a fuller, more dramatic tail.
- Replace pearl beads with tiny sequins or embroidery beads for some shimmer.
- Experiment with metallic thread for veins to give a subtle fantasy sparkle.
How to Use or Display This Crochet Project
This Moonlit Orchid Betta Dragon makes a gorgeous shelf statement or a magical gift for anyone enchanted by fantasy creatures. Its size suits desk or bedroom decoration, nursery accents, or as a thoughtful handmade gift that shows off your crocheting skills. Add a loop to the dorsal fan or tail for a unique hanging ornament, or place it beside other sea-inspired amigurumi like the pastel jellyfish keychain amigurumi for a charming display.
Care Instructions
To keep your crochet dragon looking its best, hand wash gently in cool water with mild detergent. Avoid wringing; instead, press out excess water by rolling in a towel. Reshape while damp and air dry flat to preserve fin details. If made from cotton yarn, store away from direct sunlight to prevent fading, and remove any beads or delicate decorations before washing.
Frequently Asked Questions
Q: Can I use other yarn weights for this pattern?
A: You can substitute similar cotton yarns, but a sport weight with a small hook size works best to maintain fine details. Using thicker yarn may require adjusting stitch counts and risks losing delicate shaping.
Q: How do I embroider the smile for best effect?
A: Use a sharp tapestry needle and soft embroidery floss or thread in blush pink, placing just a few tiny stitches near the head’s front to keep the expression subtle and sweet.
Q: What’s the best way to attach the safety eyes?
A: Insert safety eyes firmly between rounds 4 and 5, about seven stitches apart, before closing the head top to ensure they’re securely fastened and evenly spaced.
Q: Can I omit the pearl beads?
A: Yes, beads are optional for decorative finishing. Omit if the amigurumi is intended for children or play to keep it safer.
Q: Is surface slip stitching the veins difficult?
A: It’s a simple technique but takes patience. Practice on a swatch first, and use contrasting thread colors to highlight the vein effect softly.
Final Thoughts
Creating the Moonlit Orchid Betta Dragon is a rewarding project that blends delicate stitchwork with creative assembly. It’s perfect for makers ready to enhance their amigurumi skillset through shaping, lace, and layered fin techniques. With some basic stitches and a manageable size, this dragon offers charm and elegance in every stitch, ready to become your next treasured hand-crocheted treasure.



