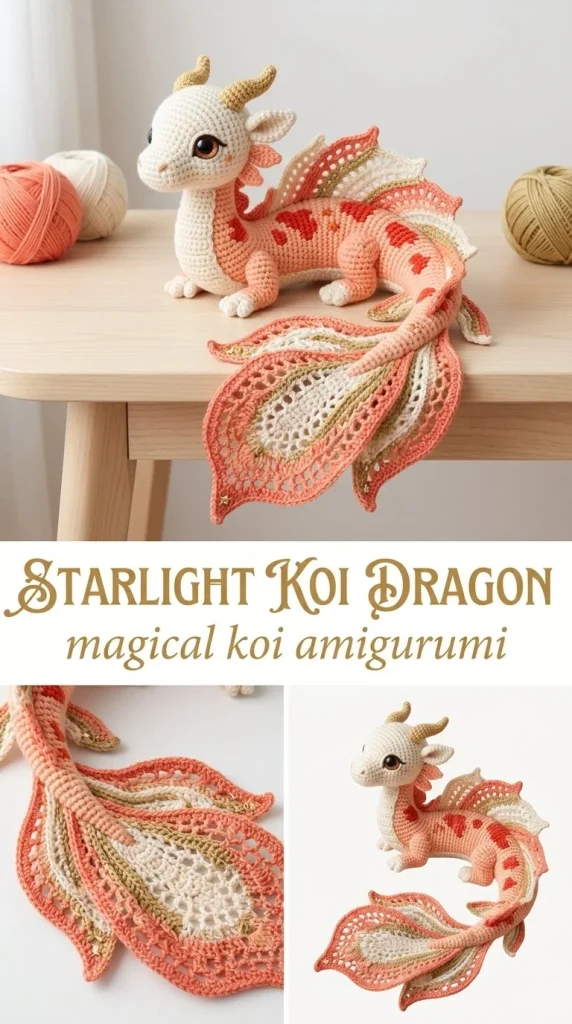
This Starlight Koi Dragon Amigurumi offers a beautifully detailed, yet approachable crochet project perfect for makers who love whimsical creatures with an elegant touch. Crafted with sport cotton yarn and worked primarily in single crochet, this pattern creates a rounded koi-shaped body with layered, flowing tail fins and delicate fins and horns that add character and charm. Ideal for gifting or displaying as a unique decoration, this amigurumi combines soft pastel shades with subtle shimmer details for a sophisticated finish. As someone who appreciates tidy shaping in amigurumi, I found that stuffing as you go helps maintain the perfect rounded form and ease in stitching later pieces onto the body, a little trick that improves the overall neatness without extra effort. If you’re looking for a crochet project that balances beginner-friendly construction with room to embellish, this koi dragon is a joyful next step—much like learning from a pastel jellyfish amigurumi pattern could inspire, this fishy fantasy blends creativity with practical stitches.
Why You’ll Love This Crochet Pattern
- Features a compact, rounded shape with smooth tapering ideal for beginner to intermediate crocheters.
- Combines simple stitches with decorative picots and surface-slip-stitch veins for a professional look.
- Uses sport cotton yarn with a small 2.25 mm hook, making the texture delicate and neat.
- Introduces assembly techniques like attaching layered fins and small embellishments, enhancing finishing skills.
- Stuff-as-you-go method ensures the body keeps its shape easily.
- Perfect for gifting or as a display piece that showcases skill without overwhelming complexity.
Finished Size
The completed Starlight Koi Dragon measures approximately 6 inches (15 cm) long from head to tail fin tip, though exact size depends on your choice of yarn, hook, and personal tension. Smaller hook and tighter stitches will yield a slightly more compact figure, while a looser tension can bring a softer, more cuddly finish.
Skill Level
Advanced beginner is suitable here. While the pattern mostly uses single crochet and standard increases and decreases, shaping the tail fins and adding picots requires attention to detail. The assembly of multiple fins and horns develops a maker’s ability to add finishing touches much like those in a beginner-friendly cherry blossom crochet hair comb pattern that encourages neat joins and layering.
Materials Needed
- Sport weight cotton yarn in cream (25 g), blush (15 g), powder blue (15 g), lavender (10 g), and muted gold (5 g)
- 2.25 mm crochet hook (appropriate for sport yarn)
- Fiberfill stuffing
- 7 mm safety eyes or embroidery thread to embroider eyes and mouth
- Tapestry needle for weaving ends and sewing parts
- Stitch marker to keep track of rounds
- Scissors
- Optional: pearl beads for fin decoration (adult display pieces only)
Stitches and Abbreviations
- sc: single crochet — insert hook, yarn over, pull through, yarn over, pull through both loops
- inc: increase — 2 sc in the same stitch
- dec: decrease — single crochet two stitches together
- ch: chain stitch
- sl st: slip stitch
- hdc: half double crochet — yarn over, insert hook, yarn over, pull up a loop, yarn over, pull through all three loops
- dc: double crochet — yarn over, insert hook, yarn over, pull up a loop, yarn over, pull through two loops, yarn over, pull through the last two loops
- tr: treble crochet — yarn over twice, insert hook, yarn over, pull up a loop, yarn over, pull through two loops, yarn over, pull through two loops, yarn over, pull through final two loops
- picot: a decorative small point made by chaining and slip stitching back into the same stitch or a previous chain
Gauge and Tension Notes
Gauge is not critical for this project but maintaining a consistent tension helps keep the body shape firm and the tail fins neat. Aim for tighter stitches with a smaller hook to prevent stuffing from showing and to hold the amigurumi structure. If you’re working with a different hook size than recommended, adjust your tension to keep the fabric dense.
Pattern Notes Before You Start
This amigurumi is worked mainly in continuous rounds for the body, with fins and horns made separately in rows or chains then sewn on. The body tapers naturally thanks to a mix of increases and decreases. Color changes are minimal, primarily used for contrasting borders on fins and subtle picot accents with muted gold. Stuff the body as you work along to keep the shape firm and manageable. Assembly involves layering four tail panels for a fanned effect at the tapered tail base, creating that flowing koi look.
Step-by-Step Crochet Instructions
Body
- R1: 6 sc in magic ring (6)
- R2: inc around (12)
- R3: (sc, inc) x6 (18)
- R4: (2 sc, inc) x6 (24)
- R5–11: sc around (24)
- R12: (2 sc, dec) x6 (18)
- R13: (sc, dec) x6 (12) — stuff the body
- R14–18: sc around (12)
- R19: (sc, dec) x4 (8)
- R20–24: sc around (8)
- R25: dec x4 (4), close the body, finish off and weave ends
Face
- Place 7 mm safety eyes or embroider eyes between rounds 4–5 spaced about 7 stitches apart near the front.
- Use embroidery thread to stitch a small simple mouth below the eyes.
Horns (make 2)
- Chain 5, slip stitch down the chain to form a curved horn shape, finish off.
Whiskers (make 2)
- Chain 8, slip stitch back down; leave ends for attachment around the mouth space.
Dorsal Fin
- Chain 15
- Row 1: sc across (14)
- Row 2: sc, hdc, 3 dc in next stitch, hdc, sc, sl st repeat to form waves along fin edge.
- Add muted-gold picots at selected wave peaks for sparkle.
Side Fins (make 2)
- Chain 10
- From 2nd chain: sc, hdc, dc, tr in next 3 chains, dc, hdc, sc
- Border in a contrasting color yarn for definition.
Tail Fins (make 4 long panels)
- Chain 16
- From 2nd chain: sl st, sc, hdc, dc in next 7, hdc, sc, sl st
- Work 3 sc in last chain to turn and mirror the pattern back.
- Make two shorter panels with chain 12 and repeat shaping.
- Decorate with surface slip stitch vein lines using blush, blue, and lavender yarn for subtle color contrast.
Assembly and Finishing
Attach the horns and whiskers neatly to the head, just above the eyes and mouth area using tapestry needle and yarn ends. Sew the dorsal fin along the back, starting close behind the head down to near the tapered tail base. Place the side fins behind the head on either side. Finally, overlap and sew the four tail fin panels around the narrow tail base to create a fanned effect. Weave in all loose ends carefully for a clean finish. If desired, sew on optional pearl beads at the fin tips for an elegant adult display.
Helpful Tips
- Stuff firmly but not too much; this helps maintain the rounded koi body shape without stressing the stitches.
- Use stitch markers on rounds to keep track of increases and decreases to avoid accidental stitch count errors.
- Block your tail fins lightly if needed to help the layered effect fan out attractively.
- Adding picots last can avoid snagging and gives you control over decoration placement.
- When sewing fins on, tack one edge first, arrange the shape, then sew the rest for even placement.
Common Mistakes to Avoid
- Skipping stuffing as you go can cause the body to lose shape or become lumpy during assembly.
- Missing decreases will affect the tapered tail’s form and may distort fin attachment.
- Uneven tension in the dorsal fin wave row can affect the wavy look; try swatching and practicing before attaching.
- Forgetting to space the eyes evenly can create an unbalanced face; count stitches carefully.
- Overstuffing or sewing on fins too tightly can restrict the fan effect of the tail panels.
Customization Ideas
- Use sport weight yarn in different shades or variegated yarn to create unique color transitions on the fins.
- Experiment with metallic or shimmer threads for the picots and vein lines to add sparkle.
- Scale the pattern up using finer yarn and smaller hook or down for a keychain-sized version.
- Add embroidery details or tiny beads to the body to mimic scales or glowing accents.
How to Use or Display This Crochet Project
This Starlight Koi Dragon amigurumi makes an enchanting display piece on your bookshelf, desk, or mantle. It’s special enough for a thoughtful handmade gift, perfect for lovers of dragons, fish, or mythical creatures. Avoid placing it where cats or small children can tug on delicate fins or beads. Pair it with other underwater or fantasy-themed crochet designs for a charming collection in a craft-room or nursery.
Care Instructions
Hand wash gently using cool water and mild soap to preserve yarn colors and shape. Avoid wringing; instead, press gently between towels and reshape while damp. Air dry flat away from direct sunlight to prevent fading. Store in a dry place to protect stuffing and decorative elements from dust or moisture.
Frequently Asked Questions
Q: Can I substitute yarn weight for this pattern?
A: It’s best to stick with sport weight yarn for proportional size and detail, but if you adjust hook size accordingly, other yarns can work with recalculated stitch counts.
Q: How do I avoid gaps between stitches when stuffing?
A: Use a smaller hook or tighter tension and stuff little by little as you work to maintain dense fabric.
Q: Are the beads on the fins safe for children?
A: For small children, omit beads to avoid choking hazards and keep the toy safe and washable.
Q: Can I use embroidered eyes instead of safety eyes?
A: Yes, embroidered eyes reduce choking risks and create softer facial features suitable for babies or sensitive users.
Q: How do I make the tail fins fan out nicely?
A: Blocking the tail fins slightly after finishing and sewing them loosely will encourage a natural fan shape.
Final Thoughts
This Starlight Koi Dragon amigurumi combines delicate shaping with playful details to offer a rewarding crochet project that’s charming and satisfying to make. Whether you’re gifting it or keeping it for yourself, the layered fins and soft pastel colors create a magical little creature you’ll adore having on display. Happy crocheting!



