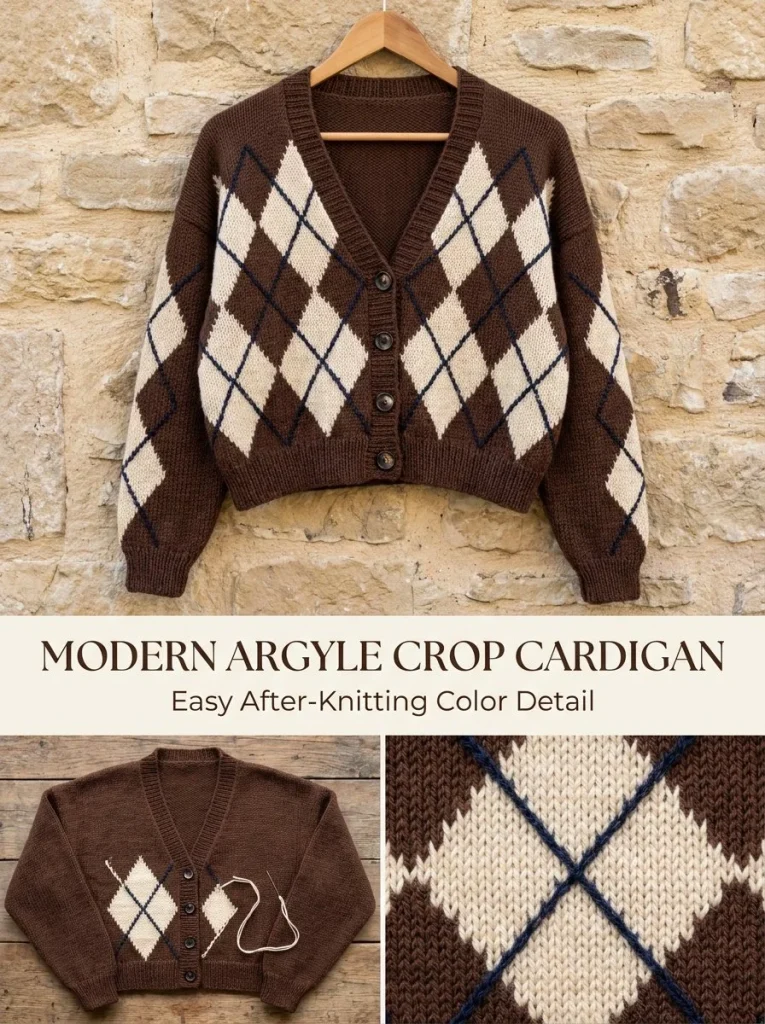
This charming Modern Argyle Crop Cardigan showcases a delightful blend of classic and contemporary knitting techniques, making it an essential addition to any wardrobe. The design features a solid chocolate base, enhanced by an oversized argyle pattern created using the duplicate stitch method. This cardigan not only allows knitters to showcase their skills but also offers warmth and style, perfect for layering in transitional seasons. You may also find Cropped Tie Front Crochet Cardigan Pattern useful.
The construction primarily utilizes a combination of garter bands and a stockinette body, allowing the fabric to lay flatter while ensuring that the ribbing provides stretch and comfort. The project is ideal for knitters with some experience who are looking to explore colorwork techniques. With the addition of a modern argyle motif and thoughtful finishing details, this cardigan stands out as a striking piece. You may also find Easy Argyle Applique Cardigan Beginner Colorwork Crochet useful.
Pattern at a Glance
- Skill level: Intermediate
- Terminology: US knitting terms
- Construction: Top-down seamless construction with front and back panels
- Finished size: Approximately 44 in / 112 cm chest and 20 in / 51 cm length
- Yarn weight: Worsted-weight
- Needles: US 6 (4 mm) needles for ribbing; US 7 (4.5 mm) circular needles for the body
- Main stitch: Stockinette with ribbing and colorwork
- Gauge: 20 sts x 28 rows = 4 in / 10 cm blocked stockinette
- Motifs: Oversized argyle pattern
- Layout: Two front panels and one back panel
- Joining: Shoulder seams and button placement
Materials
To knit your own Modern Argyle Crop Cardigan, you will need the following materials:
-
Yarn:
- Approx. 950 yd chocolate brown (main color)
- Approx. 120 yd cream (for argyle)
- Approx. 90 yd navy (for outline)
-
Needles:
- US 6 (4 mm) needles for the ribbing
- US 7 (4.5 mm) circular needles for the body
-
Notions:
- Tapestry needle for weaving ends
- 6 dark horn-look buttons
These materials are essential not only for the aesthetic appeal of the project but also for achieving the desired fit and relaxation of the fabric.
Yarn and Color Notes
Selecting the right yarn is crucial for this cardigan’s design, as the visual impact primarily relies on contrasting colors and textures. Worsted-weight smooth wool is ideal, as it offers warmth without excessive bulk. The chocolate brown serves as a vibrant backdrop, while the cream and navy provide a striking contrast in the argyle pattern. You might also consider color variations based on personal style, but maintaining a level of contrast will enhance the overall effect.
Finished Measurements
The finished cardigan measures approximately 44 in / 112 cm around the chest and 20 in / 51 cm in length from the top of the shoulder to the hem. These dimensions are designed to provide a comfortable fit with enough ease for layering. It’s important to measure your gauge accurately to ensure these dimensions are met.
Gauge
The gauge for this pattern is 20 stitches x 28 rows per 4 in / 10 cm in blocked stockinette stitch. Keeping gauge consistent is key, especially in a fitted garment like this cardigan. If your gauge is larger, the finished garment may turn out larger than intended; conversely, a smaller gauge can lead to a tighter fit. Always check your gauge before starting the project and adjust needle sizes as necessary.
Abbreviations
- K – Knit
- P – Purl
- St(s) – Stitch(es)
- Yo – Yarn over
- K2tog – Knit two together
Important Pattern Notes
- Make sure the ribbing is worked evenly to ensure uniform bounces and flexibility.
- The buttonholes are incorporated in the right front band. Ensure you create them at the specified rows to allow for proper alignment of the buttons.
- The duplicate stitch technique used for the argyle pattern provides a clean and professional finish, capturing a modern aesthetic without too much complexity.
Special Stitches and Techniques
Duplicate Stitch
This technique is integral to adding the argyle element to the cardigan. Duplicate stitch is executed by following the shape of the diamonds after the knitting process is completed, allowing for precision in color placement.
Garter Stitch
Garter stitch, where you knit every row, is used for the front bands and helps to create a sturdy and structured edge. This provides a nice contrast with the softer stockinette body.
Understanding the Construction
The cardigan is constructed as follows:
- Body Work: Begin with the body in a solid chocolate color, working from the bottom up. This includes setting up the front bands in garter stitch, followed by the main body in stockinette.
- Shaping: The back and front panels are knitted separately, then joined at the shoulders, ensuring a clean finish.
- Sleeves and Neckband: The sleeves are picked up around the armholes and knitted in the round, while the neckband completes the structure.
- Colorwork: Finally, the argyle motif is added as a decorative technique after the main body has been completed.
This logical approach splits knitting tasks into smaller, manageable sections, making the pattern approachable for intermediate knitters.
Full Pattern Instructions
Foundation
With the smaller needle, cast on 220 stitches.
Body
-
Work Front Bands:
- Work in garter stitch as follows:
- Row 1-10: Knit all stitches for 10 rows (garter front bands).
-
Stockinette Body:
- Change to larger needle.
- Continue with 6-st garter front bands and switch to stockinette stitch for the body.
- Buttonholes: Create 6 buttonholes on the right front band on rows 12, 34, 56, 78, 100, and 122 using yo, K2tog.
-
Shaping the Body:
- Continue until you reach 13 in / 33 cm from the bottom edge. At this point, divide the stitches as follows:
- 55 stitches for each front panel.
- 110 stitches for the back panel.
- Continue until you reach 13 in / 33 cm from the bottom edge. At this point, divide the stitches as follows:
Back Panel
- Work to 19.25 in / 49 cm.
- Bind off center 36 stitches.
- Work shoulder shaping: Work 37 stitches for shoulders for 6 rows, then bind off.
Front Panels
- At 16 in / 41 cm, bind off 12 stitches at each neck edge.
- Decrease 1 stitch at the neck edge 6 times.
- Continue to shoulder height, then bind off.
- Join shoulders.
Sleeves
- Pick up 70 stitches around each armhole.
- Knit in the round and decrease 2 stitches every 10 rounds for a total of 10 times until you have 50 stitches.
- At 17 in / 43 cm, change to the smaller needle and work K1, P1 rib for 10 rounds, then bind off.
Neckband
- Pick up about 118 stitches around the neckline.
- Work K1, P1 rib for 6 rows, then bind off.
Argyle After Knitting
- Mark the front panels only.
- Center one large 21-st-wide x 24-row-tall cream diamond on each front panel, with its widest row around mid-chest.
- Duplicate stitch the cream diamond over the chocolate fabric.
- Add a narrow navy diagonal outline one stitch outside each cream edge to create the modern argyle effect.
- Optionally add a second partial diamond near the lower outer corner to maintain symmetry.
- Sew on 6 buttons, weave ends, and steam-block gently without flattening the duplicate stitch.
Checkpoints
- After separating for front and back panels, ensure that the total stitch count still aligns with the original.
- Before starting the sleeves, double-check that the armhole opening looks even.
- While working on the neckband, it should lie flat without curling.
Assembly
Joining the finished pieces takes care and attention to detail. Here are steps to consider:
- Aligning Panels: Ensure that all panels are facing the correct side. Generally, the right sides should be facing each other.
- Sewing Shoulders: Use the mattress stitch to join the shoulder seams for an invisible finish.
- Button Placement: Confirm the exact positioning of the buttons in relation to the buttonholes made on the right front band for a polished look.
Finishing
The final touches solidify the cardigan’s overall look:
- Weave in any loose ends using the tapestry needle to keep the interior tidy.
- Blocking the finished piece helps set the dimensions and even out any inconsistencies in tension. Use a steam blocker for delicate adjustments.
How to Resize
To make adjustments to the size of the cardigan, consider the following:
- Adding Stitches: If you want to increase the size, adjust the cast-on amount by multiples of the stitch pattern.
- Length Adjustments: To make the cardigan longer, you can add additional rows before dividing for the front and back panels.
- Sleeve Fit: Modify the number of stitches picked up around the armholes if a looser fit is desired.
Useful Variations
Consider these variations while knitting:
- Single Color Variation: A solid chocolate version for a classic look.
- Seasonal Palette: Experiment with vibrant or muted colors to fit specific seasons.
- Longer Cardigan: Extend the length by additional rows for a stylish duster effect.
These variations allow you to personalize the cardigan to your style preference.
Troubleshooting
Why Is My Project Getting Wider?
If you notice that your project is expanding, it may be due to too many stitches being added at the join. Always count your stitches regularly to avoid losing track.
Why Is My Edge Wavy?
Inconsistent tension or using the wrong needle size can cause wavy edges. Keep your tension even and ensure you’re using the suggested needle sizes.
Why Don’t My Motifs Match?
Misalignment can happen with colorwork if the gauge isn’t consistent throughout. Use the same yarn for all sections and follow the gauge closely.
Frequently Asked Questions
Can I use a different yarn weight?
Using a different yarn weight may affect gauge. Be sure to check and adjust your stitch count accordingly.
Can I make it larger?
Yes, increasing the initial cast-on or adding length in the body will provide for a larger size.
Do I need a special hook?
No special hooks are required for this project, but ensure that you have the correct needle sizes.
Final Thoughts
Creating the Modern Argyle Crop Cardigan involves understanding the steps of knitting based on structured sections, which ultimately come together to form a stylish and warm garment. Getting adept at various techniques, such as duplicate stitch for colorwork, can enhance your knitting repertoire, making this project both educational and rewarding. Happy knitting, and enjoy the process of making your unique cardigan!



