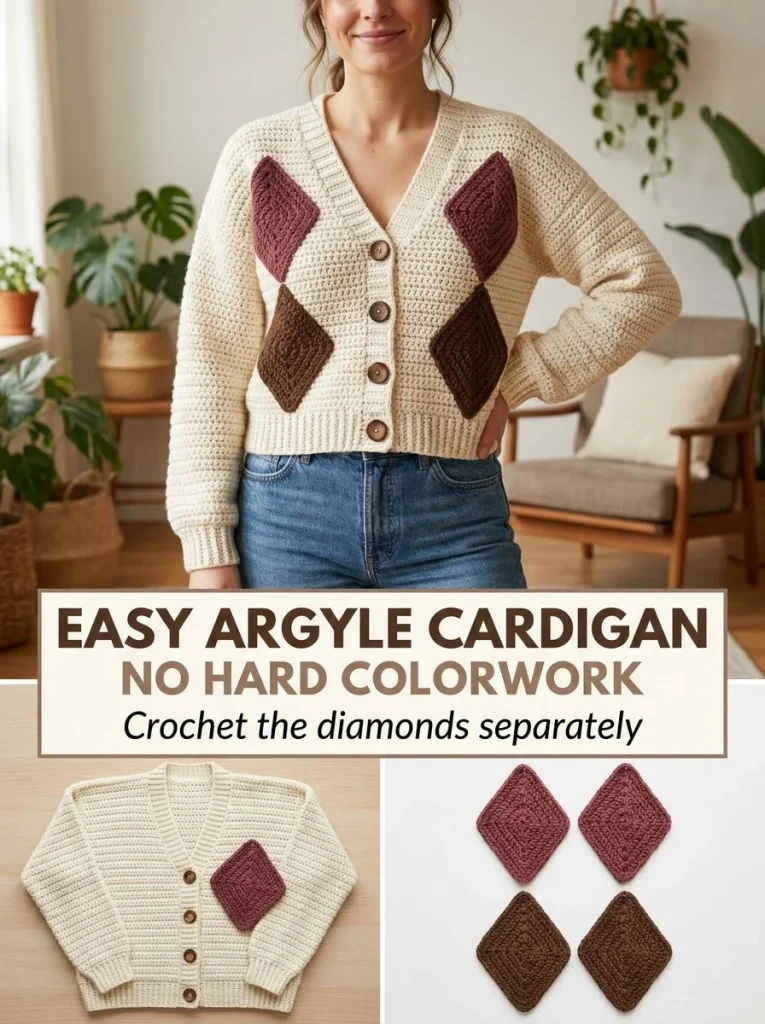
Crocheting a cozy cardigan is not only a rewarding craft but also a great way to create a personalized garment for any occasion. The Easy Argyle Appliqué Cardigan utilizes colorwork techniques that add a beautiful twist to a classic design. This beginner-friendly project can help you enhance your skills with a simple yet stylish V-neck cardigan made from worsted-weight yarn. For those looking for additional beginner patterns, consider exploring this easy amigurumi pumpkin pattern.
Skill Level
Beginner. This project is suitable for beginners as it involves basic stitches such as half double crochet and simple colorwork techniques.
Materials
- Worsted-weight #4 cream yarn
- Small amounts of burgundy yarn
- Small amounts of chocolate yarn
- 5mm crochet hook
- 4 buttons
- Tapestry needle
- Stitch markers
- Measuring tape
- Gauge: approximately 14 hdc = 4 in/10 cm
Abbreviations — US Terms
- ch – chain
- hdc – half double crochet
- sc – single crochet
- st(s) – stitch(es)
- sp – space
Special Stitches
Half Double Crochet (hdc)
To work a half double crochet, yarn over, insert the hook into the stitch, yarn over again, pull through to have three loops on the hook, yarn over and pull through all three loops.
Gauge
Gauge should be checked before starting. Aim for approximately 14 hdc in 4 inches (10 cm) to ensure proper fit.
Finished Size
The finished size of the cardigan is customizable based on the bust measurement. The back width should be set at half the bust measurement, while each front panel should be approximately one-fourth of the finished bust.
Pattern Notes
- The cardigan is constructed in separate panels: one back, two front panels, and two sleeves.
- The V-neck shape is created by decreasing stitches on each side.
- Ribbed cuffs and hem add a neat finish.
- Buttons will be added to the front band after completing the panels.
Crochet Instructions
Part 1 – Cardigan Panels
Back Panel
-
Foundation Chain: Chain a number equal to half the finished bust measurement plus 2 for turning.
-
Row 1: Starting in the 2nd chain from the hook, work 1 hdc in each chain across. (Total: [half bust size])
-
Row 2: Ch 2 (counts as first hdc), turn, and hdc in each st across.
-
Repeat row 2 until the back panel measures 24 inches in length or desired length.
-
Final row: Fasten off.
Front Panels (Make 2)
-
Foundation Chain: Chain a number equal to one-fourth the finished bust measurement plus 2 for turning.
-
Row 1: Starting in the 2nd chain from the hook, work 1 hdc in each chain across. (Total: [one-fourth bust size])
-
Row 2: Ch 2 (counts as first hdc), turn, and hdc in each st across.
-
Rows 3-6: Repeat row 2 until the front panel measures 8-10 inches from the foundation chain.
-
Decreasing for V-neck: Beginning on the next row, decrease 1 st at the inner edge every 2nd row until the neckline reaches the desired V shape.
-
Final row: Fasten off.
Sleeve Panels (Make 2)
-
Foundation Chain: Chain a number suitable for your desired sleeve width plus 2 for turning.
-
Row 1: Starting in the 2nd chain from the hook, work 1 hdc in each chain across.
-
Rows 2-8: Repeat rows until the sleeve measures 18 inches in length or desired measurement.
-
Final row: Fasten off.
Part 2 – Assembly
-
Join Front and Back Panels:
- Align the front and back panels. Seam the shoulders together using a whip stitch or slip stitch.
-
Attach Sleeves:
- Align the sleeves to the armholes and seam them securely.
-
Seam Sides:
- Align and seam the sides of the cardigan from hem to underarm.
-
Ribbed Cuffs:
- For the cuffs, work in a rib stitch (such as hdc in the same st, skip 1 st) around the wrist opening, repeating until the desired cuff width is achieved.
-
Ribbed Hem:
- Work around the entire hem of the cardigan using the same ribbing technique.
-
Button Band:
- Attach a band of hdc over the cardigan’s front edges where buttons will be sewn.
-
Sew on Buttons:
- Place the 4 buttons evenly along the button band and secure tightly.
Part 3 – Diamond Appliqué (Make 4)
Diamond Appliqué Construction
-
Foundation Chain: Ch 2.
-
Row 1: Work 1 sc in the 2nd ch from the hook. (Total: 1 sc)
-
Row 2: Ch 1, turn. Work 2 sc in the first st. (Total: 2 sc)
-
Increase Rows:
- Row 3: Ch 1, turn, work 2 sc in the first st, sc in each st across to the last st, 2 sc in the last st. Repeat this until the half-width reaches approximately 4-5 inches.
-
Decrease Rows:
- Once the diamond reaches the desired width, work a sc2tog at each end of the row until 1 st remains. Finish off.
-
Color Variations:
- Create 2 diamonds in burgundy and 2 in chocolate.
-
Attach Diamond Appliqués:
- Position the diamonds symmetrically on the front panels and sew around their edges using matching yarn.
Tips for the Best Result
- Keep your tension consistent to avoid irregularities in your garment.
- Use stitch markers to mark the locations of decreases when shaping the V-neck to maintain accuracy.
- Before sewing in buttons, ensure the button holes are in line for ease of use.
To enhance your cardigan experience, you might also enjoy the one-rectangle cocoon cardigan, which offers a simple yet stylish option for beginners.
Common Mistakes
Uneven Seams
Make sure to check your stitch counts regularly and keep your seams consistent for a professional look.
Misplaced Buttons
Before sewing buttons, lay them out to ensure they align correctly with your buttonholes.
Finishing
After completing all your panels and attachments, ensure to weave in any loose ends with the tapestry needle. Blocking the cardigan can also help it hold its shape. This will allow your beautiful colorwork to stand out and provide a polished finish.
Care
When caring for your finished cardigan, refer to the yarn label for specific washing instructions. It’s generally advisable to hand wash or gentle cycle in cool water to maintain the integrity of the fibers.
This Easy Argyle Appliqué Cardigan is not only practical and warm, but it also allows you to express your creativity through colorwork and personal touches. Enjoy the process of crafting your unique garment!



