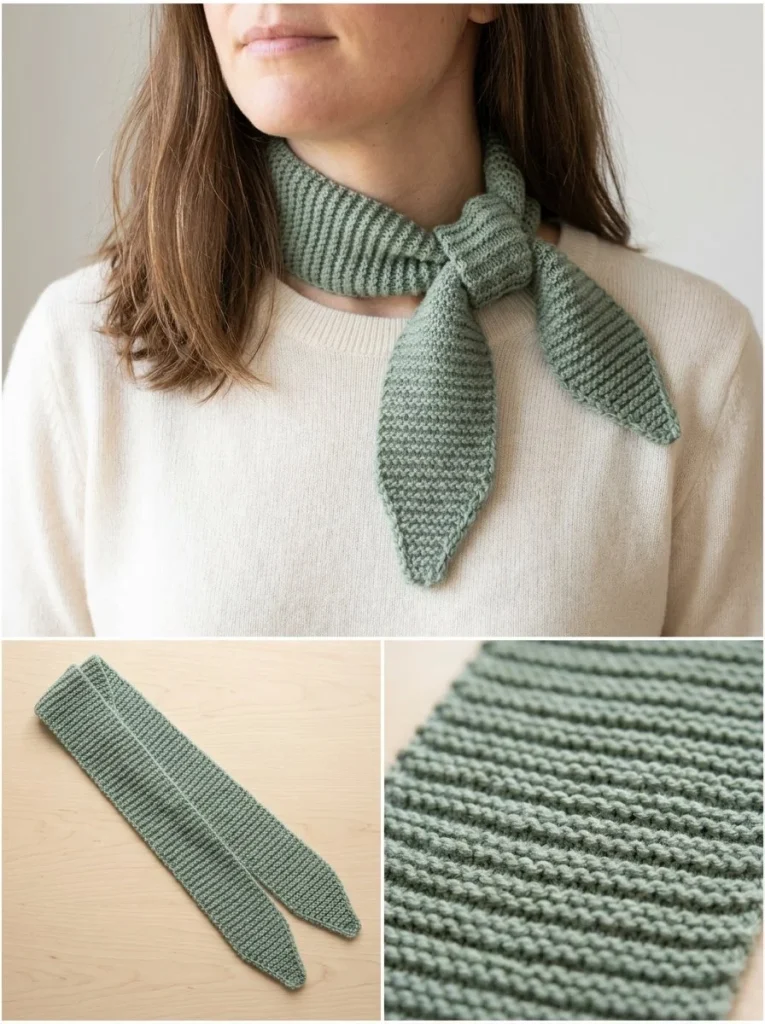
This horizontal ridge mini scarf is a simple, cozy knit accessory perfect for cooler days. Its compact size makes it a great gift or a versatile winter layering piece that won’t feel bulky. Worked entirely in garter stitch, it’s an ideal project for beginners who want to master basic knitting stitches while creating something stylish and practical. The gradual increases and decreases create a beautifully tapered shape with strong horizontal ridges that add texture and interest without any complex stitch patterns. Having knitted this myself, I found the shaping straightforward but effective, and blocking the piece lightly really helps the ridges stand out and gives the scarf a polished finish. If you’re also interested in beginner-friendly crochet projects, you might enjoy browsing this easy beginner crochet pumpkin pattern that complements simple knits like this scarf.
Why You’ll Love This Crochet Pattern
- Perfect size for quick completion — about 90 cm long, so it’s a satisfying project without dragging on.
- Garter stitch texture creates a cozy, stretchy fabric that lies flat with attractive horizontal ridges.
- Beginner-friendly shaping through simple increases and decreases enhances knitting skills.
- Tapered ends make the scarf feel modern and less bulky around the neck.
- Works well with common DK yarns and standard 4.5 mm needles found in most knitters’ stashes.
- Versatile for gifting, layering, or pairing with DIY accessories like mini charms or seasonal decorations.
Finished Size
The finished scarf measures approximately 90 cm (35 inches) in length and 12 cm (5 inches) wide at its widest point. Keep in mind the final size may vary slightly based on your yarn choice, knitting needle size, and personal tension.
Skill Level
Beginner / Easy: This project is well-suited for knitters just starting out with shaping, as it uses only knit stitches (garter stitch) paired with straightforward increases and decreases. No complicated pattern repeats or stitch counts are needed, making it accessible yet fun.
Materials Needed
- DK weight yarn in a muted sage or oatmeal shade (approximately one skein or 100 grams)
- 4.5 mm knitting needles (US size 7)
- Tapestry needle for weaving in ends
- Scissors
- Optional: stitch markers to mark position during increases/decreases, though not essential
Stitches and Abbreviations
- Knit (K): Insert your right needle into the front of the stitch on the left needle and yarn over to pull a new stitch through.
- Knit front and back (Kfb): An increase stitch where you knit into the front and then the back of the same stitch.
- Slip, slip, knit (SSK): A left-leaning decrease where you slip two stitches knitwise one at a time, then knit them together through the back loops.
- Knit two together (K2tog): A right-leaning decrease where you knit two stitches together as one.
Gauge and Tension Notes
Gauge is not critical for this scarf as a size-specific fit isn’t necessary, but maintaining consistent tension will help keep the garter stitch ridges clean and even. Aim for a medium tension—not too tight to preserve flexibility and not too loose to avoid floppy fabric.
Pattern Notes Before You Start
This scarf is worked flat in rows using garter stitch, so knit every row without purling. The construction begins with just 3 stitches, gradually increasing to 25 stitches, knitting straight, and then decreasing back to 3 stitches to form tapered ends. No pieces are seamed since it’s one continuous panel. Blocking after finishing is important to enhance the horizontal ridges and shape.
Step-by-Step Crochet Instructions
-
Cast on 3 stitches.
-
Increase Section:
- Row 1: Knit all stitches.
- Row 2: Knit 1, knit front and back (Kfb), knit to last 2 stitches, Kfb, knit 1.
Repeat these two rows until you have 25 stitches on your needle.
-
Straight Section:
Knit every row until the scarf measures about 78 cm from the cast-on edge, maintaining the 25 stitches to create the horizontal ridge texture. -
Decrease Section:
- Row 1: Knit 1, slip slip knit (SSK), knit to last 3 stitches, knit two together (K2tog), knit 1.
- Row 2: Knit all stitches.
Repeat these two rows until 3 stitches remain.
-
Bind off the remaining 3 stitches.
Assembly and Finishing
Weave in all loose ends carefully with a tapestry needle, taking care not to distort the knitted fabric. Lightly block the scarf by gently wetting it and pinning it flat to dry, preserving the tapered ends and emphasizing the horizontal ridge texture. This finishing step really helps the scarf look neat and professional.
Helpful Tips
- Mark your rows or stitch counts with a simple tally or row counter app to keep track of increases and decreases easily.
- Keep your yarn tension steady especially during increases and decreases to avoid uneven width.
- For a neat edge, try slipping the first stitch on each row purlwise if you are comfortable—it creates a cleaner selvedge.
- Use a soft DK yarn with good stitch definition to highlight the ridged texture.
- Avoid overly fuzzy or novelty yarns as they can obscure the ridge pattern.
- Blocking makes a difference here — don’t skip this final step to showcase the horizontal ridges fully.
Common Mistakes to Avoid
- Forgetting to perform both increases (at beginning and end of row) during the increase section will make your scarf lose its shape.
- Skipping decreases on either side during the decrease section affects the tapered look. Always follow instructions carefully.
- Working too loosely or too tightly can cause uneven ridges and sizing issues — keep your tension consistent.
- Binding off too tightly can make edges pucker; bind off with a looser tension than your knitting rows.
- Not blocking will result in a less polished look and less visible ridges.
Customization Ideas
- Use variegated or tonal DK yarn to add subtle color variations within the ridges.
- Adjust length by knitting the straight section longer or shorter to suit preferences.
- Try different needle sizes to make the scarf thinner or thicker but keep in mind that this affects texture and gauge.
- Add a crocheted edge or tassels after blocking for a personalized finish like those found on mini projects such as this granny square bag charm crochet accessory.
How to Use or Display This Crochet Project
This mini scarf pairs beautifully with casual coats or sweaters and fits well under collars without bulk. It’s also a thoughtful, handmade gift idea for friends or family who appreciate cozy, handmade wearables. Because it’s lightweight and packs flat, it’s great for travel or as a fashionable accessory for transitional weather.
Care Instructions
Hand wash gently in cool water with mild detergent to keep the DK yarn in the best condition. Rinse thoroughly, squeeze out excess water without wringing, and lay flat to dry to maintain the scarf’s shape and texture. Store folded or rolled loosely rather than hanging to avoid stretching.
Frequently Asked Questions
Q: Can I substitute different yarn weights for this pattern?
A: You can, but keep in mind the finished size and texture will change. Adjust needle size accordingly and consider swatching.
Q: Is this stretchy or warm enough for very cold weather?
A: The garter stitch fabric is stretchy and moderately warm but this scarf is best suited as a layering piece or for mild to cool climates.
Q: What do I do if my increase or decrease row count is off?
A: Carefully recount stitches after each increase or decrease row to stay on track, and use stitch markers if it helps.
Q: Can this pattern be adapted for crochet?
A: While this is a knit pattern, beginner crocheters may enjoy similar textured projects; for inspiration, explore beginner-friendly crochet patterns like the mini amigurumi pumpkin.
Q: How do I achieve sharper ridges in the garter stitch?
A: Keeping consistent tension and blocking lightly after finishing are key to emphasizing the horizontal ridge texture.
Final Thoughts
This horizontal ridge mini scarf is a delightful project for knitters at any stage looking to build confidence in shaping and enjoy a cozy accessory that’s both stylish and practical. With simple stitches, clear shaping, and minimal materials needed, it’s a rewarding knit that also leaves room for personalization and creativity. Enjoy making yours and perhaps pairing it with other handmade touches for a warm, inviting winter look.



