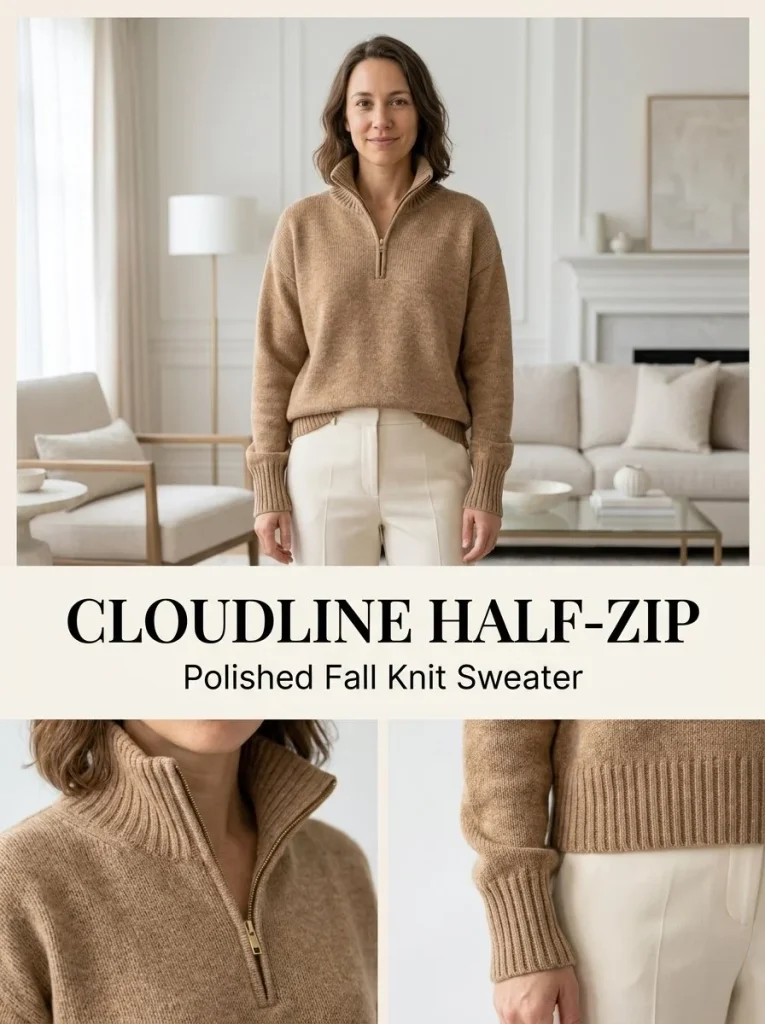
The Cloudline Half-Zip Pullover is a versatile and stylish piece that can be worn for various occasions, making it an essential addition to your wardrobe. This pattern utilizes DK-weight merino or a merino/cashmere blend, providing the luxurious feel you desire while keeping you warm. Whether you’re looking to enhance your knitting skills or create a thoughtful gift, this project offers a great opportunity for creativity and craftsmanship. Before you dive into the instructions, you may find it helpful to explore related knitting patterns, such as the Fair Isle Yoke Pullover for more inspiration.
Skill Level
Intermediate. This pullover involves a mix of techniques, including ribbing, stockinette stitch, and setting in sleeves, making it suitable for knitters who have some experience under their belt.
Materials
- Yarn: 1,200–1,400 yd / 1,097–1,280 m DK-weight merino or merino/cashmere-blend yarn in heathered camel
- Needles: US 6 / 4.0 mm and US 4 / 3.5 mm
- Zipper: 8–9 in / 20–23 cm closed-end zipper in antique brass or matching neutral
- Notions: Stitch markers, tapestry needle, sewing needle, and matching thread
Abbreviations — US Terms
- k – knit
- p – purl
- st(s) – stitch(es)
- BO – bind off
Special Stitches
In this pattern, you will primarily use basic stitches, so no special stitches are necessary.
Gauge
Gauge is not specified, but consistent tension is essential for achieving the correct fit.
Finished Size
The finished pullover will fit a standard adult size. You may adjust the size by altering the number of stitches cast on.
Pattern Notes
- This pattern is worked in rows for the back and front pieces, and the sleeves.
- The zipper installation requires careful handling to ensure a clean finish.
- It’s essential to block your finished pieces before assembly to ensure an accurate fit and a polished look.
Crochet Instructions
BACK
- Cast on 110 sts with the smaller needles.
- Row 1: Work K2, P2 rib until the piece measures 2.25 in / 5.5 cm.
- Row 2: Change to larger needles and continue working in stockinette stitch.
- Continue until the piece measures 23 in / 58.5 cm.
- Shape Shoulders: Bind off 34 sts for each shoulder. Place the center 42 sts on waste yarn for the back neck.
FRONT
- Cast on 110 sts with the smaller needles and work the hem as for the Back.
- Row 1: Change to larger needles and work stockinette until the piece measures 16.5 in / 42 cm.
- ZIP OPENING: Work the first 55 sts and place them on hold; continue with the remaining 55 sts separately.
- Continue each side independently until the total length is 20.5 in / 52 cm.
- Shape Neck: Bind off st as described for the back.
SLEEVES — MAKE 2
- Cast on 46 sts using the smaller needles.
- Row 1: Work K2, P2 rib for 3 in / 7.5 cm.
- Row 2: Change to larger needles and work stockinette.
- Increase: Increase 1 st at each side every 8th row until you reach a total of 72 sts.
- Continue until the sleeve measures 19 in / 48 cm. Bind off.
ASSEMBLY
- Block all pieces to measurements.
- Seam Shoulders: Join the shoulder seams using the tapestry needle.
- Attach Sleeves: Sew the sleeves into the drop-shoulder openings, aligning the seams carefully.
- Sew Side and Sleeve Seams using your preferred method.
HIGH COLLAR
- Using the smaller circular needle, pick up approximately 118 sts around the neckline.
- Row 1: Work K2, P2 rib back and forth for 3.5 in / 9 cm.
- Bind off in pattern.
ZIPPER
- Pin the zipper behind the center-front opening.
- Hand-sew both zipper tapes securely using matching thread.
SIDE SPLITS
When seaming, if desired, leave the lower 2 in / 5 cm open for side splits.
Tips for the Best Result
- When working the ribbing, ensure you maintain a consistent tension to avoid puckering.
- Use stitch markers to keep track of your increases in the sleeves and for maintaining ribbing continuity.
- If you’re unfamiliar with placing a zipper, consider practicing on a scrap piece or checking out resources on zipper installation to ensure a professional look.
Common Mistakes
Uneven Hem
Ensure that your ribbing rows are consistent in tension; adjustments may be made in subsequent rows if you notice any distortion.
Misaligned Zipper
Take extra care to pin the zipper securely along the center front before sewing it in place. Verify alignment before proceeding with stitching.
Explore further projects, like the Acorn Brown Keyhole Scarf, to enhance your knitting repertoire.
Finishing
- Weave in all ends using the tapestry needle.
- Gently steam press or wet block your pullover to finish, ensuring that the final shape is well-defined.
Care
For best results, follow the care instructions specific to your yarn, typically gentle hand washing and lay flat to dry, especially for merino and cashmere blends.



