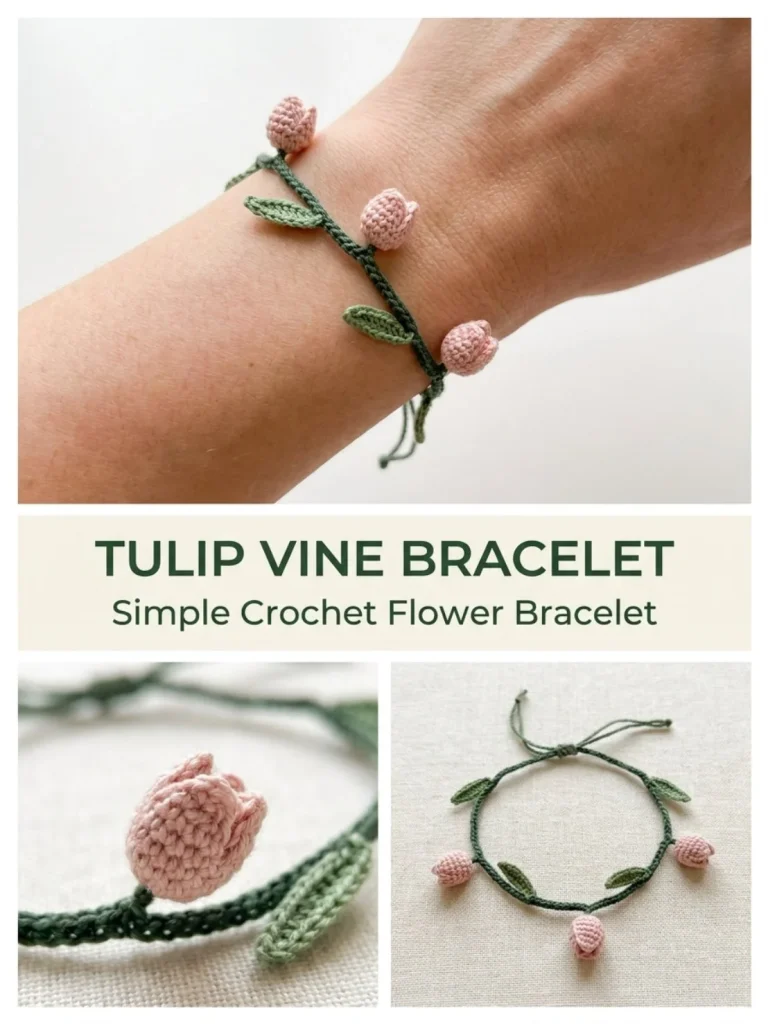
Creating a charming accessory like a tulip vine bracelet can add a delightful touch to any outfit. This project is not only visually appealing but also a great introduction to crochet for beginners or a lovely quick project for experienced makers. With easy-to-follow instructions, you’ll be able to craft several tulip buds that create a whimsical statement piece. This bracelet is perfect for casual wear or gifting to friends who appreciate handmade jewelry. One great tip is to ensure your tulip buds are shaped well so they sit upright, giving the piece a polished look.
Why You’ll Love This Crochet Pattern
- Enjoy a beginner-friendly project that builds your crochet skills.
- Create a beautiful accessory that’s perfect for spring and summer.
- Use vibrant colors to bring your tulips to life.
- Personalize the size to fit your wrist or for gifting.
- This pattern can easily be adapted for matching sets, such as a necklace to go along with your bracelet.
Finished Size
The estimated finished size of the tulip vine bracelet will vary between 7 to 9 inches, depending on the size of your wrist and how many chains you use. Remember, you can adjust the length during the chaining phase.
Skill Level
This pattern is classified as easy. The straightforward stitches and repetition make it perfect for beginners, while still offering enough detail to engage intermediate crocheters.
Materials Needed
- Size 10 cotton thread in blush pink, leaf green, and dark green
- 1.25–1.5 mm steel hook
- Yarn needle
- Scissors
- Optional: Small clasp or tie closure for the bracelet
Stitches and Abbreviations
- sc: single crochet
- sl st: slip stitch
- hdc: half double crochet
- ch: chain
Gauge and Tension Notes
While gauge is not critical for this project, it is essential to maintain consistent tension to ensure your tulip buds and leaves appear uniform in size. If you tend to crochet tightly, consider using a slightly larger hook to match the recommended size.
Pattern Notes Before You Start
This bracelet is worked as a series of separate pieces that are then assembled. You’ll crochet three tulip buds and six leaves, which will be attached to a vine created with chains. Color changes will occur primarily within the individual buds and leaves.
Step-by-Step Crochet Instructions
-
Tulip Buds (make 3):
- With pink, ch 2.
- Round 1: 6 sc in 2nd ch from hook.
- Round 2: sc in next st, 2 sc in next st around = 9 sts.
- Round 3: sc in each st around.
- Round 4: sl st, ch 1, sc in next st around to give a tiny pointed rim. Fasten off.
-
Leaves (make 6):
- With leaf green, ch 6.
- Starting in 2nd ch from hook: sl st, sc, hdc, sc, sl st. Fasten off.
-
Bracelet Vine:
- With dark green, ch 45-55 to fit your wrist plus ties.
- Row 1: Starting in 2nd ch from hook, sl st in each ch across. Fasten off.
-
Assembly:
- Arrange the 3 tulip buds along the center of the vine.
- Sew 2 leaves under or beside each tulip.
- If using a clasp, leave a short chain loop at one end and sew the clasp to the other.
- For a tie bracelet, simply leave the vine long enough to tie in a bow.
- Weave in ends and shape the buds to sit upright.
Assembly and Finishing
To assemble your bracelet, carefully sew the buds and leaves to the vine, ensuring they are evenly spaced. Weave in any loose ends for a tidy finish. If you’re using a clasp, securely attach it by sewing through the chain loop at one end.
Helpful Tips
- To create a more pronounced shape for your tulip buds, consider lightly steaming them after shaping.
- When changing yarn colors, maintain tension to keep the transition seamless.
- Test length before fastening off your bracelet to ensure a comfortable fit.
- Use stitch markers to keep track of your stitches if you’re new to crocheting in the round.
Common Mistakes to Avoid
- Be cautious when counting stitches; losing track can lead to uneven shapes.
- Make sure your slip stitches are snug to avoid gaps in your vine piece.
- If your leaves look floppy, check that they’re securely attached and consider adding more stitches for support.
Customization Ideas
- Swap out the colors for seasonal themes or your favorite shades.
- Experiment with varying the number of tulip buds for different looks.
- Add beads or charms to the vine for a more decorative finish.
- Try using a different type of yarn for varied textures and appearances.
How to Use or Display This Crochet Project
This tulip vine bracelet can be worn as a delightful accessory for casual outings or special occasions. It makes a heartfelt gift for friends or family who enjoy unique handmade items. Display it beautifully on a jewelry stand or in a decorative box to showcase your craftsmanship.
Care Instructions
To clean your tulip vine bracelet, hand wash it in lukewarm water with mild soap. Lay it flat to dry to maintain its shape.
Frequently Asked Questions
Q: How do I adjust the size of the bracelet?
A: Simply change the number of chains in the bracelet vine section to match your desired wrist size.
Q: Can I use different yarn types?
A: Absolutely! Just be mindful that the finished size and appearance may change based on the yarn used.
Q: What should I do if my buds don’t hold shape?
A: Make sure to weave in ends securely and consider adjusting your tension if they seem floppy.
Q: Are there other matching accessories available?
A: Yes! Complement your bracelet with a delightful tulip vine necklace for a cohesive look, which can be found here!
Final Thoughts
Crafting your own tulip vine bracelet is a rewarding project that brings together color, creativity, and crochet skills. With practical tips and clear instructions, you can make this lovely accessory confidently. Enjoy the process of creation and the satisfaction of wearing your unique piece!



