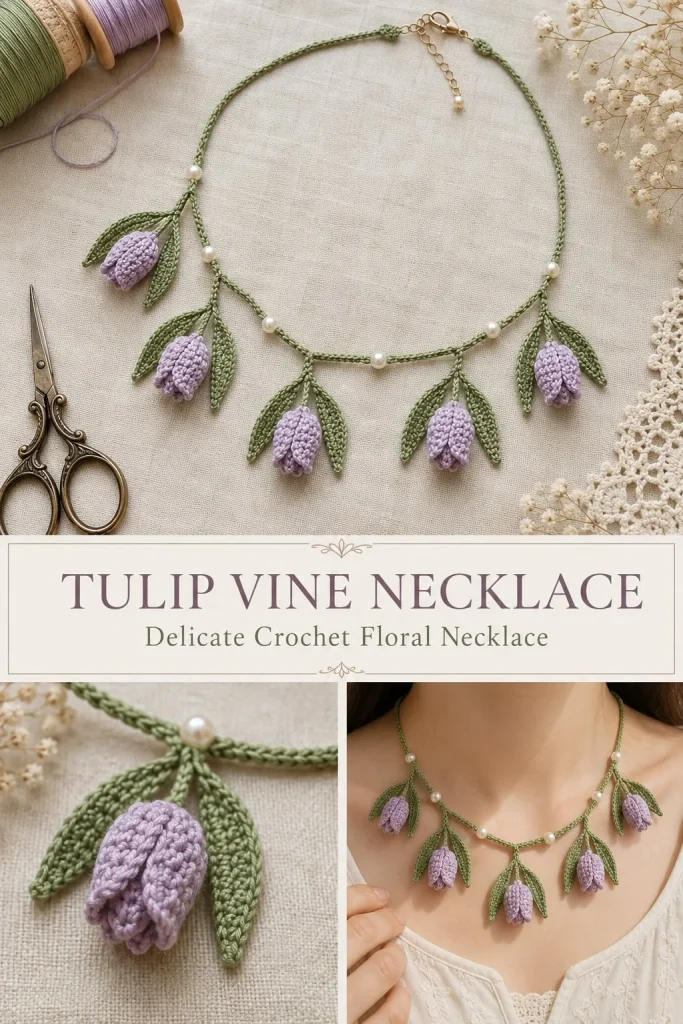
Creating a delicate crochet necklace inspired by tulip vines is a satisfying project that blends floral charm with wearable art. This pattern uses fine crochet thread and simple stitches to create a lightweight necklace featuring soft lilac tulip buds and elegant olive green leaves arranged on a flat slip-stitched cord. It’s an ideal accessory for anyone who loves unique handmade jewelry or gifts with a personal touch. The design is approachable for anyone comfortable with basic crochet techniques, and working with size 10 thread and a 1.00 mm hook adds a lovely level of detail without being overwhelming. One thing I discovered while testing this pattern is that gently pinching the tulip buds after stitching them helps maintain their natural shape and avoids a too-rounded look, enhancing the botanical feel.
Why You’ll Love This Crochet Pattern
- Creates a charming, floral-inspired necklace perfect for spring or garden-themed outfits
- Uses basic stitches and techniques, making it suitable for adventurous beginners
- The flat slip stitch cord provides a strong yet subtle foundation that feels comfortable
- Offers opportunities for personal customization with colors, bead types, and leaf arrangements
- No complicated shaping or stuffing ensures beginner-friendly construction
- Lightweight and delicate design makes it a unique, wearable statement piece
Finished Size
The finished necklace length will vary depending on your chosen chain length and tension, but typically it measures about 16 to 18 inches long (including the clasp). Tulip buds measure approximately 1 inch tall each, with leaves sized proportionally along the vine. Adjust the chain length to suit your preference, remembering to subtract 2 inches for clasp attachment.
Skill Level
Intermediate beginner – this pattern is suitable for crocheters who are comfortable with single crochet, working in rounds, basic increases, and simple shaping techniques. Beginners will find it rewarding, though may need to practice slip stitching evenly and shaping the tulip buds for best results.
Materials Needed
- Size 10 crochet thread in lilac (for buds) and olive green (for cord and leaves)
- 1.00 mm steel crochet hook
- 4 small 3 mm pearl beads for embellishment
- 1 necklace clasp and 2 jump rings
- Fine tapestry needle for sewing and weaving in ends
- Sharp scissors
- Optional: a small amount of matching lilac thread scraps for additional shaping control
Stitches and Abbreviations
- ch: chain
- sc: single crochet – insert hook, yarn over, pull through, yarn over, pull through both loops
- hdc: half double crochet – yarn over, insert hook, yarn over, pull through, yarn over, pull through all loops on hook
- dc: double crochet – yarn over, insert hook, yarn over, pull through, yarn over, pull through first two loops, yarn over, pull through last two loops
- sl st: slip stitch – insert hook, yarn over, pull through both the stitch and loop on hook
- st(s): stitch(es)
- rnd: round
Gauge and Tension Notes
Gauge is not critical with this necklace as size depends mainly on chain length and tension consistency. Keep your slip stitches firm but not too tight when making the cord to maintain flexibility while preventing gaps. For the buds, a relaxed tension helps produce a softly rounded shape.
Pattern Notes Before You Start
This necklace consists of three main crocheted parts worked separately: a slip-stitched cord, five tulip buds crocheted in rounds, and multiple long leaves crocheted flat around a chain foundation. After crocheting, all components are sewn together—buds arranged evenly along the center of the cord with leaves placed between them to form a vine effect. Pearl beads are added between buds for a delicate finishing touch. Color changes occur naturally between the lilac and olive green crochet threads.
Step-by-Step Crochet Instructions
Necklace Cord
- Chain to your desired necklace length minus 2 inches (to allow for clasp attachment).
- Starting in the 2nd chain from the hook, work slip stitch (sl st) evenly across all chains to create a flat cord. Keep stitches consistent to avoid uneven edges.
- Fasten off, leaving a long tail for assembly.
Tulip Buds (Make 5)
- Begin with a magic ring using lilac thread.
- Rnd 1: Work 6 single crochet (sc) evenly into the ring, join with sl st to first sc. (6 sts)
- Rnd 2: Increase evenly by working 2 sc in each stitch around. (12 sts)
- Rnds 3-6 (or about 3-4 additional rounds): Work single crochet evenly around, maintaining 12 sts per round to build height and roundness without stuffing.
- To shape petals, mark five evenly spaced points around the upper edge of the bud, then stitch these points inward slightly with a tapestry needle and matching lilac thread to create gentle petal indentations. Avoid tightening too much to keep a natural bloom shape.
- Fasten off, leaving a tail for sewing.
Long Leaves (Make as many as desired)
- With olive green thread, chain 10.
- Work along the chain: sc in first chain, hdc in next, dc in next, hdc in next, sc in next (or choose a smooth stitch progression you prefer) to create a leaf shape.
- Turn and work the same sequence on the other side of the chain to form a symmetrical leaf edge.
- Fasten off, leaving a tail.
Assembly and Finishing
- Find the center of your slip-stitched cord. Arrange the five tulip buds evenly spaced along the cord.
- Using a tapestry needle and matching thread, sew each bud securely to the cord, anchoring at their base to prevent shifting.
- Position the long leaves between the buds, sewing each in place to create a natural vine effect.
- Add pearl beads between buds for delicate embellishments, sewing them securely.
- Attach the necklace clasp and jump rings to each end of the cord using jewelry pliers.
- Weave in all loose ends carefully with a tapestry needle, trimming excess threads for a polished look.
- Gently adjust the buds and leaves to perfect their shape and placement.
Helpful Tips
- Use a stitch marker to mark the center of your cord for even placement of buds.
- Pinch the tulip buds lightly after stitching the petal indentations for a more natural bloom without flattening.
- When making the cord, keep your slip stitches snug to avoid a floppy cord but not so tight that it curls.
- Secure beads thoroughly to avoid snagging or loss during wear.
- Block the necklace gently by pinning it flat on a mat and lightly steaming if your threads allow — this helps leaves and buds lay nicely.
Common Mistakes to Avoid
- Crocheting the cord too loosely, causing it to stretch or sag unnecessarily. Keep tension consistent.
- Over-tightening petal stitches, which can cause buds to look unnaturally puckered.
- Skipping the long tail for assembly when fastening off makes sewing buds and leaves tricky.
- Misplacing leaves unevenly; measure or mark positions beforehand for balance.
- Not securing beads and jump rings firmly, leading to loss or damage.
Customization Ideas
- Swap the lilac thread for other pastel or bright colors to create seasonal variations, like pink roses or bluebells.
- Use a slightly thicker thread and larger hook for a chunkier necklace effect.
- Replace pearl beads with tiny crystals or seed beads for extra sparkle.
- Add additional leaves or buds for a fuller vine or longer necklace variation.
How to Use or Display This Crochet Project
This tulip vine necklace makes a lovely gift for flower lovers and admirers of handmade jewelry. It pairs beautifully with casual or dressy outfits, perfect for spring events, garden parties, or everyday wear. The lightweight design is comfortable for extended use and can be displayed on a jewelry stand or in a delicate box when not worn to preserve its shape.
Care Instructions
Hand wash gently in cool water using mild detergent, avoiding harsh agitation to preserve cotton thread integrity. Lay flat to dry away from direct sunlight to prevent fading. Store flat or hanging to prevent bending buds or leaves out of shape.
Frequently Asked Questions
Q: Can I use regular yarn instead of crochet thread?
A: You can, but the look will be chunkier and less delicate. Adjust hook size accordingly and expect a larger necklace.
Q: How do I prevent my slip-stitched cord from curling?
A: Keep tension consistent and not too loose. Blocking the finished cord flat can also help it lie smoothly.
Q: Can I make the tulip buds larger?
A: Use thicker thread or yarn and a larger hook, and add extra rounds. Just remember this will change necklace proportions.
Q: Is stuffing needed for the tulip buds?
A: No stuffing is required; the buds maintain shape through stitch placement and shaping techniques.
Q: How do I attach the clasp securely?
A: Use jump rings and sturdy pliers to close rings tightly after attaching to the ends of the slip-stitched cord.
Final Thoughts
This tulip vine necklace is a delicate but rewarding project that transforms simple crochet stitches into wearable art. It’s an approachable way to experiment with shaping and fine thread work while creating a beautiful accessory that carries personal handmade charm. With some patience and care in assembly, this necklace can become a treasured piece in your jewelry collection or a heartfelt gift to someone special. Happy crocheting!



