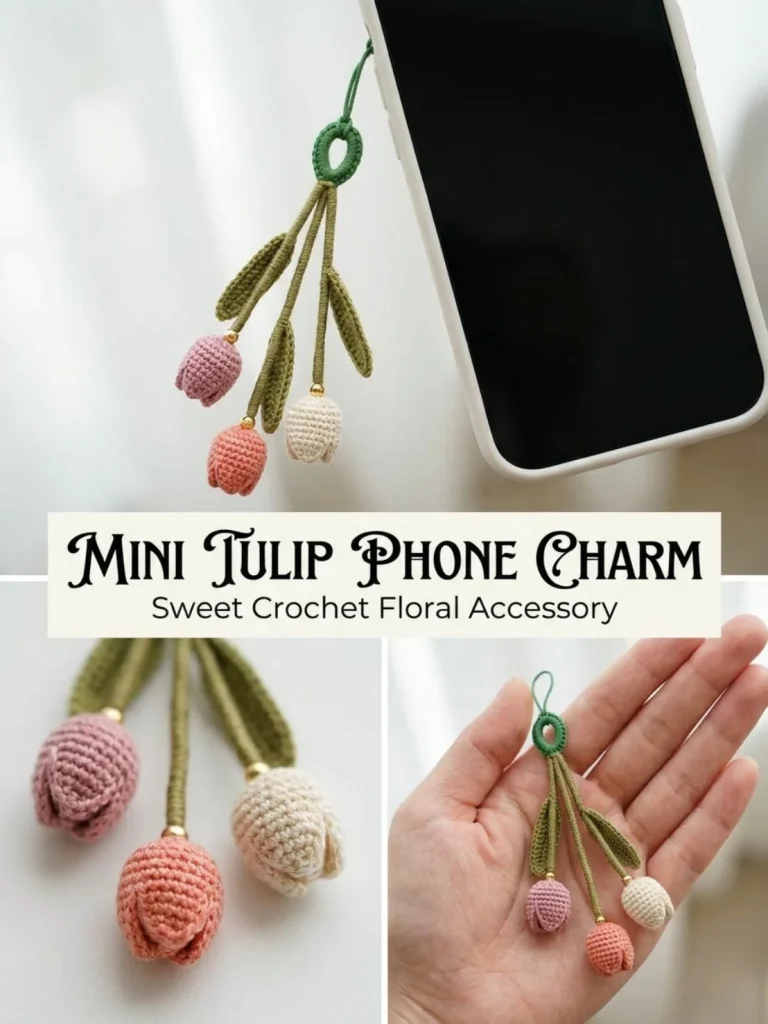
Mini tulip phone charms are a charming and practical crochet project perfect for adding a pop of handmade beauty to your everyday accessories. This pattern creates delicate tulip buds in soft, pastel colors with slender green stems and leaves, all designed to attach easily to your phone, keys, or bag. The project is beginner-friendly, working mainly in simple rounds and chains, making it an enjoyable introduction to shaping small motifs and sewing parts together neatly. I’ve found that paying attention to how the tulip points are formed—by carefully sewing front and back edges to create those little petal dips—really makes a big difference in achieving a neat, realistic look. Plus, the subtle height differences between the three tulips give a lovely natural effect. If you enjoy miniature crochet accessories, this pattern pairs wonderfully with other floral-inspired pieces like the mini cottage bunny lovey for a sweet gift set or personal collection.
Why You’ll Love This Crochet Pattern
- Small and quick to make, perfect for beginners wanting a satisfying project.
- Uses basic stitches like single crochet and slip stitch, making learning easy.
- Combines crocheted parts with simple sewing to develop assembly skills.
- Customizable with different yarn colors for unique personal style.
- Adds a handmade charm to phones, bags, or gifts—practical and decorative.
- A natural project to practice shaping small motifs and assembling neat, tidy crochet pieces.
Finished Size
The finished mini tulip phone charm measures approximately 3 to 4 inches tall, depending on your yarn weight and tension. The tulip buds themselves stand about 1 inch tall, while the green stems vary with chained lengths of 11, 14, and 17 to create staggered heights for visual interest. Adjusting your tension or hook size will slightly influence overall dimensions.
Skill Level
This project is suitable for easy to intermediate beginners. The stitches are straightforward, but shaping the petals by sewing edges evenly spaced requires some attention and patience. Assembly with sewing the parts together is a great introduction to finishing techniques for those newer to crochet.
Materials Needed
- Light fingering or crochet thread in dusty pink, soft coral, cream, and olive green (cotton or acrylic blend works well)
- 2.0 mm crochet hook
- Yarn needle for sewing parts and weaving ends
- Small scissors
- Phone charm cord or swivel clasp to attach the finished piece
- Optional: 3 small gold beads to add a subtle highlight above each tulip bud
Stitches and Abbreviations
- ch – chain: foundation stitch for starting rows or rounds.
- sc – single crochet: insert hook, yarn over, pull through loops (creates tight, dense fabric).
- inc – increase: 2 single crochets in the same stitch to widen.
- sl st – slip stitch: joining stitch used for seaming or finishing edges.
Gauge and Tension Notes
Gauge is not critical for this small accessory, but consistent tension helps keep the tulip buds smooth and even. Aim for stitches that are neither too tight (which makes parts stiff and harder to shape) nor too loose (which may cause gaps or floppy petals). Practicing tension on small swatches of the tulip bud rounds can help you find a comfortable balance.
Pattern Notes Before You Start
The tulip buds are worked in continuous rounds starting with a magic ring, then shaped by sewing edges together to form the three distinct petal points. The three tulip buds are made in separate colors. The green stems are crocheted as separate chains of staggered lengths with slip stitches back to reinforce and add texture, then leaves are worked in a small oval shape with a progression of stitches on both sides of the chain. Pieces are sewn together after all elements are crocheted and finished. No stuffing is needed—keeping the buds unstuffed maintains their delicate look.
Step-by-Step Crochet Instructions
-
Tulip Buds (Make 3 in different colors)
- R1: Start with a magic ring, work 6 sc in ring (6 sts).
- R2: Inc in each stitch around (2 sc in each stitch) (12 sts).
- R3-5: Sc around for three rounds (12 sts each round).
- Flatten the opening by folding the piece gently.
-
Forming Tulip Points
- Lay the bud flat, then sew front and back edges together at three evenly spaced points: left, center, and right edges.
- These stitches create shallow dips between the points, giving the petal shape.
- Secure firmly; do not stuff the buds.
-
Green Stems (Make 3 with lengths of 11, 14, and 17 ch)
- Ch the required length (11, 14, or 17).
- Starting in the 2nd ch from hook, work slip stitches back down chain.
- Leave long tails on each end for sewing.
-
Leaves (Make 3)
- Ch 7.
- Starting in 2nd ch, work sl st, sc, hdc (half double crochet), dc (double crochet), hdc, 3 sc in last chain.
- Work down the opposite side of chain with hdc, dc, hdc, sc, sl st.
- Fasten off and leave tail for sewing.
-
Top Connector Loop
- With green yarn, ch 10 and join to form a loop.
- Work slip stitches evenly around the loop for strength.
- Alternatively, attach a ready-made phone charm cord or swivel clasp.
Assembly and Finishing
Sew one stem to the bottom center of each tulip bud, positioning the buds neatly. Attach a leaf along the upper third of each stem to highlight the floral structure. Gather the three stem tops and sew these together securely onto the connector loop, making sure buds sit at different heights to mimic natural growth. If you like, sew a small gold bead above each bud for a subtle shimmer—just be sure beads are sewn tightly to avoid loss. Finally, weave in all yarn ends cleanly to prevent unraveling. Attach your connector loop to a phone charm opening or clasp.
Helpful Tips
- Use stitch markers if needed to keep track of where to sew petal points for even spacing.
- Keeping your chain length for stems staggered helps avoid awkward bunching and gives visual interest.
- Sew gently but firmly when shaping tulip petals to maintain defined curves without distortion.
- Use a sharp tapestry needle to make neat sewing and joining easier, especially with crochet thread.
- Experiment with slightly varied yarn thicknesses or hook sizes for petals and stems to add subtle texture contrasts.
Common Mistakes to Avoid
- Avoid stuffing the tulip buds; stuffing squashes their delicate shape and makes sewing tricky.
- Don’t skip flattening and shaping the buds before sewing the edges—this step defines the petals.
- Be careful not to stretch the chains while slip stitching back on stems; a tight stitch keeps stems strong and neat.
- Secure beads or embellishments firmly to avoid losing them with use.
- Take care to weave in ends well, as small projects tend to show loose threads easily.
Customization Ideas
- Swap the pastel bud colors for bright primary shades to create a bold, playful look.
- Use variegated yarn or thread for a subtle multicolor effect on petals.
- Add tiny embroidered details like French knots on leaves for realistic texture.
- Increase chain lengths to make stems longer for use as a keychain rather than a phone charm.
Inspired by floral motifs? This project pairs nicely with other handmade touches and is a charming gift idea for spring or special occasions. If you love tiny floral accessories, also take a look at the elegant tulip vine necklace pattern to complement your collection with wearable crochet jewelry.
How to Use or Display This Crochet Project
Attach your mini tulip charm to phone cases, backpacks, zipper pulls, or as a cute bag accessory. It’s also a great gift accent for flower lovers or anyone who appreciates handmade touches. Because it’s lightweight, it won’t weigh down your tech or accessories but adds a lovely personal flair. You can even cluster several together or pair with different charms for a unique look.
Care Instructions
Hand wash gently in cool water with mild soap, reshaping the buds and stems while damp. Avoid wringing or twisting to maintain shape. Lay flat to dry away from direct sunlight to prevent fading. Store in a small, breathable bag or box to keep dust-free and preserve delicate stitches.
Frequently Asked Questions
Q: Can I use thicker yarn instead of thread?
A: Yes, but the charm will be larger and less delicate. Use a correspondingly larger hook to maintain neat stitches.
Q: How tightly should I crochet the petals?
A: Aim for medium tension—not so tight that fabric is stiff, nor loose enough to gape. This allows easy shaping.
Q: Can I make more than three tulips on one charm?
A: You can, but keep stems staggered and buds small to avoid a bulky look.
Q: Are the gold beads necessary?
A: They’re optional for decoration and add a nice shimmer, but the charm looks lovely without them.
Q: Can I attach this to a necklace instead of a phone?
A: Absolutely! Use a small jump ring and chain for a whimsical floral necklace pendant.
Final Thoughts
This mini tulip phone charm is a delightful way to practice shaping small crochet motifs and assembling a polished project. Its neat details and gentle colors make it a sweet gift or personal accessory you’ll enjoy crafting. Whether you’re new to crochet or building your skills, this pattern strikes the right balance of simplicity and charm, turning simple stitches into a precious floral keepsake.



