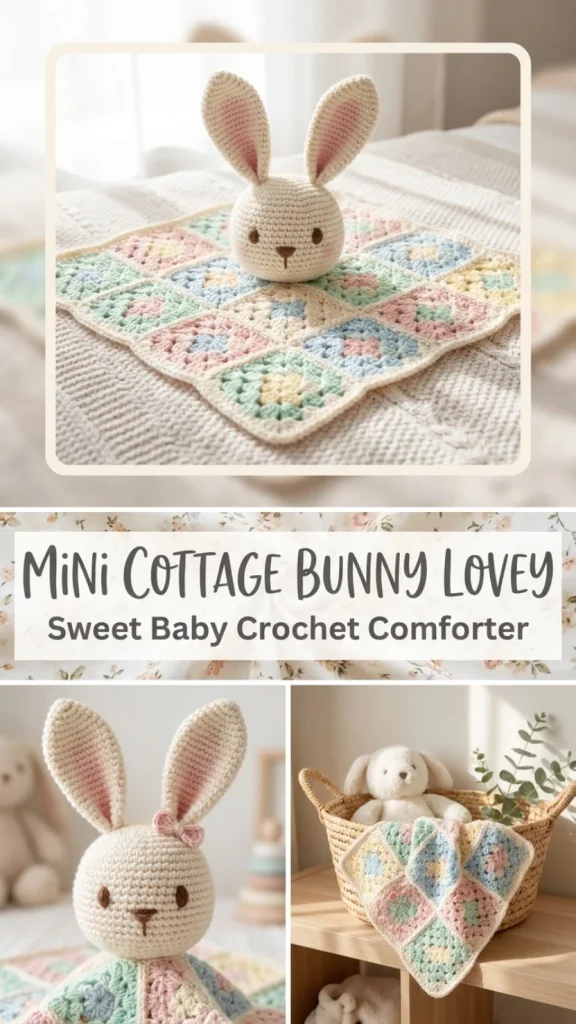
Creating a Mini Cottage Bunny Lovey is a delightful crochet project that combines the cozy charm of a lovey blanket with an adorable bunny head. This project is perfect for beginners or intermediate crocheters looking for a sweet, cuddly toy that makes a thoughtful gift or nursery companion. The soft cotton yarn in dusty pink, cream, and sage combined with classic granny square stitches makes for a comforting texture that’s easy to maintain. One thing I’ve found helpful while working on this pattern is keeping your stitches consistent in tension to ensure the lovey blanket lays flat without puckering, especially around the corners. You can also add a delicate touch by pairing this project with other handmade accessories, similar in feel and softness, like the Lily of the Valley Barefoot Sandal, which adds a lovely complementary detail for a baby gift set.
Why You’ll Love This Crochet Pattern
- Combines a classic granny square lovey base with an irresistible bunny head for extra charm.
- Uses beginner-friendly stitches with clear shaping instructions, ideal for those new to amigurumi or lovey blankets.
- The modular construction allows you to customize colors and size easily.
- The pattern includes optional arms and embroidered details to personalize your bunny’s expression.
- Practical project size, approximately 10 inches square, easy to carry or stash in a diaper bag.
- Lightweight cotton yarn makes the lovey soft, durable, and machine-washable.
Finished Size
The mini bunny lovey measures about 10 inches square, not including the ears and optional arms. Finished dimensions may slightly vary depending on your yarn choice, hook size, and personal tension. Blocking the lovey after completion will help even out edges and smooth the blanket base.
Skill Level
This pattern is suitable for an advanced beginner. It includes basic stitches such as chain (ch), double crochet (dc), single crochet (sc), half double crochet (hdc), increases (inc), and decreases (dec). The shaping of the bunny head and ears introduces simple amigurumi techniques but remains very accessible with step-by-step guidance.
Materials Needed
- DK weight cotton yarn in cream, dusty pink, and sage
- 3.25 mm crochet hook
- Polyfill stuffing for bunny head and optional arms
- Safety eyes or embroidery thread for eyes and facial details
- Tapestry needle for sewing and weaving in ends
- Stitch marker to track rounds
- Scissors
- Optional: embroidery floss for nose and mouth details
Stitches and Abbreviations
- ch – chain: foundation stitch creating loops
- sc – single crochet: a tight, compact stitch
- hdc – half double crochet: a stitch taller than sc, shorter than dc
- dc – double crochet: a taller stitch creating more open fabric
- sl st – slip stitch: used to join or move yarn without adding height
- inc – increase: making two stitches in the same stitch to widen the work
- dec – decrease: combining two stitches to reduce the stitch count
Gauge and Tension Notes
Gauge is not critical for this project, but consistent tension throughout is important for an even, flat lovey base and well-shaped head. Too tight tension may cause a stiff fabric, while too loose could lead to floppy ears or uneven shaping. Try a small swatch in the stitches to find a comfortable hook size that produces a smooth texture.
Pattern Notes Before You Start
This lovey combines two main sections: a classic granny square style blanket base and the amigurumi-style bunny head with matching ears and optional arms. The blanket base is worked in joined rounds with chains and double crochet clusters, while the head and limbs are crocheted in continuous rounds (magic rings). The different parts are sewn together after all pieces are made. Color changes happen naturally between parts, mainly transitioning from dusty pink or cream for the blanket to cream for the head. Embroidery details add personality and are done last.
Step-by-Step Crochet Instructions
-
Lovey Blanket Base:
Using dusty pink or cream yarn, ch 4, join to form a ring.
Round 1: ch 3 (counts as first dc), (2 dc, ch 2) in ring; repeat from * 3 more times for 4 corner groups. Join with sl st.
Round 2: Sl st to corner space. In each corner, work (3 dc, ch 2, 3 dc). On each side, work 3 dc evenly in side space. Continue rounds, growing the classic granny square until it measures about 10 inches. Fasten off. -
Bunny Head with Cream:
R1: Magic ring, 6 sc.
R2: Inc around (2 sc in each st) = 12.
R3: (sc, inc) repeat 6 times = 18.
R4: (2 sc, inc) repeat 6 times = 24.
R5-7: sc around. Insert safety eyes between rounds 5 and 6.
R8: (2 sc, dec) repeat 6 times = 18.
Stuff head firmly with fiberfill.
R9: (sc, dec) repeat 6 times = 12.
R10: dec around = 6. Close hole by sewing with tapestry needle. -
Ears (Make 2):
Ch 8.
In 2nd ch from hook: sc, hdc, dc, dc, hdc, sc, 3 sc in last chain.
Continue on opposite side: sc, hdc, dc, dc, hdc, sc.
Fasten off leaving long yarn tails for sewing. Add inner ear embroidery or a small stitched insert in dusty pink for detail. -
Optional Arms (Make 2):
R1: Magic ring, 6 sc.
R2-3: sc around.
Lightly stuff and flatten. Fasten off leaving tail for sewing.
Assembly and Finishing
Sew ears securely to the top of the bunny head. Use embroidery thread to add the nose and mouth gently, keeping stitches small and neat. Position the head in the center of the lovey blanket and sew them together firmly. Attach optional arms just below the head if desired. Add a small bow at the neck for an extra charming touch. Weave in all yarn ends securely and block the lovey lightly to even out the square shape and soften the fabric.
Helpful Tips
- Use stitch markers to keep track of rounds, especially on the amigurumi head, to avoid losing count.
- When stuffing the head, don’t overfill as it can cause the stitches to stretch and distort the shape.
- Embroider facial details with care, using a fine needle and embroidery thread to avoid bulky stitches.
- Blocking the lovey base after assembly helps flatten corners and create a smooth finish.
- Try laying the ears flat and sewing from behind to reduce bulk at the seam.
Adding a handcrafted detail like the Blossom Pearl Hair Vine can inspire you to create matching accessories or use this lovey as part of a delicate nursery display.
Common Mistakes to Avoid
- Skipping the chain 2 in corners of the granny square can cause edges to curve and the square not to lay flat.
- Stuffing the head unevenly often results in a misshapen face; stuff gradually and shape as you go.
- Missing stitch decreases/increases in rounds leads to incorrect stitch counts and odd shaping – always count your stitches.
- Sewing the ears on loosely risks them coming off during use; stitch firmly with several passes.
- Neglecting to block the lovey base can leave the square looking uneven or bumpy.
Customization Ideas
- Substitute colors to match nursery decor—soft pastels, bright hues, or neutrals all work well.
- Use a fluffy or textured yarn for a more plush feel but adjust hook size accordingly.
- Add embroidered initials or a small heart on the lovey corner for personalization.
- Expand the lovey size by continuing granny square rounds for a larger blanket effect.
How to Use or Display This Crochet Project
This mini bunny lovey is perfect as a soft, portable comfort object for babies and toddlers. It fits easily in a stroller or crib and can be used as a gentle plaything or naptime companion. The sweet bunny face makes it an adorable nursery decoration, especially when paired with other handcrafted items. It also makes a thoughtful gift for baby showers or first birthdays, offering handmade warmth and charm.
Care Instructions
To keep your mini cottage bunny lovey fresh, machine wash on a gentle cycle with cold water if using cotton yarn. Use a mild detergent and avoid bleach. Lay flat to dry or gently reshape the lovey while damp to maintain the square and bunny shape. Store in a clean, dry place away from direct sunlight to preserve color and fiber quality.
Frequently Asked Questions
Q: Can I use a different yarn weight or fiber?
A: You can, but keep in mind the finished size and texture will change. Use an appropriate hook size and adjust stitch counts if needed.
Q: What if I don’t have safety eyes?
A: You can embroider the eyes with black thread instead, which is safer for baby items.
Q: How do I avoid the lovey curling or puckering?
A: Maintain consistent tension and include the ch 2 corner spaces in granny square rounds to ensure a flat blanket base.
Q: Is the lovey suitable for machine washing?
A: Cotton DK yarn usually holds up well to machine washing on gentle cycles, but always check yarn label instructions.
Q: Can I add a rattle inside the head?
A: Yes, you can insert a small rattle before stuffing for added sensory stimulation.
Final Thoughts
This Mini Cottage Bunny Lovey is a charming project that blends simple granny square crochet with the sweet personality of a bunny toy. Its manageable size, gentle colors, and soft cotton yarn make it perfect for little ones or as a thoughtful gift. Whether you’re new to amigurumi or looking to mix motifs with blankets, this pattern is approachable and satisfying to make. Happy crocheting!
Conclusion
For a beautifully crafted, delightful gift idea that complements handmade loveys perfectly, consider pairing it with the Sweet Personalized Bunny Lovey – Holbrook Cottage. This external resource offers personalized options that add an extra touch of charm and customization to your crochet gifting.



