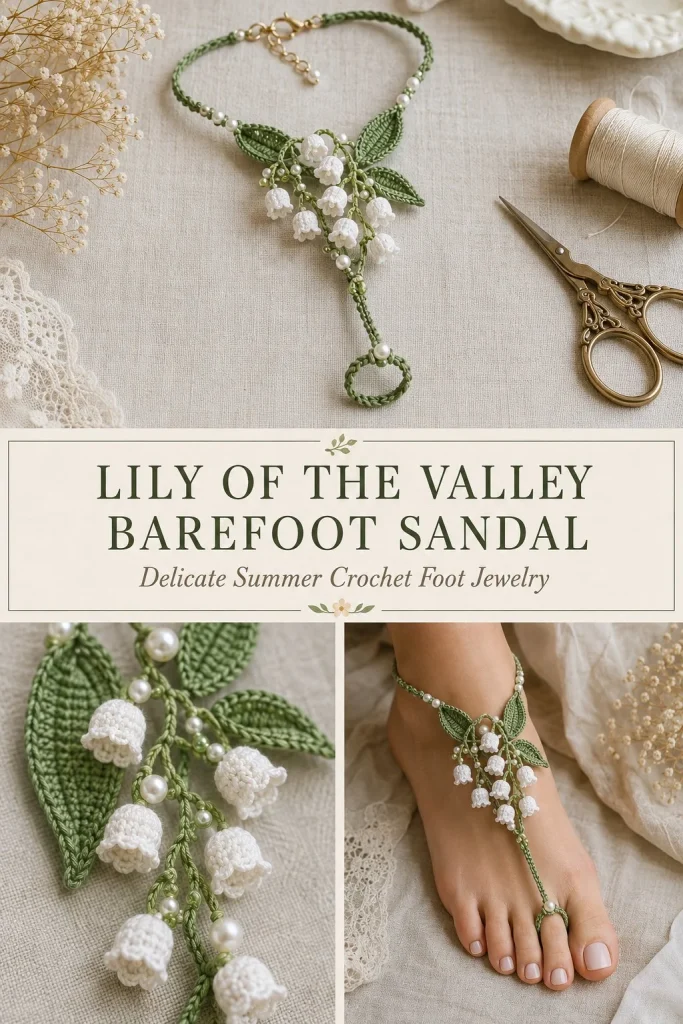
This barefoot sandal pattern brings a delicate woodland charm to your summer wardrobe or casual lounge wear. Crafted with fine threads and small hooks, it’s lightweight and comfortable, ideal for warm weather strolls or beach days. I designed the Lily of the Valley Barefoot Sandal to be both decorative and practical, giving your feet that unique handmade touch without bulk or fuss. Its open toe loop and adjustable ankle band ensure a snug but gentle fit, while the charming leaves and tiny bell motifs add an elegant, natural feel reminiscent of spring blooms. Beginners will appreciate the mostly slip stitch construction, which keeps shaping simple, while the finishing touches like pearl beads elevate the piece. From my experience, taking care with tension and neat joining here really makes the motifs pop and keeps the sandal wearable all day without irritation.
Why You’ll Love This Crochet Pattern
- Lightweight and breathable design perfect for barefoot comfort
- Clear, beginner-friendly slip stitch instructions with simple shaping
- Adjustable sizing to fit various foot and ankle measurements
- Delicate floral motifs create a natural, elegant look
- Practical construction that stays secure without causing discomfort
- Uses common crochet techniques, perfect for practicing neat finishing
Finished Size
The finished sandal will fit around a standard adult foot size 6 to 9, depending on your adjustments. The toe loop length ranges from 14 to 18 chains to fit the second toe comfortably. The ankle band measures approximately 22-26 cm in circumference, minus clasp allowance. Size may vary based on your crochet thread tension and hook size.
Skill Level
Advanced beginner. While most stitches are slip stitches and single crochets, shaping the toe loop and attaching small motifs requires some careful attention, so it’s well suited for those who have completed basic projects and want to try a slightly more detailed wearable accessory.
Materials Needed
- Size 10 crochet thread in olive green and white (fine cotton thread)
- 1.00 mm steel crochet hook
- Six 3 mm pearl beads
- One small lobster clasp and two jump rings (alternatively, two ankle tie cords)
- Fine tapestry needle for sewing and weaving ends
- Sharp scissors
- Optional: stitch markers to keep track of chain counts or sewing points
Stitches and Abbreviations
- Ch — chain
- Sc — single crochet: Insert hook, yarn over, pull through loop, yarn over, pull through both loops on hook
- Hdc — half double crochet: Yarn over, insert hook, pull through, yarn over, pull through 3 loops
- Dc — double crochet: Yarn over, insert hook, pull through, yarn over, pull through 2 loops twice
- Sl st — slip stitch: Insert hook, yarn over, pull through loop and loop on hook (used for joining and creating smooth edges)
Gauge and Tension Notes
Gauge is not critical for fit but maintaining consistent tension is important for even shaping and motif size. Use a lighter hand when working the toe loop to avoid a tight fit, and keep stitches slightly loose in the ankle band for comfort. Check your work often by laying the chain pieces against your foot.
Pattern Notes Before You Start
This barefoot sandal is worked mostly in separate flat pieces that are sewn together in assembly. The toe loop forms a small ring encircling the second toe, attached to a center connector chain running up over the foot, connected at the ankle band. Leaves and bell motifs are crocheted separately and sewn on in groups for decoration and movement. The sandal finishes with pearl beads sewn on for added elegance and a lobster clasp closure or soft ankle ties for adjustability. No color changes are required during crochet; leave long tails for sewing pieces together neatly.
Step-by-Step Crochet Instructions
-
Toe Loop (in olive green):
- Ch 14-18, adjusting to fit comfortably around your second toe without tightness.
- Join with a sl st to first ch, making sure the chain is not twisted.
- R1: Ch 1, sc in each chain around (14-18 sc). Join with sl st to first sc.
- Fasten off, leaving a tail for sewing if needed.
-
Center Connector (in olive green):
- Join yarn to top center stitch of the toe loop.
- Ch 30-36 to fit length from toe loop to ankle comfortably.
- Starting in the 2nd ch from hook, work sl st back down the chain to toe loop.
- Fasten off, leaving a long tail for sewing.
-
Ankle Band (in olive green):
- Ch to fit your ankle circumference minus clasp allowance (approximately 22-26 cm).
- Starting in 2nd ch from hook, sl st across the chain.
- Fasten off, leaving a long tail for attaching clasp or ties.
-
Leaves (make 8 in olive green):
- Ch 6.
- Starting in 2nd ch from hook: sl st, sc, hdc, dc, sc; work 3 sc in last ch to create leaf tip.
- Continue working on opposite side of foundation chain: sc, dc, hdc, sc, sl st.
- Fasten off.
-
White Bells (make 8):
- R1: Make a magic ring, 5 sc in ring, join with sl st.
- R2: Increase in each stitch around (2 sc in each), total 10 sc.
- R3: Sc in each st around (10 sc).
- R4: Sl st in next st, ch 2, dc in next st, ch 2, sl st in same st as dc; repeat 5 times to create bell shape.
- Fasten off.
Assembly and Finishing
- Mark the center point of the ankle band. Sew the free end of the center connector securely to this mark with at least eight passes of yarn for durability.
- Arrange the eight leaves and bells along the front half of the ankle band in four motif groups. Each group should have two leaves angled upward with two bells hanging side by side on delicate 6-8 mm thread loops to allow natural movement.
- Sew a pearl bead between each motif group (three pearls) and evenly distribute the remaining three pearls down the center connector.
- Make sure none of the leaves, bells, or beads are positioned where they would touch the sole or skin directly, to prevent irritation.
- Attach the lobster clasp and jump rings at the ends of the ankle band or securely attach ankle tie cords as preferred.
- Weave all yarn tails inside the sandal neatly and trim excess close to the fabric for a clean finish.
Helpful Tips
- Use stitch markers when counting chains to maintain correct toe loop and ankle band lengths.
- Keep the toe loop slightly looser rather than tighter to avoid discomfort.
- When sewing motifs, secure beads firmly but avoid tight stitching that deforms thread loops.
- Work in good lighting during assembly to arrange motifs evenly and symmetrically.
- Blocking the ankle band before assembly can help it lay flat and prevent twisting.
- Use a fine tapestry needle with a blunt tip to avoid splitting the thin crochet thread.
Common Mistakes to Avoid
- Twisting the toe loop chain before joining – lay it flat carefully before slip stitching.
- Making the toe loop too tight, which can restrict toe movement or cause discomfort.
- Over-tightening motif attachments that restrict their natural movement and delicate appearance.
- Placing beads or decorations directly under the sole where they can cause irritation.
- Skipping weaving in tails carefully, leading to loose ends catching or unraveling.
Customization Ideas
- Use soft pastel colors or variegated thread for the leaves and bells for a subtle color shift.
- Substitute tiny fabric flowers or beads instead of some bells for a unique look.
- Swap the lobster clasp for adjustable tie cords made from matching or contrasting thread.
- Adjust the chain lengths to create miniature versions for kids or larger sizes for wider feet.
How to Use or Display This Crochet Project
This barefoot sandal works beautifully as a delicate accessory for summer weddings, yoga sessions, beach walks, or even casual home wear. It makes a lovely handmade gift, combining practicality with an elegant, unique touch. After a day of wear, lay it flat to keep its shape and avoid stretching.
Care Instructions
Hand wash gently in cool water with mild detergent. Avoid bleach or harsh washing as the fine thread can weaken. Lay flat to dry away from direct sunlight to preserve color and shape. Store wrapped in tissue paper or a small cloth bag to avoid snagging.
Frequently Asked Questions
Q: Can I make this sandal with thicker yarn and a larger hook?
A: You can, but it will not have the same delicate look. Also, motifs and chains will be bulkier and less flexible, which might affect fit and comfort.
Q: How do I adjust the size to fit larger or smaller feet?
A: Adjust the number of chains in the toe loop and center connector, and measure carefully against your foot. Make sure the ankle band fits snugly but comfortably with allowance for clasp or tie.
Q: Are the bells functional or just decorative?
A: They are decorative crochet motifs shaped like bells, not actual ringing bells, attached with thread loops for gentle movement.
Q: Can I substitute beads with buttons?
A: Small, flat buttons can work, but pearls keep the delicate feel. Choose lightweight beads to prevent weighing down the sandal.
Q: How do I keep the motifs from irritating my feet?
A: Arrange all decorative elements on the top half of the ankle band and center connector, avoiding placement under the sole or where toes bend.
Final Thoughts
The Lily of the Valley Barefoot Sandal is a charming project that blends simple crochet techniques with thoughtful design details. It offers both beauty and function while letting you build confidence in working with fine thread and delicate motifs. I hope this pattern adds a touch of handmade grace to your summer accessories and inspires you to explore more wearable crochet pieces. Happy crocheting!




Une commande du produit fini est possible ? Merci