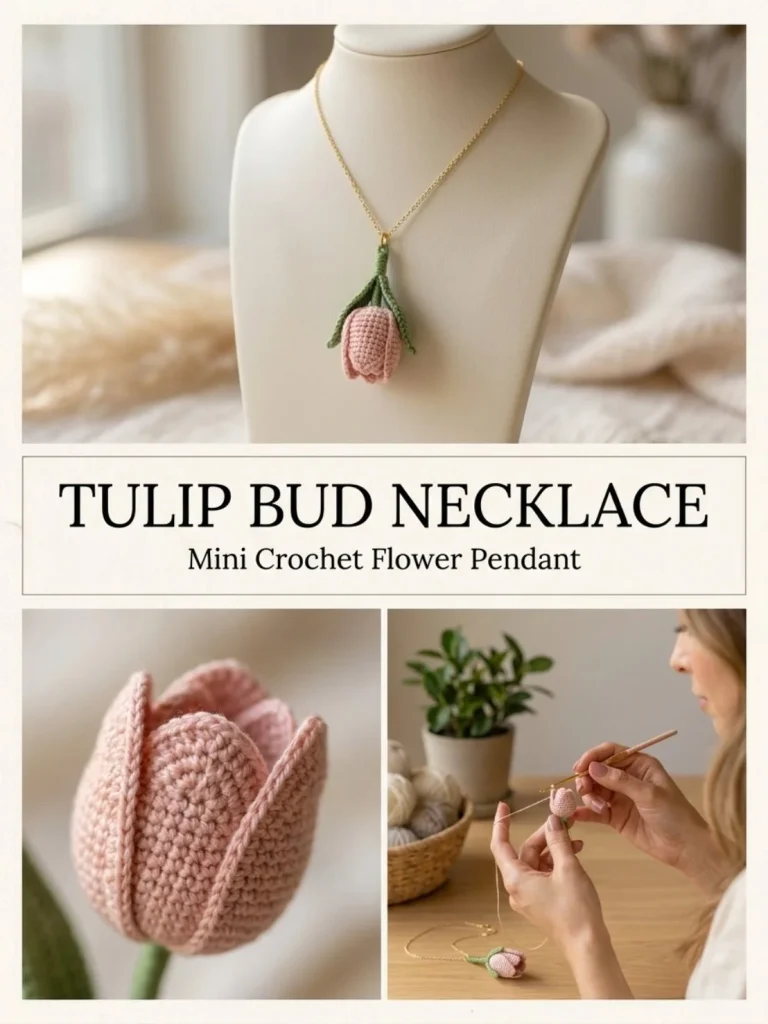
This charming crocheted tulip bud necklace is a delicate statement piece perfect for makers who love floral-inspired accessories. Designed with fine cotton thread and a minimalist approach, it captures the simple beauty of a tulip bud, making it an excellent gift or a sweet personal treat. The pattern is beginner-friendly, focusing on basic stitches worked in rounds with subtle shaping to make the petals and stem look lifelike yet neat. I found that flattening the top gently before forming the petal edge helps the buds maintain their shape without curling awkwardly. Whether you choose to attach your bud to a jewelry chain or crochet a slim cord, this necklace is both wearable and tidy, ideal for everyday charm. If you’ve enjoyed other delicate projects like the tulip vine necklace, this bud pattern will be a lovely addition to your crochet jewelry collection.
Why You’ll Love This Crochet Pattern
- Works up quickly with small amounts of cotton thread, so it’s great for last-minute gifts.
- Uses simple stitches, building beginner confidence with shaping and color changes.
- The finished piece is lightweight and comfortable to wear, making it practical for layered looks.
- The pattern teaches subtle texture techniques through petal edging for realistic detail.
- You have the freedom to finish with a chain or crocheted cord, improving your accessory skills.
Finished Size
The completed tulip bud measures approximately 2 inches (5 cm) in length, plus the stem and hanging cord or chain length which you can customize. Keep in mind the size may vary slightly depending on your yarn choice, hook tension, and finishing method.
Skill Level
This project suits an advanced beginner who is comfortable crocheting in the round and following increases. Familiarity with slip stitch (sl st) and half double crochet (hdc) will help, but detailed abbreviations and step instructions ensure clarity for newer makers willing to learn.
Materials Needed
- Fine cotton crochet thread in blush pink (for the bud) and leaf green (for the stem and sepals)
- 2 mm crochet hook
- Fine jewelry chain or crochet cotton (for making the cord)
- Clasp for finishing the necklace
- Tapestry needle for weaving in ends
- Scissors
Stitches and Abbreviations
- sc: single crochet – Insert hook, yarn over, pull through; yarn over, pull through two loops.
- inc: increase – Make 2 single crochets in the same stitch.
- sl st: slip stitch – Insert hook into stitch, yarn over, pull through stitch and loop on hook.
- hdc: half double crochet – Yarn over, insert hook into stitch, yarn over, pull through; yarn over, pull through all 3 loops on hook.
- ch: chain – Yarn over, pull through loop on hook.
Gauge and Tension Notes
While exact gauge is not critical for a jewelry-sized piece, keeping stitches tight and consistent helps the bud hold its shape well. Slightly firm tension will make the petals stand up and the stem neat without stretching the thread or curling edges.
Pattern Notes Before You Start
This necklace bud is worked entirely in rounds starting with a magic ring. The petal edge uses a combination of slip stitches, single crochets, and half double crochets worked over existing stitches to create the scalloped look. The stem uses green thread joined at the base of the bud and consists of a chain of 8 stitches slip stitched back for a subtle rope effect. Sepals are small chains joined around the top edge for added detail. Finally, the bud can be attached either to a delicate chain or a crochet cord made with chain and slip stitches for a consistent handmade feel.
Step-by-Step Crochet Instructions
- Bud Base: Start with blush pink thread. Make a magic ring.
- Round 1: 6 sc into the magic ring (6 sts).
- Round 2: sc 1, inc around (9 sts).
- Rounds 3–5: sc around (9 sts each round).
- Flatten the top slightly by pressing gently with fingers.
- Round 6 (Petal edge): Working over the first 3 stitches, repeat sl st, sc, hdc; then repeat over the next 3 stitches to form scalloped petals.
- Stem: Switch to leaf green thread at the base.
- Ch 8, sl st back along the chain to the base.
- Make 3 small sepals by chaining 3, slip stitching into the 2nd chain, then joining back at the top edge around the bud.
- Fasten off, leaving a tail for sewing if needed.
- To finish, attach the bud to a fine jewelry chain or crochet a cord by chaining 70 and slip stitching back along it for a neat cord. Add clasp as desired.
Assembly and Finishing
Attach the finished bud securely to your choice of necklace base. If using a jewelry chain, sew the base of the bud with the green thread tail, taking care to hide the knots inside the bud’s underside for neatness. For a crochet cord, weave in ends thoroughly and block gently to reshape if necessary. Weaving the ends with a tapestry needle will prevent unraveling and improve durability. The petal edges hold best with light shaping after finishing, so gently pressing them for definition helps your necklace look polished.
Helpful Tips
- Make sure to tighten your magic ring as much as possible to avoid a hole in the bud’s center.
- When changing colors to green for the stem, leave a longer tail to sew the bud on more securely.
- Flattening the bud top before working the petal edging accentuates the flower’s shape.
- Use fine cotton thread and a 2 mm hook for sharp stitch definition.
- Blocking your finished piece on a flat surface helps the petals retain their shape without curling.
Common Mistakes to Avoid
- Avoid loose stitches in the magic ring as this will affect the bud’s shape.
- Don’t skip pressing the bud top before adding petals — it makes a big difference.
- Inconsistent tension can cause the petals to curl or limp.
- Ensure the stem chain is tight without pulling, or it will distort the bud base.
- Forgetting to securely fasten ends can cause the necklace to fall apart after wear.
Customization Ideas
- Use different shades of pink or even purple tones to create a variety of tulip bud colors.
- Try metallic or variegated threads for a sparkly or textured effect.
- Adjust the stem length by changing the chain stitch count to create pendants or brooches.
- Add a tiny bead at the base of the sepals for a subtle decorative touch.
How to Use or Display This Crochet Project
Wear your tulip bud necklace as a charming floral accessory for casual or dressy outfits. It also makes a thoughtful handcrafted gift, ideal for birthdays or Mother’s Day. Display it as a cozy statement piece by pairing it with matching crochet jewelry or adding it to your collection of DIY accessories. The lightweight thread and delicate shape ensure it layers well with scarves or cardigans without bulk.
Care Instructions
Hand wash the necklace gently in cool water with mild detergent and reshape while damp. Avoid wringing or twisting. Lay flat to dry away from direct heat or sunlight. Store in a jewelry box or fabric pouch to protect its delicate threads and maintain its shape.
Frequently Asked Questions
Q: Can I use yarn instead of cotton thread?
A: Yes, but using thicker yarn will result in a larger and less delicate bud. This pattern is designed for thread and a small hook.
Q: How do I avoid the petals curling too much?
A: Keep stitches firm and block the finished piece flat to encourage the petals to lie nicely.
Q: Can I make the cord adjustable?
A: Absolutely. Use a sliding knot or adjust the clasp placement to customize length.
Q: Is this pattern suitable for complete beginners?
A: It’s best for advanced beginners who have experience with magic rings and basic increases.
Q: Can I add more sepals or petals?
A: You can experiment by increasing the number of petal rows or sepals, but note it changes the shape.
Final Thoughts
This tulip bud necklace is a sweet beginner-friendly project that brings a touch of handmade elegance to your accessory collection. The precise yet simple stitches allow you to build skills while producing a wearable floral piece. With its delicate shape and customizable options, you’ll enjoy crafting this pattern again and again, perfect for gifting or keeping as a thoughtful keepsake. If you want a small project that feels both practical and decorative, this pattern fits beautifully.
For those exploring cute crochet accessories, also consider checking out the bunny earbud pocket pouch for a playful complementary pattern.



