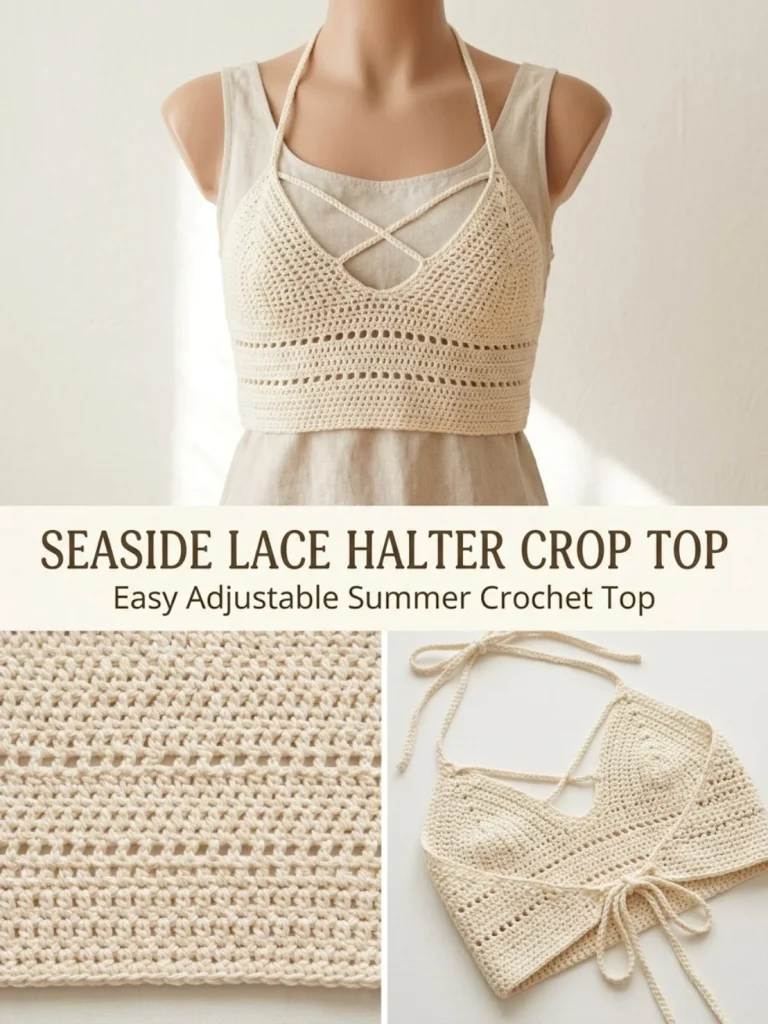
The Seaside Lace Halter Crop Top is a delightful crochet project that embodies both style and comfort. This piece showcases a beautiful lace pattern that is perfect for a sunny day at the beach or a casual outing. It’s not only chic and trendy but also beginner-friendly, making it an excellent project for those new to crochet. An essential tip to keep in mind is to maintain loose stitches while working; this helps create a relaxed fit and ensures the lace pattern shines through. The contrast between the lace and the solid crochet makes it a versatile addition to any summer wardrobe, easily paired with high-waisted shorts or skirts.
Why You’ll Love This Crochet Pattern
- This crochet top offers a stylish way to showcase your crochet skills.
- The lace design is airy and perfect for summer wear.
- It can be made as a unique gift for friends and family.
- The pattern is beginner-friendly and easy to follow, ensuring a satisfying crafting experience.
Finished Size
The finished size of the Seaside Lace Halter Crop Top is approximately suitable for sizes small to medium, but keep in mind that the size may vary depending on your yarn, hook, and tension.
Skill Level
This project is categorized as beginner. The straightforward stitches used make it an ideal choice for those just starting their crochet journey.
Materials Needed
- Yarn: DK (#3) mercerized cotton, 350-400 yd / 320-365 m in natural cream
- Hook: 4.0 mm
- Notions: yarn needle, scissors, 4 stitch markers, measuring tape
Stitches and Abbreviations
- hdc: Half Double Crochet
- dc: Double Crochet
- ch: Chain
- sl st: Slip Stitch
- st: Stitch
Gauge and Tension Notes
For this project, gauge is not critical, but maintaining consistent tension will help achieve an even finish.
Pattern Notes Before You Start
The Seaside Lace Halter Crop Top is worked in rows with a focus on horizontal eyelet bands. Be mindful of keeping your tension loose for the lace sections, ensuring each stitch is clearly defined.
Step-by-Step Crochet Instructions
- Chain 75 loosely.
- Row 1: Hdc in the 2nd ch from the hook and in each ch across (74 hdc). Turn.
- Rows 2-6: Ch 1, hdc in each st across (74 hdc). Turn after each row.
- Row 7: Ch 2, dc in the first 2 sts, ch 1, skip 1 st, dc in the next st across until 2 sts remain, dc in the last 2 sts. You will maintain 74 stitch/space positions across. Turn.
- Row 8: Ch 1, hdc in each dc and each ch-1 space across (74 hdc). Turn.
- Rows 9-10: Ch 1, hdc in each st across (74 hdc).
- Repeat Rows 7-10 one more time. You now have two horizontal eyelet bands.
- Row 15: Ch 1, hdc2tog over the first 2 sts, hdc across to the last 2 sts, hdc2tog (72 sts).
- Row 16: Ch 1, hdc across (72 sts).
- Repeat Rows 15-16, decreasing 2 sts on every odd-numbered shaping row until 56 sts remain.
- Work 2 more plain hdc rows over 56 sts. Fasten off.
- Join yarn at the upper-left corner. Ch 1 and sc evenly across the 56-st top edge. Fasten off.
- Join yarn at the upper-right corner. Ch 80. Sl st in the 2nd ch from the hook and in each ch back to the corner. Sl st into the corner and fasten off.
- Repeat at the upper-left corner for the second neck tie. Each tie should measure about 18-20 in / 46-51 cm after relaxing.
- Join yarn at the lower-right corner of the band. Ch 95. Sl st back along the chain. Fasten off.
- Repeat at the lower-left corner.
- For the exact featured design, make two slim decorative cords: ch 48, sl st back along each chain. Sew one end of each cord to the inner upper corners, then cross the cords over the chest and secure their opposite ends to the lower band about 4 in / 10 cm from each side edge.
- Weave in all ends. Lightly wet-block the front panel to the stated measurements without stretching the ties.
- Wear with the lower ties secured at the back and neck ties adjusted comfortably.
Assembly and Finishing
To finish, ensure all ends are securely woven in and that any joining or stitch lines are smooth. The light blocking will help shape your top beautifully.
Helpful Tips
- Keeping your stitches loose will enhance the lace appearance.
- Utilize stitch markers to help maintain row counts, especially in decreasing rows.
- Don’t rush the finishing touches; a careful finish can significantly impact the final look of your project.
- Experiment with different colored yarns to customize your Seaside Lace Halter Crop Top.
Common Mistakes to Avoid
- Avoid pulling your stitches too tight; this can distort the pattern.
- Make sure to pay close attention to the stitch counts in the shaping rows to maintain consistency.
- Don’t skip the blocking step; it’s essential for achieving the right shape and finish.
Customization Ideas
- Change the yarn color to match your style or complement your wardrobe.
- Adjust the length of the crop top based on personal preference.
- Add embellishments such as beads or embroidery to enhance visual interest.
- Consider different yarn weights for a variety of textures and drapes.
How to Use or Display This Crochet Project
This crochet top is perfect for summer outings, beach days, or casual gatherings. Style it with high-waisted bottoms for a trendy look.
Care Instructions
To clean your Seaside Lace Halter Crop Top, hand wash in cold water and lay flat to dry. Store it in a cool, dry place to maintain its shape and quality.
Frequently Asked Questions
-
Can I use a different yarn type?
Yes, but make sure it has a similar weight to ensure the fit and drape are correct. -
How can I adjust the size?
You can add or subtract chains in the foundation row, but remember to keep the stitch counts consistent in subsequent rows. -
Is it necessary to block the top?
Yes, blocking helps shape the lace and enhances the overall look of the top. -
What is the best way to store my completed piece?
Store it folded in a dry area away from direct sunlight to prevent fading.
Each stitch in this Seaside Lace Halter Crop Top brings warmth and style, making it a cherished addition to any summer wardrobe. For more delightful crochet designs that pair well with this top, check out the Tulip Vine Necklace for a coordinated look. Happy crocheting!



