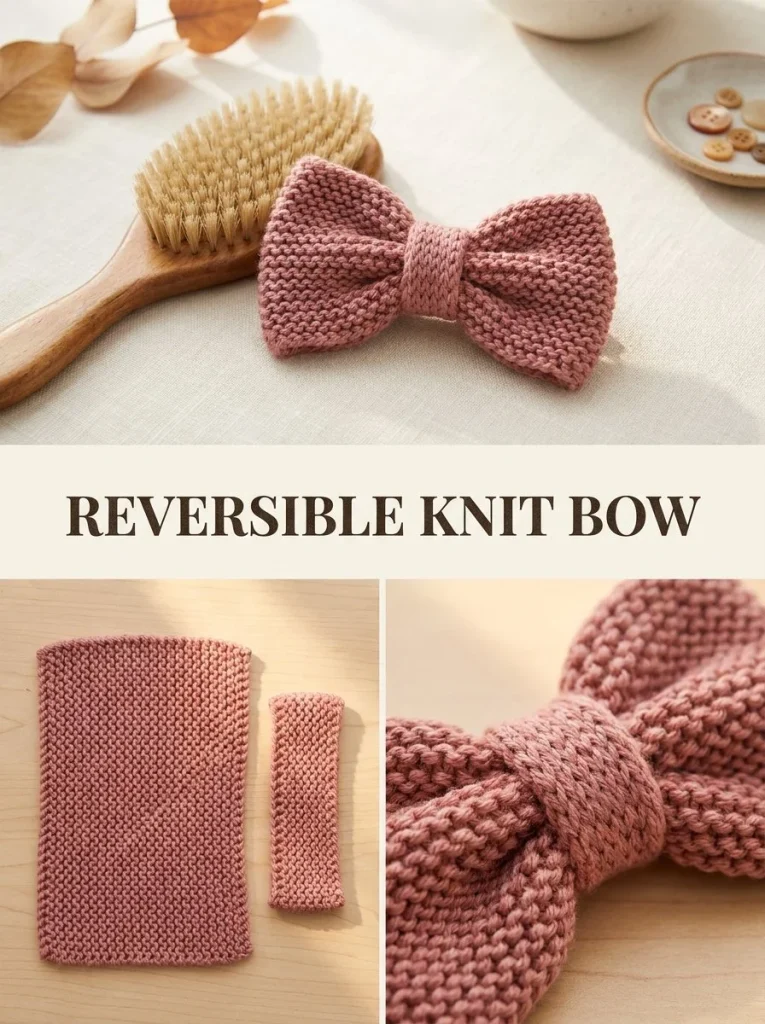
Creating a Reversible Knit Bow Barrette is a delightful project that combines both style and functionality. This charming accessory can easily elevate any outfit while showcasing your knitting skills. The unique design features a reversible construction, allowing for versatility; whether you choose to wear the bow with a vibrant side facing out or the understated one, it’ll still look elegant. In this article, we’ll guide you through all the essential steps to make your very own bow barrette while providing you with tips and resources to inspire your creativity further—be sure to check out this reversible double layer beanie knitting pattern for more fun projects!
Pattern at a Glance
Skill level: Intermediate
Terminology: US knitting terminology
Construction: Flat knitting in garter stitch
Finished size: Approximately 5.5 in / 14 cm wide x 3 in / 7.5 cm high
Yarn weight: DK-weight
Needles: US 6 (4.0 mm) knitting needles
Main stitch: Garter stitch
Gauge: Approximately 20 sts and 28 rows = 4 in / 10 cm in garter stitch (exact gauge is not critical)
Motifs: Bow and center band
Seaming: Seam the bow ends and attach the barrette
Materials
For this project, you will need the following materials:
- Yarn: DK-weight wool or merino yarn in dusty rose
- Needles: US 6 (4.0 mm) knitting needles
- Notions: Tapestry needle, scissors
- Hardware: 2.5-3 in / 6-7.5 cm metal barrette clip
The soft texture of the wool or merino yarn will not only provide warmth but will also give your barrette a lovely structure.
Yarn and Color Notes
Choosing the right yarn is crucial for achieving the best results for your bow barrette. DK-weight yarn is recommended as it allows for the right amount of drape without being overly bulky. The dusty rose color is a beautiful choice for those looking to add a romantic touch to their accessory. You may opt to use variegated yarn for a more playful look or stick to a solid color for a classic feel. You can also play with color combinations if you like experimenting with different shades.
Finished Measurements
The finished barrette will measure approximately 5.5 inches / 14 centimeters wide and 3 inches / 7.5 centimeters high. This size is ideal for producing a statement piece that is not too overwhelming but still stands out.
Gauge
Maintaining the correct gauge is important for your project to come out well. The recommended gauge is approximately 20 sts and 28 rows = 4 in / 10 cm in garter stitch. If your gauge is larger, your barrette may come out bigger than intended. Conversely, if your gauge is smaller, the finished product may be tighter or not achieve the desired dimensions. However, for this project, exact gauge is not critical but is worth noting if making adjustments.
Abbreviations
- CO: Cast On
- BO: Bind Off
- sts: Stitches
Important Pattern Notes
- Ensure to keep your tension consistent throughout the knitting process.
- When measuring your pieces, always double-check dimensions to ensure a proper fit.
- Garter stitch is created by knitting every row, which contributes to the elasticity of the piece.
Special Stitches and Techniques
This pattern primarily involves using the garter stitch technique, which is very beginner-friendly. As you will be knitting every row, the texture creates a beautiful, squishy fabric while making both sides reversible.
Understanding the Construction
The barrette consists of two main components: the bow and the center band. You will knit the bow first, which forms the larger part that will be seen from both sides, followed by a narrower center band that provides the neat finish and holds everything together. The assembly is straightforward, ensuring the whole project comes together beautifully.
Full Pattern Instructions
Foundation
Start by gathering your materials and ensure your workspace is comfortable and well-lit.
Main Bow
- CO 28 sts using the DK-weight yarn.
- Knit every row for 44 rows, or until the piece measures approximately 8 in / 20 cm long.
- BO loosely.
- Bring the two short ends together and seam them to create a flat loop.
- Turn the seam to the center back, flatten the loop, and pinch the middle into three small folds.
- Tack through the folds several times, securing the center in place.
Center Band
- CO 6 sts.
- Knit every row for 18 rows, or until the band wraps comfortably around the pinched center with a small overlap.
- BO.
- Wrap the band around the bow center, placing its seam at the back, and stitch the short ends together.
Finishing
- Sew the metal barrette to the back of the center band using strong sewing thread or yarn, ensuring to catch only the back layer so stitches do not show on the front.
- Shape the two bow loops evenly and steam lightly. The garter-stitch construction makes both visible faces neat, allowing the bow to sit on either side without displaying a wrong side.
Checkpoints
- Your piece should now measure approximately 8 inches / 20 cm long before seaming.
- Check that the bow loops are shaped evenly and the center band fits snugly around the pinched area.
- Ensure that the barrette is securely sewn to the center band and does not interfere with the bow’s appearance.
Assembly
The assembly of your bow barrette is straightforward. Once you’ve completed the individual components, align the center band to the bow, ensuring the seam is at the back. The barrette clip should be attached firmly to prevent any movement when worn.
Variations
You can experiment with various yarn colors or textures for fun variations. For example, consider:
- A one-color version for a minimalistic look.
- A two-color version, using contrasting colors for the bow and band.
- A scrap-yarn version, where you utilize leftover yarn from previous projects.
Troubleshooting
Why Is My Bow Not Keeping Its Shape?
If the bow does not maintain the desired shape, ensure that you have sewn the center pinched area securely, as this is crucial in keeping the bow’s form.
Why Is My Fabric Curling?
Curling can result from not having the right tension. Ensure you are consistently knitting in garter stitch, as this stitch helps to minimize curling.
Why Are My Edges Wavy?
If your edges are not lying flat, it might be due to inconsistent knitting tension or bind-off. Try binding off more loosely if necessary.
Frequently Asked Questions
Can I use a different yarn weight?
Using a different weight can affect the final size and drape of your bow barrette. If you choose to experiment, adjust your cast-on and row counts accordingly.
Is the pattern reversible?
Absolutely! The garter stitch ensures that both sides of the barrette look great.
Can a beginner make this?
While intermediate skills in knitting are recommended, a dedicated beginner willing to learn can tackle this project with patience.
For additional inspiration and projects to explore alongside this bow barrette, consider trying out the little luxury reversible diamond scarf knitting pattern.
In conclusion, creating the Reversible Knit Bow Barrette is an engaging and rewarding project that brings both beauty and practicality to your wardrobe. Whether you’re crafting it for yourself or as a thoughtful gift, this simple yet delightful accessory adds a special touch to any outfit. Enjoy your knitting!



