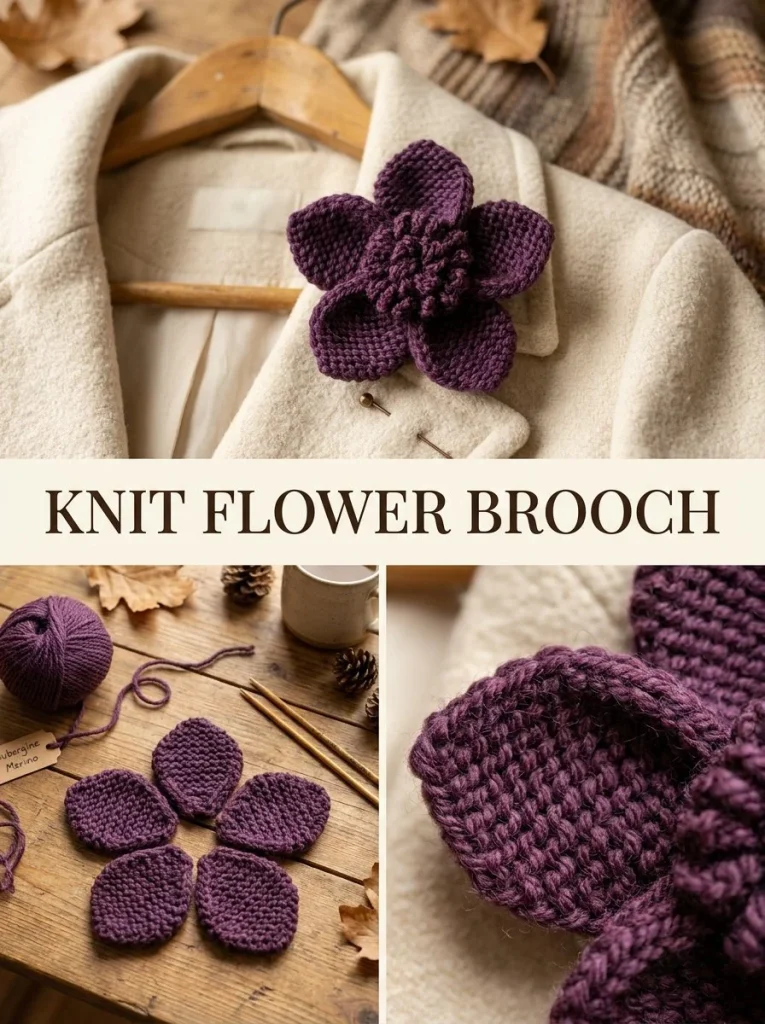
This charming knitting project allows you to create a lovely aubergine flower brooch that can add a pop of color to any outfit. With its textured petals and straightforward assembly, this flower brooch is not just visually appealing but also a satisfying quick project for knitters of all skill levels. The construction revolves around basic knitting techniques, making it accessible while providing an opportunity to develop your skills.
The flower consists of five individual petals, each carefully crafted to form a beautiful flower shape. This not only makes the brooch stand out but also provides ample opportunity to play with yarn colors or even experiment with different sizes. Plus, the versatility of this brooch means that it can be worn in various settings, from casual gatherings to more formal occasions.
Pattern at a Glance
- Skill level: Intermediate
- Terminology: US knitting terminology
- Construction: Worked flat then assembled
- Finished size: About 3.5 in / 9 cm across
- Yarn weight: DK-weight merino or wool-blend
- Needles: US 6 (4.0 mm) knitting needles
- Main stitch: Garter stitch
- Gauge: Not critical; aim for a firm garter fabric.
- Motifs: 1 flower comprised of 5 petals
- Joining: Petals gathered and sewn together
- Finishing: Brooch pin attached
Materials
To create this delightful flower brooch, gather the following materials:
- Yarn: DK-weight merino or wool-blend yarn in aubergine. This type of yarn provides a nice drape and texture, making your flower look vibrant and full.
- Needles: US 6 (4.0 mm) knitting needles for comfortable handling and stitch creation.
- Notions:
- Tapestry needle for weaving in ends and attaching parts.
- Scissors for cutting yarn.
- One brooch pin back to create the wearable aspect of the flower.
- A small piece of felt (optional) for added backing to securely attach the pin.
Yarn and Color Notes
Choosing the right yarn is crucial for obtaining the desired look and feel for your brooch. DK-weight yarn is perfect because it strikes a balance between being lightweight yet substantial enough for this project. An aubergine color works beautifully for this project, evoking a sense of elegance. If you want to experiment, consider using a contrasting color for the center of the flower or even incorporating variegated yarn for a unique visual effect.
Finished Measurements
The finished brooch will measure about 3.5 in / 9 cm across. This size is perfect for a brooch, allowing it to stand out without being overwhelmingly large. Remember that blocking may slightly alter the dimensions, so it’s good to keep this in mind when finalizing your piece.
Gauge
Although the gauge is not critical for this project, aiming for a firm garter fabric is advisable. Achieving a consistent tension will ensure that your petals look uniform and help in the neat assembly of the flower. If you’re unsure, knit a small swatch and adjust your needle size if necessary.
Abbreviations
- CO: Cast On
- K: Knit
- KFB: Knit into Front and Back of one stitch
- K2tog: Knit Two Together
- SSK: Slip-Slip-Knit decrease
- BO: Bind Off
Important Pattern Notes
- When working this pattern, remember that rows are knit flat, so you will turn your work at the end of each row.
- The cast-on count of each petal should remain consistent throughout, enabling symmetrical petals.
- Ensure that you have enough yarn tail length for finishing; leaving a 10 in / 25 cm tail is best for assembly.
Special Stitches and Techniques
This pattern primarily utilizes basic knitting techniques such as garter stitch, increases (KFB), and decreases (SSK and K2tog). Understanding how to execute these stitches clearly will ensure your petals maintain their intended shape and design.
Understanding the Construction
This flower brooch is made from five individual petals that are knitted flat and then sewn together to create a single cohesive flower shape. Each petal starts with a small number of stitches and gradually increases in width, creating the petal form. After knitting, the petals are gathered at the base to bring them together in the center, before securing with yarn and attaching the brooch pin at the back. This simple assembly process makes it an enjoyable project for knitters looking for a quick make.
Full Pattern Instructions
Foundation
Petal: (make 5)
- CO 5 sts and prepare for knitting.
Row 1
- K all. (Keep the stitches uniform)
Row 2
- K1, KFB, K1, KFB, K1. (You will now have 7 sts)
Row 3
- K all. (No increases on this row)
Row 4
- K1, KFB, K3, KFB, K1. (Total of 9 sts now)
Rows 5-7
- K all. (Continue to establish the size of the petal)
Row 8
- K1, SSK, K3, K2tog, K1. (Bring down to 7 sts)
Row 9
- K all. (Consistent knitting here)
Row 10
- K1, SSK, K1, K2tog, K1. (You will now have 5 sts)
Row 11
-
K all. (Finish working the petal)
-
BO loosely, leaving a 10 in / 25 cm tail.
Assembly
To bring your flower brooch together:
- Arrange the five petals in a circle with their cast-on ends meeting at the center.
- Use the long tail from the cast-on edge of each petal to thread through, pulling gently to gather the bases into a flower and securing the shape.
- Using another tail, tack neighboring petals together for about 0.5 in / 1.25 cm along the base to prevent twisting.
- Make 5-7 small yarn knots or French-knot-style stitches in the center using the same yarn.
- Sew the brooch pin securely to the back; consider adding a small piece of felt behind the pin if desired for extra stability.
- Finally, steam lightly without flattening the garter ridges to maintain the texture.
Resizing
If you wish to resize the flower brooch, you can do so by adjusting the number of stitches cast on for each petal, proportionally increasing your KFB increases and the overall length of rows. This allows for larger or smaller flowers without altering the basic construction.
Variations
Explore different color palettes or textures by using other yarns or adding embellishments. For example:
- Create a two-tone version by using a contrasting color for the center stitches or the petals.
- Experiment with larger petals for a more dramatic flower.
- Use lighter or heavier yarns to alter the texture and weight of the brooch.
Troubleshooting
Why Is My Petal Curling?
Curling can be a common issue when working with garter stitch. Ensure that you are knitting consistently and consider blocking your petals flat after completion.
Why Do My Petals Look Different Sizes?
This typically happens due to inconsistent gauge. To maintain uniformity, use the same tension throughout while knitting each petal.
How Can I Ensure the Center of My Flower Is Neatly Finished?
Gathering the petals loosely ensures that they form a nice shape without tightness. Make sure not to pull too tightly when securing the petals together.
Frequently Asked Questions
Can I Use a Different Yarn Weight?
Yes, but be aware that this may affect the final size of the flower. Adjust your casting on if necessary.
Can I Use Cotton Yarn?
Cotton may work but could result in a less structured flower. Consider a wool blend for better drape and texture.
Can I Make It Larger?
Absolutely! Adjust the cast-on stitches and row counts as needed to create bigger petals.
Can a Beginner Make This?
Yes, while the project may have intermediate elements, a beginner with some guidance can definitely accomplish it.
How Should I Block It?
Light blocking can help shape the petals and enhance the final appearance. Use a steam iron at a distance to lightly steam them.
In conclusion, the delicate structure and vibrant color of this aubergine flower brooch make it a delightful addition to your accessory collection. With these instructions, you’ll create a beautiful piece that showcases your creativity and knitting skills, perfect for adding a touch of charm to any outfit. For more inspiration, feel free to check out this oversized blue flower brooch pattern or explore this acorn keyhole scarf pattern.



