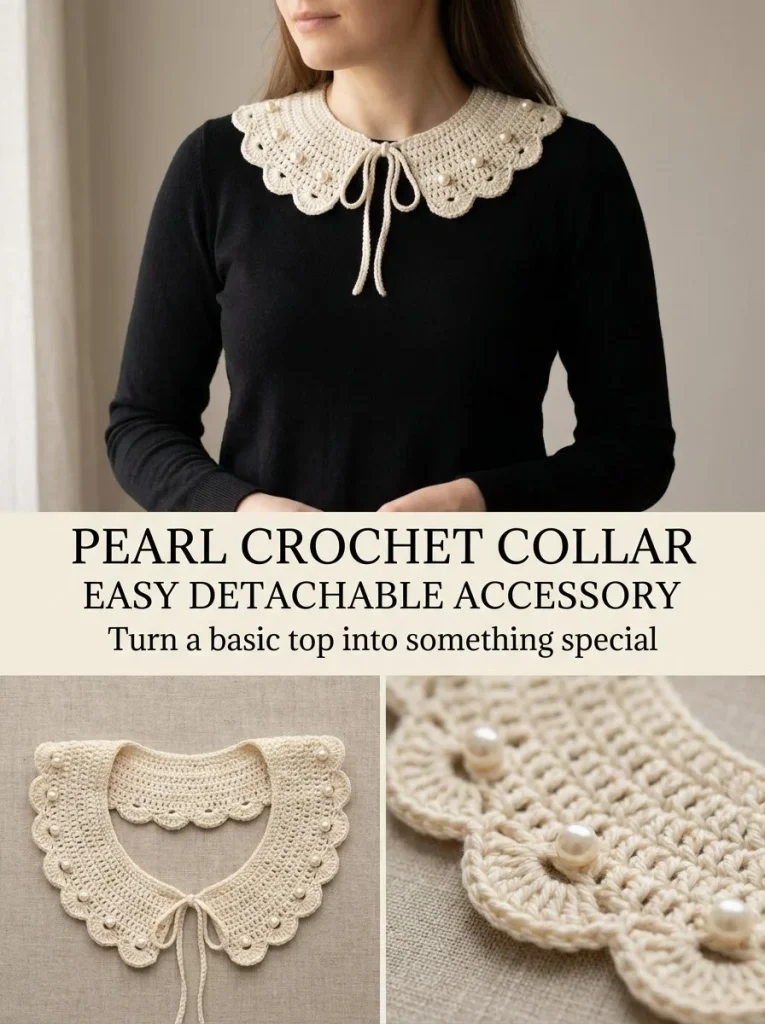
This elegant Pearl Scallop Detachable Crochet Collar is an ideal project to enhance your wardrobe with a unique touch. A simple yet sophisticated accessory, it adds flair to any outfit, from casual to dressy. The collar is designed using basic crochet stitches, making it highly accessible for crocheters at any skill level. The delicate scallop edge, adorned with small faux pearls, gives a refined finish to the piece, making it perfect for those who wish to express their personal style effortlessly. Whether you’re looking for a statement piece for an event or a lovely gift, this collar is a delightful choice.
Pattern at a Glance
Here’s a brief overview of the project details:
Skill level: Easy
Terminology: US crochet terminology
Construction: Worked in rows with scallop edges
Finished size: Neckline measurement of 16-20 inches
Yarn weight: DK #3
Hook: 4mm
Main stitch: Half double crochet (hdc)
Gauge: Not specified, but it’s essential for fitting
Motifs: N/A
Layout: Collar with scalloping edge
Joining: N/A
Border: Scallop edge
Materials
To create the Pearl Scallop Detachable Crochet Collar, you will need the following materials:
- DK #3 cream cotton yarn: This lightweight yarn offers a soft and smooth finish, perfect for comfortable wear.
- 4mm crochet hook: This size is recommended for the yarn to achieve the necessary tension.
- 5 small faux pearls: These will be sewn along the collar to enhance the elegance of your accessory.
- Tapestry needle: For weaving in ends and sewing on the pearls.
- Sewing needle suitable for beads: This helps in attaching the pearls without damage.
- Measuring tape: Essential for ensuring the collar fits properly around your neckline.
Yarn and Color Notes
When selecting yarn, a DK #3 cream cotton yarn is excellent for this project due to its versatility and comfort. Cotton fibers offer a breathable quality, making this collar ideal for year-round wear. If you wish to explore color variations, pastel shades or earthy tones can make lovely alternatives while still maintaining the collar’s delicate aesthetic.
Finished Measurements
The collar should measure approximately 16-20 inches in length, adjustable to fit many adult sizes. This flexibility makes it an excellent gift or a personal item for various occasions. Be sure to measure the neckline where you intend to wear the collar and adjust the starting chain accordingly.
Gauge
While specific gauge measurements are not stated for this project, checking your tension is crucial, especially since it determines the final fit. To achieve the best results, work a small sample patch and measure your half double crochet stitches before starting. If your gauge is too loose, the collar could stretch out and not hold its shape; if too tight, it may become uncomfortable.
Abbreviations
- ch: chain
- hdc: half double crochet
- sl st: slip stitch
Important Pattern Notes
- Turning chains: Be mindful that if using turning chains, such as for hdcs, they do not count as a stitch.
- Spacing for increases: Distributing increases evenly is essential to maintain a smooth curvature of the collar.
- Right side/Wrong side: Typically, the right side of the work is the side that faces outward.
Special Stitches and Techniques
The primary stitch used in this collar is the half double crochet (hdc). Additionally, a scallop stitch along the outer edge creates a beautiful decorative finish:
- To create the scallop: sl st in next st, skip 1, 5 dc in next, skip 1 and repeat.
Understanding the Construction
The collar starts by measuring the desired neckline and chaining accordingly. As you progress through the rows, the piece will develop a gentle curve, thanks to evenly distributed increases. The scallop edge offers flair while completing the look, making it a straightforward yet impactful project.
Full Pattern Instructions
Foundation
Measure the neckline where the collar will sit, which should be approximately 16-20 inches for many adult sizes. Chain to this measurement plus 2 chains.
Row 1
Work hdc in the 3rd ch from hook and across. This starting row lays the foundation for your collar.
Row 2
Chain 2, turn your work, and then work:
hdc in the next 4 stitches, 2 hdc in the next stitch across, ensuring that the increases are evenly distributed. This step is crucial for allowing the collar to begin its gentle curve.
Row 3
Chain 2, turn again, and work hdc across, while adding 6-8 evenly spaced increases throughout the row. Continue this process for 1-2 more rows if a wider collar is desired, maintaining the even spacing so that the piece lies flat.
Scallop Edge
Along the outer edge, repeat the following pattern as spacing permits:
sl st in the next stitch, skip 1, 5 dc in the next stitch, skip 1. This will create the charming scallop finish.
Ties
At each front corner, chain 35-45 chains for ties, and sl st back along the chain to provide a firmer cord for fastening.
Pearl Placement
Sew 5 pearls evenly across the upper portion of the collar, securing each firmly in place to finish your accessory with elegance.
Checkpoints
As you complete each stage, take a moment to check:
- Your piece should now measure approximately 16-20 inches.
- Ensure you have the correct number of stitches per row (the final count after increases).
- The curvature of the collar should form smoothly without distortions.
Assembly
As this project doesn’t require intricate assembly, simply ensure that the fastening ties are secure and the pearls are evenly spaced for a polished look.
Finishing
Be mindful of weaving in any loose ends to maintain the collar’s aesthetics. If desired, you can lightly block the collar to ensure it retains its shape.
Resizing
If you want to adjust the size of your collar, you can increase or decrease the initial chain based on your neckline measurement. Since this collar uses a flexible half double crochet pattern, maintaining even increases will help keep the shape consistent.
Variations
Consider making the collar in different colors or even creating a two-color version for special occasions. Experimenting with the size of the pearls could also yield a distinct look.
Troubleshooting
Why Is My Project Getting Wider?
This may be due to adding too many stitches in your increases. Count your stitches carefully on each row to ensure consistency.
Why Is My Edge Wavy?
Ensure that the increases are evenly spaced and that the tension is consistent throughout.
Why Is My Neckline Too Tight?
Re-measure your neckline and re-evaluate your foundation chain to ensure it accommodates your desired fit.
Frequently Asked Questions
Can I use a different yarn weight?
While DK yarn is recommended, you can use other weights, but adjustments may be necessary to maintain proper sizing.
Can I use cotton?
Yes! In fact, cotton is perfect for this project due to its breathable properties.
Can I make it larger?
Certainly! Adjust the foundation chain to fit your needs, following the same row instructions.
Do I need a special hook?
A 4mm hook works best, but if you maintain the same gauge, other sizes can be used.
Final Thoughts
Creating the Pearl Scallop Detachable Crochet Collar is not only a delightful project but also a fantastic way to enhance your wardrobe. This collar combines practicality with elegance, making it a suitable accessory for various occasions. Enjoy the process of crafting this unique piece and don’t hesitate to explore your creativity with colors and embellishments!
For those interested in more crochet accessories, you might enjoy checking out the blue bow bag charm pattern or the blue pearl crochet wrist cuff pattern. Happy crocheting!



