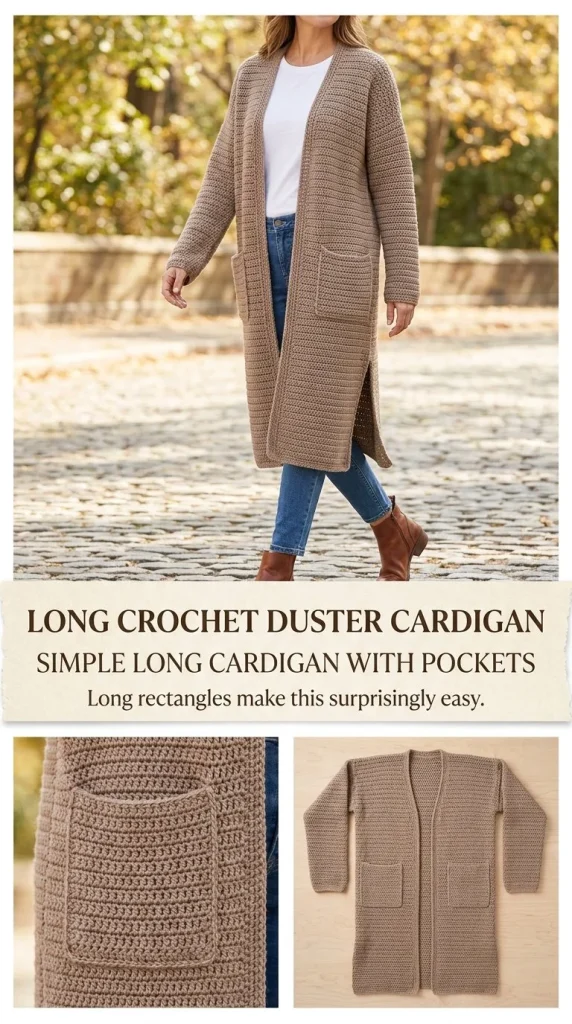
Creating your own crochet duster cardigan can be a rewarding project that combines functionality and style. This easy long cardigan is perfect for layering, featuring pockets for added convenience. With just a few supplies and following the detailed instructions provided, you’ll be able to craft a unique piece that reflects your personal style. If you’re new to crochet or looking to expand your skills, this is an excellent project to consider. You might also enjoy creating other accessories like this adorable blue bow bag charm, which make perfect gifts or accent pieces.
Skill Level
Confident Beginner. This cardigan is perfect for those who have a basic understanding of crochet and are ready to tackle a slightly more complex project. The technique involves simple stitches, but it also requires several shaping methods that will help build your confidence.
Materials
To make your long everyday crochet duster cardigan, gather the following materials:
- DK #3 or worsted-weight #4 yarn
- 5mm crochet hook
- Tapestry needle for weaving in ends
- Stitch markers for keeping your place
- Measuring tape to check your dimensions
- Gauge: 14-16 dc = 4 in/10 cm
Abbreviations — US Terms
Here’s a list of common crochet abbreviations used in this pattern:
- ch – chain
- sl st – slip stitch
- sc – single crochet
- hdc – half double crochet
- dc – double crochet
- st(s) – stitch(es)
- sp – space
Special Stitches
You will primarily use basic stitches for this project. However, if you wish to explore more techniques or embellishments, you can include special stitches, such as:
V-Stitch
To create a V-stitch, work 1 dc in the indicated ch-sp, ch 2, and 1 dc in the same ch-sp.
Gauge
Gauge is important for ensuring your cardigan fits well. The recommended gauge for this pattern is 14-16 double crochets (dc) per 4 inches (10 cm). Always check your gauge before starting the project to make adjustments to your hook size or yarn if necessary.
Finished Size
This cardigan has an open front style, with the length reaching mid-calf. The size can be adjusted by altering the width of the back and front panels.
Pattern Notes
- The cardigan is constructed in pieces and then sewn together.
- It is worked from the bottom up in rows.
- The finished bust size should allow for 4-6 inches of positive ease for a relaxed fit.
- Remember to seam the shoulders with a comfortable neck opening.
Crochet Instructions
Back Panel
- Determine your finished bust measurement and divide it by 2 to find the back panel width. For example, if your finished bust is 40 inches, the back panel should be 20 inches wide.
- Chain the appropriate foundation chain for your back panel width, ensuring to maintain gauge.
- Row 1: Work 1 dc in the 4th ch from the hook (counts as 1 dc). Work 1 dc in each ch across. (Total stitches = your foundation chain count – 2)
- Row 2: Turn. Ch 3 (counts as first dc). Work 1 dc in the next st and each st across.
- Repeat Row 2 until your back panel reaches the desired mid-calf length.
Front Panels
- For the front rectangles, chain a foundation chain that is approximately 1/4 of your finished bust measurement.
- Row 1: Work 1 dc in the 4th ch from the hook. Continue with dc across.
- Continue working in rows until the front panel is equal to the back panel’s length.
- Repeat for the second front panel.
Seaming Shoulders
- Align the front panels with the back panel at the shoulders.
- Seam across the top, leaving a neck opening of about 4-6 inches. This will allow for a comfortable fit.
Body Sides
- Seam the body sides from the underarm down to the lower hem. Stop 8-12 inches before the end to create side slits.
Sleeves
- Make two sleeve panels by chaining an initial foundation that matches the circumference of the armhole.
- Row 1: Work 1 dc across.
- Continue in rows until the sleeves reach your desired length and taper slightly if preferred.
- Attach the sleeves to the armholes.
Pockets
- To create pockets, chain to form two rectangles approximately 7-9 inches wide and tall.
- Sew one pocket on each lower front side along the sides and bottom edge.
Finishing Edges
- Work 2-4 rows of single crochet (sc) or half double crochet (hdc) continuously along one front edge, around the back neck, and down to the opposite front edge.
- This step will help finish off the edges, giving the cardigan a polished look.
Blocking
After completing your cardigan, it’s important to block the panels. Lay them flat, making sure the long edges hang straight. This will help your pieces to settle and achieve even dimensions.
Care
Care for your duster cardigan based on the yarn’s label. Generally, hand wash in cool water and lay flat to dry to maintain the shape.
By following these comprehensive steps, you will create a beautiful, functional cardigan. It can serve as a versatile addition to your wardrobe or a thoughtful handmade gift. Feel free to experiment with colors and textures to make it uniquely yours. For more crochet inspiration, consider making a blue crochet bun cover as a matching accessory for your new cardigan!



