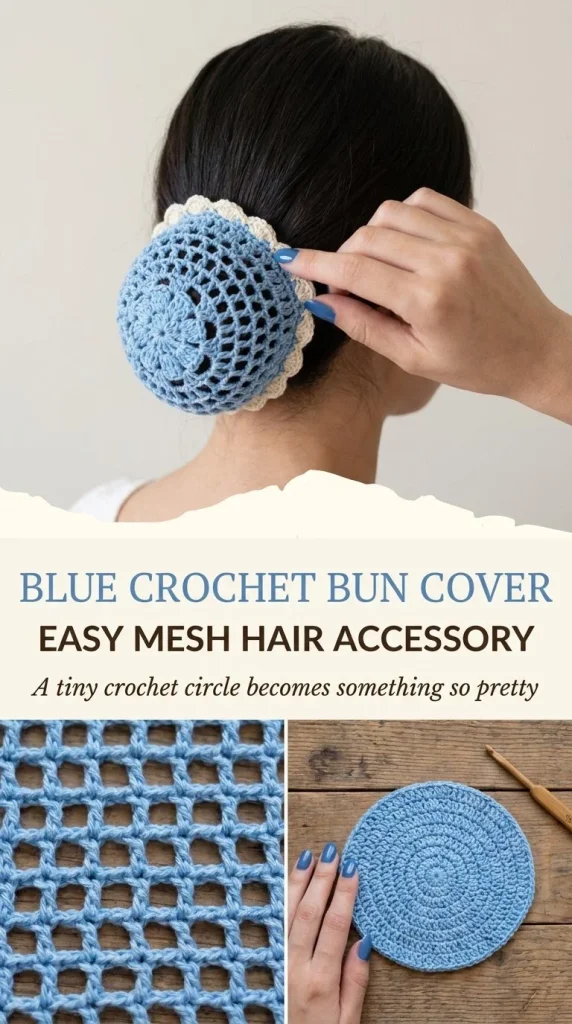
Creating a beautiful blue crochet bun cover is not only an enjoyable project but also a practical accessory for your hair. This easy mesh design provides both style and function, allowing you to keep your hair neatly tucked away while adding a touch of charm to your look. If you’re looking for other fun crochet ideas, you might consider trying this blue bow bag charm as a complementary accessory.
Skill Level
This project is suitable for the Confident Beginner. While some basic crochet skills are needed, the pattern is straightforward and repetitive, making it accessible to those who have a little experience with crochet.
Materials
For this project, you will need the following materials:
- Sky-blue cotton yarn
- 3.5mm crochet hook
- Tapestry needle
- Scissors
Abbreviations — US Terms
For this pattern, you will encounter the following abbreviations:
- ch – chain
- sl st – slip stitch
- sc – single crochet
Special Stitches
This pattern primarily uses basic stitches. However, it also involves working into chain loops to create the mesh design:
Chain Loop Formation
When forming chain loops, you will be making chains that are skipped in certain rounds to create an open mesh effect, which offers flexibility and style to your bun cover.
Gauge
Gauge is not critical for this project; however, maintaining consistent tension is important to achieve a uniform look.
Finished Size
The finished size will depend on how many rounds you decide to work, generally designed to comfortably cover an average-sized bun. Typically, this will be about 5-6 rounds in total.
Pattern Notes
- This project is worked in rounds.
- The starting chain and magic ring method creates the foundation.
- Each round features chain spaces for the mesh effect.
- The pattern grows in width as you increase chain length with each round.
Crochet Instructions
Round 1
- Begin with a magic ring.
- Chain 1 (ch1) and work 8 single crochets (sc) into the magic ring.
- Join to the first sc with a slip stitch (sl st).
At the end of this round, you should have 8 sc in a circular shape.
Round 2
- Ch3 (this counts as your first stitch), then skip the first st.
- Work a sl st in the next st. Continue this pattern around, forming small chain loops instead of standard stitches.
You should see small chain loops forming around the circle, continuing to maintain a count of 8.
Round 3
- Sl st into the first loop you just created.
- Ch4, then sl st into the next loop around. Repeat this around for the entire round.
At the end of this round, you will have created a row of chain 4 loops along with the base.
Round 4
- Repeat Round 3, but this time work ch5 loops to increase the size of your bun cover.
This round will lift the loops higher, contributing to the mesh effect.
Rounds 5–6
Continue this process, gradually increasing the chain length by 1 (ch6, then ch7) for each subsequent round until the piece is wide enough to comfortably cover your bun.
- Repeat the instructions: sl st into the first loop, chN (where N is the current round number plus 3), sl st into the next loop again until you finish these rounds.
After completing 5–6 rounds, you should see a wide, mesh-like band forming that will fit over your bun perfectly.
Final Tie
- Separately, ch70 to create a tie.
- Weave this tie in and out through the final chain-loop round.
- Position the bun cover over your bun, gently pull the tie to secure it underneath.
This finishing touch ensures that the bun cover stays in place while also allowing you to adjust how tightly it fits.
Tips for the Best Result
- Pay close attention to the spacing of your chain loops to avoid accidental increases in size.
- Using a stitch marker at the beginning of your rounds can help you keep track of your rows as you work.
- You might also enjoy creating other crochet accessories for a full set, like the stylish triangle bandana to complement your bun cover.
Common Mistakes
Uneven Chain Loops
If you find that your chain loops are uneven, double-check that you’re consistently skipping stitches as indicated. This will help maintain an even spacing throughout.
Tight Stitches
Be mindful not to make your stitches too tight, as this will make it difficult to work into the stitches in subsequent rounds.
Finishing
To finish your project, weave in the yarn ends using a tapestry needle, ensuring there are no loose ends sticking out. Consider blocking your bun cover to give it a nice shape and finish, which can help the mesh design stand out even more.
Care
Using cotton yarn allows for easy washing. For longer-lasting results, hand wash in cool water and lay flat to dry, as recommended on your yarn label.
By following these instructions, you will create a lovely blue crochet bun cover that’s both practical and stylish. Enjoy the process and the final product!




Thank you very much for this wonderful pattern. I appreciate your generosity